 Skip to content
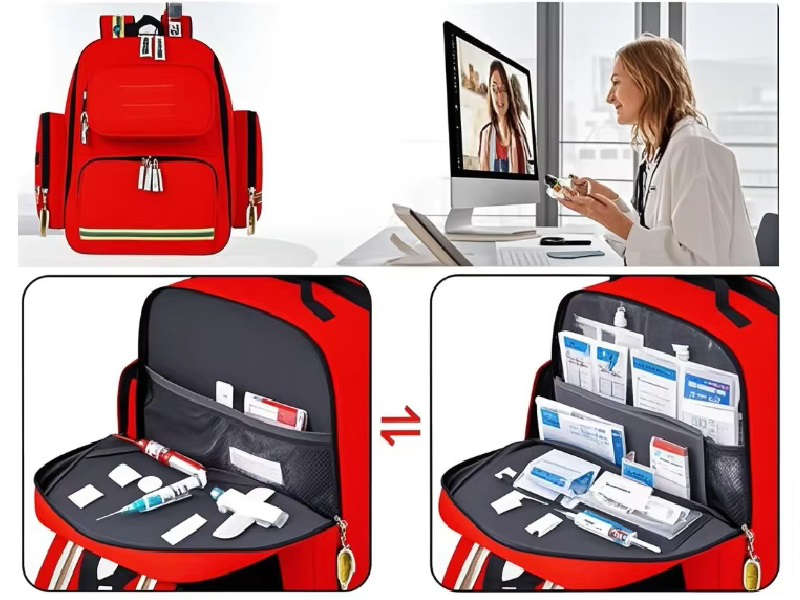
Nurse Tool Bag Professional Layout: What to Carry, Which Bags Nurses Use, and How OEM Factories Build It
A “nursing bag” sounds simple until you watch what happens on a real shift. You’re moving fast. You’re switching tasks constantly. You’re documenting, cleaning, answering calls, and dealing with unexpected patient needs. In that reality, the bag isn’t fashion—it’s a workflow tool. A bad layout turns into wasted steps (“Where did I put my shears?”), messy cross-contamination (“snacks next to used supplies”), and the kind of small daily friction that slowly drains energy.
That’s why “professional layout” is not about adding more pockets. It’s about pocket logic: which items must be reachable with one hand, which must be isolated, which must be zip-secured, and which should never touch the “clean zone.” And for sourcing private label, the layout must also be repeatable in bulk—because a sample can look perfect while production drifts if the factory doesn’t lock dimensions, stitch routes, reinforcement, and QC checkpoints.
A nurse tool bag is a nursing tote/organizer designed to carry shift essentials with a clean workflow layout: a quick-grab zone (pens, shears, tape), a clean storage zone (gloves, wipes, reference notes), and a personal-secure zone (wallet/phone/keys). Nurses commonly use totes, backpacks, crossbodies, or waist packs depending on their setting and how much they carry. The best bag uses wipeable materials, reduces dirt traps (excess Velcro/elastic), and keeps clean/dirty items separated—especially in home health.
Below is a deeper, -focused guide (for clinicians and brands sourcing OEM/private label) that turns “what do nurses put in their bags?” into a layout blueprint you can actually manufacture.
What is a nurse tool bag, and why does a “professional layout” matter on real shifts?
A nurse tool bag (often called a nurse bag, nursing tote, nurse organizer, or clinical tool bag) is a carry system for shift essentials and personal items. A professional layout matters because it reduces time-to-task, prevents lost tools, and supports clean/dirty separation. The goal is not “more pockets”—it’s fewer decisions during busy moments.
What is a nursing bag called? In real searches and everyday talk, you’ll see: nurse bag, nursing tote, nurse organizer bag, medical work bag, clinical bag, and in some settings home health nursing bag (often tied to bag technique and infection-control practices). The naming matters for B2B programs because the product name influences expectation: a “tote” implies quick access; a “backpack” implies capacity and hands-free; an “organizer” implies compartment logic and standardization.
Now the bigger question: why layout matters more than style.
1) Shift reality is decision fatigue
On a shift, your brain is already full. Every extra “Where did I put it?” adds friction. A layout should behave like muscle memory:
pens always live in one place
shears always live in one place
tape always has a dedicated slot
personal items are always zip-secured
That reduces micro-stress and prevents the common “I left it in another room” loop.
2) Layout is also risk control
A bag is a moving surface. If you mix items carelessly, it becomes a contamination problem—especially if the bag goes in and out of cars, homes, clinics, or shared break rooms. Home care settings have specific “bag management” concerns because the bag travels between environments and can act as a vector if not managed properly (often discussed as “nursing bag technique”).
3) A professional layout is zoning, not pocket-count
More pockets can make things worse if the pockets don’t match item geometry. A better approach is zoning:
- Quick-Grab Zone (work tools): items you use repeatedly (pens, shears, tape, penlight).
- Clean Storage Zone: gloves, spare masks, small wipe packs, reference notes (kept clean).
- Personal-Secure Zone: phone, wallet, keys, chargers—zippered and physically separated.
This zoning matches what nurse “must-have” lists keep repeating: stethoscope, scissors, penlight, notebook/report sheets, moisturizer, etc.
4) For brands, layout must survive bulk production
If you’re sourcing private label, the layout must be manufacturable with stable repeatability. The most common failure in bulk is not the bag body—it’s the details:
- pocket angles drift (harder to access)
- tape loops shrink/stretch (tape falls out)
- zipper ends are weak (early failure)
- pocket openings are too tight (tools don’t fit)
A factory-ready layout is one where every pocket has a dimension spec, a stitch route, reinforcement rules, and a QC method to confirm it. That’s the difference between a “nice sample” and a “reorderable product line.”
Who uses nurse tool bags, and when are they needed most (students, travel nurses, home health)?
Nursing students, hospital nurses, travel nurses, clinic staff, and home health/hospice teams all use nurse bags—but they need different layouts. Students want “training + organization.” Hospital nurses often want a bag for commute + locker organization, then shift tools move to pockets or a waist pack. Home health needs strong clean/dirty separation and easy wipe-down routines.
What bags are nurses using for work? The honest answer is: it depends on where they work, what their facility allows, and how much they carry.
1) Nursing students (clinical rotations)
Students often carry more “learning support”: notebooks, cheat sheets, skills checklists, stethoscope, pens, and small supplies. Many “nurse essentials” articles explicitly call out a nursing bag as a core item because students are building their personal toolkit.
Layout priority: organization + quick identification. Too many pockets is confusing; they need labeled logic.
2) Hospital/unit-based nurses (med-surg, ICU, ER)
Many hospital nurses use a bigger bag as a commute + staging bag: it carries lunch, extra socks, chargers, backup pens, and a few tools. But once they clock in, the daily “in-motion” tools often move to uniform pockets or a small pouch/waist pack for speed. A nurse fanny pack is commonly framed as a “portable toolkit” that keeps essentials within arm’s reach during active tasks.
Layout priority: a staging zone + a rapid-access mini-system (pouch/waist pack) for the floor.
3) Travel nurses
Travel nurses live in a hybrid world: they need an everyday work bag plus travel convenience. They value:
compact structure that still holds essentials
easy cleaning (bags go everywhere)
stable reorders (they replace gear often)
Layout priority: durability + predictable carry + quick cleaning.
4) Home health and hospice
This is the most sensitive use-case. The bag travels between homes, cars, and clinical tasks. “Nursing bag management” is a known infection-control discussion in home care, emphasizing cleaning and contamination risk management.
Layout priority: strict zoning. You need a clear “clean supply” approach and a cleaning routine that’s practical. AllHeart’s “nursing bag technique” content even includes wiping down the interior using disinfectant wipes and respecting contact time instructions.
5) The “when is it needed most” rule
A nurse tool bag becomes essential when:
- you rotate locations (student rotations, float pools, travel)
- you work outside the hospital (home/community)
- you carry specialized tools (wound care, community kits)
- you need a reliable personal system (ADHD-friendly organization, minimized friction)
For private label , this section is where SKU planning starts: you don’t build “one nurse bag.” You build a role-based lineup: student tote, commuter backpack, and an on-shift waist pouch option.
What do nurses actually carry: which tools should the bag layout protect and separate?
Most nurses carry a mix of patient-care tools (pens, scissors/shears, penlight, stethoscope), documentation items (notebook/report sheets), comfort + skin care (lotion), and personal essentials (phone/keys). Lists of common must-haves repeatedly include stethoscope, scissors, penlight, notebook, and moisturizer.
This section answers the four questions keep typing into Google:
- What items should every nursing bag have?
- What do nurses put in their bags?
- What bags are nurses using for work? (covered in H2-2/4)
- What is a nursing bag called? (covered in H2-1)
Now, the practical packing logic.
A) The “Shift Essentials” baseline (what every nursing bag should have)
Across multiple nurse supply lists, the repeat items are consistent: stethoscope, medical-grade scissors/shears, penlight, notebook/clipboard, watch/timing method, moisturizer, plus pens and small supporting items.
Add to that the reality items nurses mention constantly: spare pens, a small snack, water bottle, spare badge reel, and basic self-care.
Baseline essentials (layout must accommodate):
- 2–3 pens + marker (if used)
- Trauma shears / medical scissors
- Penlight
- Stethoscope (some keep it on person; some store it)
- Small notebook / report sheet method
- Hand moisturizer / lip balm
- Badge items (badge reel, access card)
- Small wipe pack / sanitizer (facility rules vary)
- Water bottle + fast snack
B) The real packing logic: fast-access vs backup vs personal
A nurse bag is not a single category. It’s three categories living together:
Fast-access work tools
These should be reachable without digging. They need either vertical slots or a top quick pocket.
Backup/support items
These can be deeper but should still be grouped: backup pens, spare mask, extra hair ties, reference cards.
Personal items
These must be physically separated, zip-secured, and ideally in an interior pocket so they don’t get exposed to messy surfaces.
C) Clean/dirty separation (don’t pretend it’s optional)
Even if the bag never enters patient rooms, it still touches: break-room tables, car seats, floors, and public surfaces. For home health, the bag technique conversation becomes even more serious.
So the layout should support an obvious rule:
- Clean Zone: sealed supplies, clean gloves, notebook, spare PPE
- Dirty/Used Zone: anything potentially contaminated (used items should ideally not go back into the main bag at all—use disposable/sealable pouches)
- Food Zone: keep snacks in a closed pouch away from work tools
D) A simple “tool-to-pocket” map (factory-friendly)
Below is a spec-friendly mapping you can hand to a product team:
| Item | Best Pocket Type | Why it works |
|---|---|---|
| Shears/scissors | Reinforced vertical slot | Prevents puncture + quick draw |
| Tape roll | Fixed loop or dedicated tube slot | Stops rolling/loss |
| Pens | 2–3 pen channels | Reduces “pen hunting” |
| Penlight | Slim sleeve pocket | No rattling |
| Notebook/report sheets | Flat back sleeve | Prevents folding |
| Phone/wallet | Zipper pocket, separated | Security + hygiene |
| Wipes/sanitizer | Sealed pocket | Leak prevention |
This is where “professional layout” becomes a buildable product: pocket types match item geometry. That’s how you reduce returns and improve reviews because the bag “just works.”
Types of nurse tool bags: which layout is right for your market and channel?
Nurses commonly use totes, backpacks, crossbodies, and waist packs. Totes win for quick access, backpacks win for commute comfort, crossbodies balance access + carry, and waist packs win for on-shift speed. The right choice depends on role, setting, and how much must be carried during active care.
If you’re building a product line (or choosing a bag for your own work), don’t start with aesthetics. Start with channel and behavior: where the bag lives during the shift.
1) Tote (nursing tote / nurse organizer tote)
Best for: students, clinic staff, commute-to-locker use, nurses who like “open + see everything.”
Layout strengths:
wide opening improves visual scanning
easy to create a 3-zone layout
simpler pocket logic, easier onboarding for new users
Common failure: too open → no secure personal zone; too many small pockets → users forget where things are.
2) Backpack (nursing backpack / work backpack)
Best for: travel nurses, long commutes, anyone carrying heavier loads (laptop, lunch, extra uniform).
Layout strengths:
weight distribution
larger capacity
easy to create a clean top section + work section
Common failure: deep compartments create “black hole.” To fix: add a front quick-grab admin panel with tool slots.
3) Crossbody / sling
Best for: mixed-use users who want access without setting the bag down often.
Layout strengths:
easier access than a backpack
more secure than an open tote
Common failure: strap discomfort under load; also swings into surfaces if not designed with stability.
4) Waist pack / nurse fanny pack
Best for: on-shift use where speed matters (rounds, med pass, tasks requiring frequent tool access). The nurse fanny pack is often described as a “portable toolkit” that keeps supplies in reach.
Layout strengths:
fastest access
encourages minimal carry (less clutter)
Common failure: overstuffing, belt stability issues, and hygiene issues if users don’t clean it.
5) Channel mapping (how products really sell)
For B2B programs, “best bag” depends on where it’s sold:
- Nursing schools: student tote kits sell well (organization + training).
- Uniform shops/retail: tote + backpack dominate (giftable, visible).
- Hospital programs: often need standardized bags with cleanable materials and clear labeling.
- Online: waist packs and compact organizers trend because they solve a specific pain point.
6) A practical decision grid (use-case first)
| Setting | Best Form Factor | Why |
|---|---|---|
| Nursing student clinicals | Tote / organizer tote | Easy to learn + see items |
| Hospital commute + locker | Backpack | Carry comfort + capacity |
| On-shift active tasks | Waist pack / pouch | Fast tool access |
| Home health | Structured tote/backpack with zoning | Clean/dirty separation + wipe-down routine |
If you’re developing private label, this is where your SKU plan should start: pick one hero form factor per channel, then refine the pocket blueprint with real packing lists (H2-3).
Nurse tool bag vs nurse fanny pack vs medical supply organizer: what’s the difference?
A nurse tool bag is a base “carry system” (commute + storage + staging). A nurse fanny pack/waist pack is a “tools-on-body” system for fast access during active tasks. A medical supply organizer is a structured insert/pouch system for standardization (often used for home health kits, training kits, or role-based modules). Many nurses use two layers: a larger bag + a waist pack for shift speed.
The confusion happens because people use “nursing bag” as an umbrella term, but these three products solve different problems. If you design (or source) them as the same thing, you’ll get poor reviews and high returns—even if the materials are good.
1) Nurse tool bag = staging + storage + commute
Think of this as your “base station.” It carries: spare supplies, paperwork, lunch, chargers, spare pens, a backup set of essentials, and personal items. It’s what you carry from car → locker → break room. Some guides call out a nursing bag with multiple compartments because it prevents the chaos of tangled tools and makes emergencies less stressful.
Layout need:
- large main compartment that opens wide enough to see contents
- a flat sleeve for documents or a clipboard
- a personal-secure zip pocket
- a clean storage area for “new/spare items”
- optional laptop sleeve for students/travel nurses
2) Nurse fanny pack = speed + one-hand access
A waist pack is not meant to hold your life. It’s meant to hold “the 6–12 things you reach for constantly” while keeping both hands free. Many nurse fanny packs are described as having multiple pockets for organization, plus details like a hidden phone pocket, detachable tape strap, or an adjustable strap to prevent sliding during movement.
Layout need:
- quick-draw front pockets for pens, shears, alcohol pads
- a stable strap system (no rolling or bouncing)
- a safe spot for phone and keys
- “no snag” closures (zippers that don’t scratch, minimal loose elastic)
Where waist packs win: med pass, rounds, float units, tasks requiring constant movement.
3) Medical supply organizer = standardization + modular kits
This is the overlooked category that becomes essential in B2B programs: an organizer that makes kits repeatable. Home health and hospice workflows often need a consistent “clean kit vs used kit” logic, plus a process for wiping/cleaning and controlling contamination risk.
Layout need:
- labeled modules (pouch A, pouch B, etc.)
- clear or mesh windows for fast verification
- sealed compartments for clean items
- a defined “dirty return” method (sealable bag/pouch separate from clean storage)
4) The most realistic solution: two-layer carry
In practice, many clinicians do this:
- base bag = everything you might need + personal items
- waist pack = what you’ll touch 50 times in a shift
When you design for this reality, your product stops trying to be “everything.” Instead, it becomes better at what it’s meant to do.
5) takeaway (for private label programs)
If you’re sourcing OEM for a brand line, don’t launch “one universal nurse bag.” Launch a system:
- One tote or backpack (commute/staging)
- One waist pack (on-shift speed)
- Optional modular organizer insert (kit standardization)
If you want Jundong to build a private label set like this (matching materials, matching logo language, and consistent QC), email info@jundongfactory.com with your target channels (student kits, uniform retail, hospital program) and expected order quantity range.
What materials are best for nurse tool bags (wipeable, waterproof, infection-control design)?
The best materials are easy to wipe, low-odor, and resistant to frequent cleaning. Look for surfaces that don’t trap dirt (smooth coatings, tight weaves, wipe-clean liners), and reduce “dirt traps” like explainable elastic webs and heavy Velcro. For home health, material decisions should support routine disinfection and clean/dirty separation practices.
For nurses, material choice is not a fashion preference. It’s about:
- how often the bag gets wiped/cleaned,
- what it touches (floors, cars, break rooms, patient environments), and
- whether the material ages gracefully under disinfectants.
1) “Wipeable” is a performance requirement, not a buzzword
In home care discussions, there’s emphasis on cleaning routines and keeping the bag’s surfaces disinfected according to contact time instructions (and acknowledging that frequency can be set by organizational policy).
If your bag material turns sticky, peels, or cracks after repeated wiping, it’s not fit for the job.
Good wipeable behavior looks like:
- smooth enough to wipe quickly
- no coating that flakes under disinfectant exposure
- liner that doesn’t “hold smell” easily
- seams that don’t create deep crevices
2) Water resistance is helpful, but leak control matters more
“Nurse bag disasters” often come from tiny leaks: a spilled coffee, a lotion cap that pops, a sanitizer bottle that drips. The bag doesn’t need to be fully waterproof to be practical, but it needs:
- a liner that can be wiped
- pocketing that isolates liquids from paper
- a base that resists soaking and warping
3) Avoid dirt traps: Velcro + loose elastic + deep mesh
Velcro and elastic can be useful, but they also collect lint, hair, and debris. In infection-control-focused discussions, the idea is to reduce surfaces that become hard to clean and to keep a practical cleaning routine.
For “professional layout,” choose:
- zippers that wipe clean
- pocket edges that don’t fray
- fewer exposed elastic webs in high-touch areas
4) Reinforcement zones matter more than the main fabric
Even premium fabric fails if the stress zones are weak. For nurse bags, stress zones are:
handle roots
strap anchors
zipper ends
base corners
These areas need reinforcement layers and stitch routes that don’t drift in bulk.
5) Material choices should match what nurses carry
This is where “What items should every nursing bag have?” becomes engineering:
- If shears go in a pocket, reinforce it (anti-puncture layer or binding).
- If you expect sanitizer/wipes, add a sealed pocket or wipeable sleeve.
- If you expect snacks, isolate a food pouch away from work tools.
6) Practical material matrix (spec-friendly)
| Use Case | Best Material Direction | Why |
|---|---|---|
| Student tote kits | durable outer + wipeable liner | frequent use, easy cleaning |
| Hospital commute bag | abrasion-resistant outer + structured panels | lockers, floors, heavy carry |
| Home health | wipe-clean outer + simple seam geometry | supports routine disinfection |
| Waist pack | thick, stable fabric + smooth wipeable surfaces | high-touch, constant movement |
If you’re building a private label program, your factory should test the material system against your intended cleaning routine. If you want us to recommend a safe material system for your target market and price point, email info@jundongfactory.com with your channel and your expected cleaning/disinfection expectations.
How to design a “professional layout”: pocket zoning, sizes, and a workflow-first blueprint
A professional nurse bag layout uses zoning: Quick-Grab tools, Clean Storage, and Personal-Secure—then matches pocket dimensions to real tools. The goal is a bag you can pack consistently without thinking. If you can’t describe where each core item goes in one sentence, the layout is too complex.
This is the section most brands get wrong because they design from photos instead of from workflow. Here’s the workflow-first blueprint that turns “what do nurses put in their bags?” into a buildable product.
1) The 3-zone layout (simple, scalable, manufacturable)
Zone A — Quick-Grab (high frequency tools)
- pens (2–3 channels)
- shears slot (reinforced)
- tape loop or tape pocket
- penlight sleeve
- small pocket for alcohol pads (if used)
Zone B — Clean Storage (low frequency, but must stay clean)
- spare gloves or clean items
- reference cards
- spare mask (policy dependent)
- small wipe pack (sealed compartment)
Zone C — Personal-Secure
phone, wallet, keys
charger
personal meds
Zippered. Separate. Preferably inside the bag, not an exposed outer pocket.
This zoning supports the “bag technique” idea used in home health: keep clean supplies protected and reduce contamination pathways.
2) Translate “what nurses carry” into pocket dimensions (the tool-by-tool method)
Instead of saying “one pocket here,” do this:
- list the top 10 items for your user persona
- measure typical dimensions
- build pocket patterns that fit the item with tolerance (don’t design too tight)
- define the pocket opening angle so hands can enter quickly
3) Pocket rules that prevent real-world frustration
- Pen pockets should be vertical, not angled downward (pens fall out).
- Shears pockets need reinforcement and must not puncture the liner.
- Tape holders must be stable and not stretch out quickly.
- Document sleeves must be flat and protected from spills.
- Personal items should not share space with high-touch tools.
4) “Less but smarter” beats “more but confusing”
High-pocket-count bags look impressive in photos, but users forget where things go. Then they dump everything into the main space and the bag becomes a black hole again. The best nurse layouts typically have:
- 6–12 truly functional pockets
- plus 2–3 “catch-all” spaces that still respect zoning
5) A factory-friendly layout drawing checklist (what brands should request)
When you brief an OEM manufacturer, include:
pocket list (name each pocket)
pocket size and purpose
material and reinforcement notes for each stress pocket
closure type (zip, snap, open)
clean/dirty separation logic
This makes sampling faster and prevents “looks right, works wrong.”
How to reduce contamination and loss: what layout features prevent “dirty bag problems”?
Prevent contamination and loss by designing for easy inspection + cleanable surfaces + separation. Use a wide opening so nothing hides, keep personal items in a sealed zone, and plan a “dirty return” method (sealable pouch) rather than putting used items back into the main bag. Home care guidance emphasizes disinfecting bag surfaces and following contact time instructions.
“Dirty bag problems” are rarely about one dramatic incident. They’re about daily habits: placing the bag on the floor, mixing food with work tools, tossing used items back into the main compartment, and never cleaning the liner because it’s hard to access.
In home care, bag technique discussions explicitly focus on preventing transfer of microorganisms and on cleaning/disinfection approaches (including keeping surfaces wet for the recommended contact time).
Even if your isn’t in home health, these principles still produce a better product.
1) The best “anti-gross” feature is visibility
A bag that opens wide and lets you see everything reduces forgotten items and hidden debris. If users can’t see the bottom corners, dirt accumulates. So your design should include:
- wide mouth opening
- lighter liner (helps visibility)
- fewer deep, unreachable pocket tunnels
2) Build in “clean habits” using layout cues
Don’t rely on user discipline alone—design prompts behavior:
- Food pouch: give snacks a dedicated sealed pocket so users don’t mix with tools.
- Personal-secure zone: stop phones from ending up in tool pockets.
- Clean supplies zone: keep unused supplies away from high-touch items.
3) Plan the “dirty return” method (this is huge)
If something becomes contaminated or used, the bag should have a planned path:
a sealable pouch (replaceable)
or a dedicated “dirty pocket” that is wipe-clean and clearly separated
Trying to keep everything in one big compartment is how contamination risk and odor show up.
4) Reduce dirt traps (design choices that age well)
- avoid overusing Velcro in high-touch areas
- limit loose elastic loops that trap lint
- pick zipper pulls that don’t drag across surfaces
- keep seams simple where possible (easier wipe-down)
5) Cleaning frequency becomes more realistic when the bag is cleanable
Some nursing bag technique guides discuss regular cleaning schedules and remind that policies vary by organization, with more frequent disinfection as an ideal.
A bag with complicated interior architecture discourages cleaning—so it becomes dirtier over time. That’s a design failure, not a user failure.
6) A simple “contamination control” checklist brands can publish
If you’re a brand selling to clinicians, including a short care card can reduce returns and improve satisfaction:
- wipe interior + exterior
- keep clean supplies in clean zone
- use a sealable pouch for used items
- don’t place bag on floors when possible
- let surfaces stay wet for contact time when disinfecting (product-label dependent)
Price & Cost Breakdown: How Much Does a Nurse Tool Bag Cost, and What Drives the Price?
A nurse tool bag can cost anywhere from $3–$25+ per unit in bulk, mainly depending on material system (fabric + lining + padding), layout complexity (pockets, dividers, zippers), hardware quality, logo method, and packaging requirements. The “best price” is not the lowest number—it’s the price that still protects layout stability, wipe-clean performance, and repeat-order consistency.
If you’re buying for a brand, a hospital program, or a distributor, cost control starts with one mindset shift: a nurse tool bag is a system cost, not a fabric cost. Two bags can look similar in photos, yet behave very differently after 60 days of daily shifts—because the hidden costs live in the parts you don’t see: zipper tape quality, seam allowance control, reinforcement at handle roots, and how the internal dividers are built.
Here’s a useful way to think about pricing: break the bag into “non-negotiables” (function + hygiene + durability) and “tradeable items” (decor, upgrades, packaging). Nurses don’t judge a bag by the marketing copy. They judge it by whether it keeps shape, opens fast, and doesn’t turn into a messy bucket.
Cost drivers you can actually manage (instead of guessing)
1) Material system (outer + lining + padding + binding)
- Outer fabric: polyester, nylon, oxford, TPU-laminated fabrics, PU-coated fabrics. Prices change sharply with denier, coating, and color matching.
- Lining: wipe-clean linings (PU, TPU, PVC-backed options) cost more than basic polyester, but reduce returns in “coffee spill / sanitizer leak” reality.
- Padding/structure: foam + PP board + EVA panels improve shape and protection, but raise both material and labor time.
2) Layout complexity (the biggest “quiet cost”)
Every pocket has a cost signature: extra panels, extra sewing lines, extra edge binding, extra inspection points. A “professional layout” usually includes:
Quick-grab slots for pens/markers
Elastic loops for scissors/penlight
Bottle/thermos zone with spill barrier
Zippered secure pocket (keys, badge reels)
If you add 10 pockets, you add 10 places that can be sewn wrong unless the factory has a stable process.
3) Hardware & consumables
Zippers: coil vs reverse coil vs waterproof zip
Pullers: standard vs custom puller
Buckles/rings: thickness and plating consistency
Hardware is also where complaints happen fastest, so don’t “save pennies” here unless the use case is light-duty.
4) Logo method (branding cost is not only the logo)
A logo is not just a decoration. It affects sampling time, approval cycles, and defect risk. Common methods:
- Silkscreen / heat transfer: low cost, fast, but needs abrasion testing for daily use
- Woven label: stable, clean look, low defect risk
- Embroidery / rubber patch / metal plate: higher cost, heavier hand-feel, more QC points
5) Packaging + labeling + compliance
If you sell in retail or ship to multiple warehouses, packaging becomes a real number:
individual polybag, warning labels, barcode/UPC placement, carton marks, inserts
“Simple packaging” can be cheap. “Retail-ready packaging” can add noticeable cost.
A cost breakdown table you can use to quote faster
Below is a typical structure. Percentages shift by design, but it helps teams align internally.
| Cost Bucket | Typical Share | What Moves It Up | What Moves It Down |
|---|---|---|---|
| Materials (outer + lining + padding) | 35–55% | TPU/PU coatings, EVA panels, thick foam | simpler fabric, fewer structural layers |
| Labor (cutting + sewing + binding) | 25–45% | many pockets, binding, complex dividers | fewer parts, simplified pocket build |
| Hardware (zippers, sliders, buckles) | 8–15% | branded pullers, waterproof zips | standard coil zips, standard pullers |
| Branding (logo + trims) | 2–12% | embroidery, rubber patch, metal plate | woven label, simple print |
| Packaging & labeling | 2–10% | retail box, inserts, barcode sets | simple polybag + basic carton marks |
| QC + rework allowance | 1–5% | tight AQL, complex build | stable spec + experienced line |
The “best price” question (what experienced really mean)
Most aren’t asking “how cheap can you make it?” They’re asking:
- Can this price still hold shape stability after daily carry?
- Will the inside layout stay neat, or collapse and waste time?
- Will repeat orders match the approved sample?
If you want a quote that’s accurate (not a bait-and-switch), send a simple RFQ pack: target size, pocket map, fabric preference, logo method, order qty, and target market. Our team supports structured development and repeatable QC, with a stable production system and dedicated inspection staff. Jundong Factory Introduction
Factory Manufacturing Process & QC: How Are Nurse Tool Bags Made at Scale?
Nurse tool bags are made through a controlled chain: design clarification → pattern → material sourcing → cutting → sewing/assembly → logo/trim → finishing → inspection → packing. Quality depends on locking a spec sheet + pocket map, controlling seam allowances, and running incoming, in-process, and final inspections so bulk production matches the approved sample. Jundong Factory Introduction
A “professional layout” bag is harder to mass-produce than a simple tote. Why? Because layout is a geometry problem. If one divider shifts 5–8 mm, a thermometer case may not fit, a pen loop becomes useless, or the zipper line gets wavy. In bulk, your enemy is not “bad intention”—it’s small drift: different sewing tension, slightly different binding width, or different operator habits.
That’s why the best factories treat nurse tool bags like structured soft goods with controlled outputs. A practical factory route looks like this:
Step 1: Design input → feasibility check
A good start is a pocket map that answers:
What are the “must-carry” items?
Which pocket needs one-hand access?
Which zone must be wipe-clean because it touches sanitizer/creams?
If you don’t define this, the sample may look good but fail in daily shifts.
Step 2: Pattern + construction map (the real backbone)
This includes:
panel list and material list
seam allowance rules
stitch route map (what gets sewn first, what gets bound last)
reinforcement map: handle roots, strap anchors, zipper ends
Without this, layout consistency is luck.
Step 3: Material sourcing + pre-check
In nursing use, your material choices must fit the real environment: friction, spills, quick cleaning, frequent open/close cycles. Material pre-check should include:
- color/hand-feel matching to sample
- coating consistency (if wipe-clean is required)
- zipper smoothness, slider fit, pull strength expectations
Step 4: Cutting (accuracy is the first quality gate)
If cut sizes drift, sewing can’t “fix” it. For multi-pocket bags, cutting accuracy is what keeps the pocket grid aligned.
Step 5: Sewing & assembly (where most defects are born)
Common production risks for nurse tool bags:
- pocket mouth curling (wrong reinforcement or wrong stitch tension)
- divider collapse (insufficient stiffness or wrong seam structure)
- zipper waviness (tape not controlled, seam allowance drift)
- handle-root failure (no box-X or bartack, or wrong webbing spec)
Step 6: In-process QC (catch errors early, not at the end)
This is where serious factories win. Instead of waiting for final inspection, they check:
- pocket alignment vs template
- zipper track smoothness
- reinforcement presence (bartack count, box-X placement)
- visible stitch defects and thread tension issues
Step 7: Final inspection + packing audit
Final inspection should verify: dimensions, function, appearance, logo placement, and packing correctness. This aligns with a multi-stage QC approach that covers incoming materials, in-process control, and final inspection, supported by dedicated QC staff and equipment. Jundong Factory Introduction Jundong Factory Introduction
A QC checkpoint table can request
| QC Stage | What to Check | Why It Matters for Nurse Use |
|---|---|---|
| Incoming Material Inspection | fabric defects, coating feel, zipper smoothness, webbing thickness | prevents “bulk feels different than sample” |
| In-Process QC | pocket map alignment, divider stiffness, reinforcement presence | protects the professional layout function |
| Final Inspection | dimension, zipper run, handle strength check, logo position, packing | reduces returns and warehouse complaints |
If you’re building a nurse bag line for retail or uniforms, ask your supplier to show:
- the construction map, not only photos
- close-ups of reinforcement and zipper ends from production
- how they control pocket alignment in bulk
If you want us to evaluate your design for manufacturability and layout stability, share a sketch or reference photo and your target price range at info@jundongfactory.com.
Custom / Private Label / OEM-ODM: Sampling Steps and Lead Time (How Long Does It Take?)
For custom nurse tool bags, sampling usually follows: requirements → artwork/logo confirmation → pattern → first sample → revisions → PP sample → bulk production. Lead time depends on material availability, logo method, and complexity. A factory with a dedicated sampling system can support rapid sampling and multi-round revisions, then lock a PP sample for consistent mass production. Jundong Factory Introduction
Sampling is not “make one pretty bag.” Sampling is risk removal. Your goal is to prevent 3 problems that kill programs:
- approved sample looks good, bulk comes different
- internal layout works for one person, fails for real users
- small errors multiply across 1,000–10,000 units
Here’s how experienced structure a nurse tool bag project:
Phase A — RFQ inputs that reduce back-and-forth
Send a simple package (even one page is fine):
target dimensions (or competitor reference size)
pocket map (what goes where)
material preference: wipe-clean or soft hand-feel priority
logo method and placement
target order qty and target market (retail vs uniform program)
This helps the factory propose the right structure rather than guessing.
Phase B — 1st sample (focus on structure, not decoration)
In the first sample, the smartest approach is:
- approve layout logic first
- test the bag with real items: pens, scissors, stethoscope, penlight, tape, notebook, water bottle
- check access speed: can you grab essentials one-handed?
- check “collapse risk”: does the bag stand, or fold into itself?
If the internal structure is right, cosmetics are easy later. If the internal structure is wrong, no logo can save it.
Phase C — Revision sample (fix the real pain points)
Typical revision topics for nurse tool bags:
- pocket widths adjusted for actual tools
- divider stiffness tuned (too soft collapses, too hard feels bulky)
- zipper path improved for faster opening
- handle length corrected for shoulder carry vs hand carry
- base reinforcement increased for daily floor contact
Phase D — PP sample (the contract sample)
The PP sample is the “this is what bulk must match” checkpoint. It should lock:
exact materials (outer/lining/padding/hardware)
logo artwork + placement
stitch specs at reinforcement points
final dimensions and tolerances
If a supplier skips PP sample discipline, you carry more risk.
Phase E — Bulk production + repeat order consistency
A factory built for B2B programs usually has:
- in-house pattern and sampling capability for revisions Jundong Factory Introduction
- structured sampling support: rapid sampling + multi-round adjustments + PP sample control Jundong Factory Introduction
- multi-stage QC so repeat orders remain stable Jundong Factory Introduction
Typical lead time ranges (realistic planning)
Exact timing depends on complexity and material readiness, but these ranges help planning:
First sample: often 7–15 days after full inputs are confirmed
Revisions: 5–12 days per round
Bulk production: often 25–45 days after PP approval (varies by order size and season)
If you have a deadline (launch, trade show, uniform rollout), plan backwards from PP approval and reserve time for at least one revision.
If you want a fast, controlled start, email info@jundongfactory.com with your reference photo, target size, target order quantity, and logo file. We can recommend a layout architecture and a material system that fits nursing reality, then move into sampling with clear checkpoints.
FAQs
FAQ 1 — What items should every nursing bag have (the real “shift-ready” list)?
Summary: A truly shift-ready nursing bag covers quick-grab tools, clean backup supplies, and a zip-secure personal zone—not just “more pockets.”
Most nurses end up carrying the same “core set,” even if their unit is different. The difference is how you zone them so your bag stays clean and fast to use. A strong baseline includes: 2–3 pens, trauma shears, penlight, small notebook/report sheets, hand lotion, badge essentials, and a sealed pouch for personal items (phone/wallet/keys). Then add a “backup lane”: spare pens, spare mask (policy dependent), small wipes, and a charger.
The biggest mistake is mixing food + work tools or mixing “clean supplies” with “high-touch items.” If you’re sourcing a private label nurse bag, your pocket map should match these items by size and access speed. For example, shear pockets need reinforcement, pen pockets should be vertical to prevent fall-out, and your personal items must be behind a zipper so they don’t get exposed when the main compartment opens.
If you want a custom layout, tell us your role (student, med-surg, ICU, home health) and what you carry daily—we can propose a pocket blueprint that works in real shifts. You can reach Heyzizi at info@heyzizi.com.
FAQ 2 — What bags are nurses using for work: tote, backpack, or fanny pack?
Summary: Nurses often use a two-layer system—a larger tote/backpack for commute + staging, and a fanny pack/mini pouch for on-shift speed.
A lot of shoppers ask “What’s best?” but the real question is: Where will the bag live during your shift? If your big bag stays in a locker, you’ll prioritize comfort and capacity (backpack) or fast visibility (tote). If you keep gear on you, a waist pack wins because it keeps essentials in reach.
Here’s a quick decision table brands can use when planning SKUs:
| Setting | Common Choice | Why It Works | Risk to Fix in Design |
|---|---|---|---|
| Nursing students | Organizer tote | Easy access + learning tools | Too many pockets = confusion |
| Hospital commute | Backpack | Comfortable under load | “Black hole” deep compartments |
| Active rounds | Fanny pack | Fast one-hand access | Overstuffing + strap sliding |
| Home health | Structured tote/backpack | Zoning + wipe-down | Clean/dirty separation needed |
For private label programs, this is why “one universal nurse bag” often underperforms. A smarter lineup is: one hero tote or backpack + one waist pouch in matching materials and branding, so can build habits quickly and reorders stay consistent.
FAQ 3 — What do nurses put in their bags (and what should be separated)?
Summary: Nurses carry a mix of high-touch tools, clean supplies, and personal items, and the bag should physically separate them to reduce mess and cross-contact.
In real life, nurse bags become a moving surface: break rooms, car seats, counters, and sometimes floors. That means the bag layout should guide good habits automatically. We recommend three zones:
- Quick-grab tool zone: pens, shears, penlight, tape, marker.
- Clean reserve zone: spare gloves, reference cards, spare mask, small wipe pack (sealed).
- Personal-secure zone: phone, wallet, keys, charger, snacks (ideally separate).
The separation matters because spills happen (sanitizer, lotion, coffee). If your notebook shares space with liquids, it gets ruined. If snacks touch high-touch tools, it feels gross. If keys float loose, they scratch your phone.
For brands, this separation is also a returns reducer. Customers may not say “your zoning is wrong,” but they’ll feel it: “This bag is messy,” “Hard to find things,” “Not practical.” A good factory will convert the zone concept into a spec: pocket dimensions, opening angles, reinforcement points, and QC checks to ensure bulk matches the approved sample.
FAQ 4 — What is a nursing bag called? Which keywords should brands use for SEO?
Summary: Common high-intent terms include nurse bag, nursing tote, nurse organizer bag, medical work bag, and nurse fanny pack, and brands should match keywords to bag type.
For SEO and conversion, you don’t want one keyword—you want a cluster that matches what shoppers actually mean. “Nurse bag” is broad. “Nurse fanny pack” signals on-shift speed. “Nursing tote” signals open access and daily carry. “Medical work bag” is often used by clinic staff and students.
A practical keyword approach:
- Tote product page: Nursing Tote Bag, Nurse Organizer Tote, Clinical Tote
- Backpack product page: Nursing Backpack, Medical Work Backpack, Travel Nurse Backpack
- Waist pouch page: Nurse Fanny Pack, Nurse Utility Belt Bag, Clinical Waist Pouch
The content should reflect the use case: what fits, how it’s organized, how it cleans, and why it holds up. That’s what Google and AI systems tend to reward—specific answers to real questions, not vague marketing lines. If you want, we can help you build an SEO-ready nurse bag page structure with modules, FAQs, and -focused pocket blueprint.
FAQ 5 — What materials are best for nurse tool bags (wipeable, durable, low smell)?
Summary: The best nurse bag materials are wipe-friendly, abrasion-resistant, and built with a cleanable lining that won’t peel or trap odor after repeated use.
Nurse bags live a hard life: constant handling, spills, and quick cleaning. That’s why “nice fabric” isn’t enough. You need a material system: outer + lining + structure + trims. For daily clinical use, a reliable direction is an abrasion-resistant outer (nylon/oxford-type constructions) plus a wipe-clean liner in high-risk zones.
What to watch out for:
- Coatings that crack or peel after cleaning
- Deep mesh/Velcro that traps lint and is hard to clean
- Weak seam binding that frays where tools rub
If you’re sourcing private label, ask the factory to confirm: zipper durability, seam allowance control, and reinforcement at handle roots and pocket mouths. Nurses judge durability fast. If the zipper jams or the shear pocket tears, the bag is “done,” no matter how good it looks.
We can recommend material options based on your target price and channel (students vs retail vs hospital program). For custom builds, email info@heyzizi.com with your use case and budget range.
FAQ 6 — How much does a nurse tool bag cost in bulk? (Price & cost breakdown)
Summary: Bulk price mainly depends on layout complexity, material system, hardware quality, logo method, and packaging, so the cheapest quote often becomes expensive through returns and inconsistency.
A bag with 6 functional pockets can cost less than a bag with 18 pockets—but more pockets don’t always sell better. Each pocket adds labor, inspection points, and failure risk. The best way to control cost is to define “must-have structure” first (shear slot reinforcement, secure personal pocket, stable opening) and treat optional features as upgrades.
Here’s -friendly cost map:
| Cost Driver | Moves Price Up | How to Control It |
|---|---|---|
| Layout | many pockets, dividers, binding | fewer but smarter pockets |
| Materials | coated/wipe liners, EVA panels | use wipe liner only where needed |
| Hardware | premium zippers, custom pullers | standardize zipper spec |
| Logo | embroidery, metal plate, rubber patch | woven label or clean print |
| Packaging | retail box, inserts, barcode sets | simple polybag + carton marks |
If your goal is retail, don’t price the bag like a commodity. The cost of one bad batch can wipe out margin. A factory program should include sample control (PP sample lock), QC gates, and packing rules so bulk matches the approved sample.
FAQ 7 — How do you design a “professional layout” that nurses actually keep using?
Summary: A layout that nurses keep using is built around speed, visibility, and habits—with clear zones and pocket sizes that match real tools.
A common mistake is designing for photos: dozens of pockets, lots of elastic, and complicated divider systems. It looks impressive, but real users forget where things go, then dump everything into the main compartment. The result: a messy bucket.
A practical layout rule: if the user can’t describe where items go in one breath, it’s too complex. We recommend:
- Quick-grab panel: 2–3 pens + shears + penlight + tape loop
- Flat sleeve: notebook/report sheets
- Secure pocket: phone/wallet/keys
- Clean reserve pocket: spare items and wipes in a sealed sleeve
For brands, the layout must also be manufacturable: pockets need defined dimensions and opening angles; shear pockets need reinforcement; and the factory must control stitch routes and seam allowances. That’s how you avoid the classic problem: “Sample feels perfect, bulk feels sloppy.”
FAQ 8 — How are nurse tool bags manufactured at a factory, and what QC should ask for?
Summary: A reliable factory follows a controlled chain—pattern → cutting → sewing/assembly → finishing → inspection → packing—and uses incoming, in-process, and final QC to prevent layout drift in bulk.
For nurse bags, the hardest part is not sewing one bag. It’s sewing 1,000 bags that all feel like the same bag. Layout products drift when operators change stitch tension, pocket angles, or binding width. So should ask for QC gates that check the features that matter:
- pocket alignment vs template
- zipper run smoothness
- reinforcement at handle roots and high-stress zones
- pocket mouth strength (no curling)
- final dimensions and functional checks (tools fit correctly)
If you’re a procurement team, don’t only request “photos.” Request a pocket map + construction spec. It makes sampling faster and reduces miscommunication. We support OEM/ODM programs with sampling and QC checkpoints designed for repeatability.
FAQ 9 — What logo methods work best on nurse bags (and which ones reduce defects)?
Summary: For nurse bags, woven labels and clean print methods often deliver the best mix of cost, durability, and low defect risk, while heavy patches and metal plates add cost and QC points.
Branding should match the bag’s job: daily carry, frequent handling, and constant cleaning. If a logo method cracks, peels, or snags, it hurts the product review even if the bag itself is solid.
Here’s a quick comparison brands like:
| Logo Method | Pros | Watchouts | Best For |
|---|---|---|---|
| Woven label | clean, durable, low risk | placement must be consistent | uniforms, schools |
| Screen/transfer print | affordable, flexible | needs abrasion testing | retail, promo |
| Embroidery | premium feel | adds thickness, can distort fabric | premium lines |
| Rubber patch | modern look | more steps, higher rework risk | lifestyle |
| Metal plate | high-end look | weight, snag risk, cost | premium gifting |
In OEM, the easiest way to reduce defects is to standardize logo placement and lock the artwork early—then verify with a PP sample before bulk.
FAQ 10 — How long does custom sampling take, and what’s the fastest way to start?
Summary: Custom nurse bag development typically runs requirements → first sample → revision → PP sample → bulk, and speed depends on how clear your pocket map, materials, and logo files are from day one.
Most delays are not factory delays—they’re “missing inputs” delays. If you want a fast launch, send: target dimensions, pocket map (what goes where), material preference (wipe-clean or soft feel), logo method, order quantity, and target market.
A realistic planning view:
| Stage | Typical Goal | What You Approve |
|---|---|---|
| First sample | confirm layout + size | tool fit, access speed |
| Revision | fix pain points | pocket widths, divider stiffness |
| PP sample | lock bulk standard | materials, logo placement |
| Bulk | repeatability | QC gates + packing rules |
If you’re building a private label nurse bag program and want a practical starting point, email info@heyzizi.com with a reference photo and your target market (students vs hospitals vs retail). We’ll suggest a layout architecture that’s easy to use and stable to mass-produce.
Let's work together
With over 10 years of OEM/ODM bag industry experience, I would be happy to share with you the valuable knowledge related to leather products from the perspective of a leading supplier in China.

Factory catalogue
Latest blogs
Make A Sample First?
If you have your own artwork, logo design files, or just an idea, please provide details about your project requirements, including preferred fabric, color, and customization options, we’re excited to assist you in bringing your custom bag designs to life through our sample production process.