 Skip to content
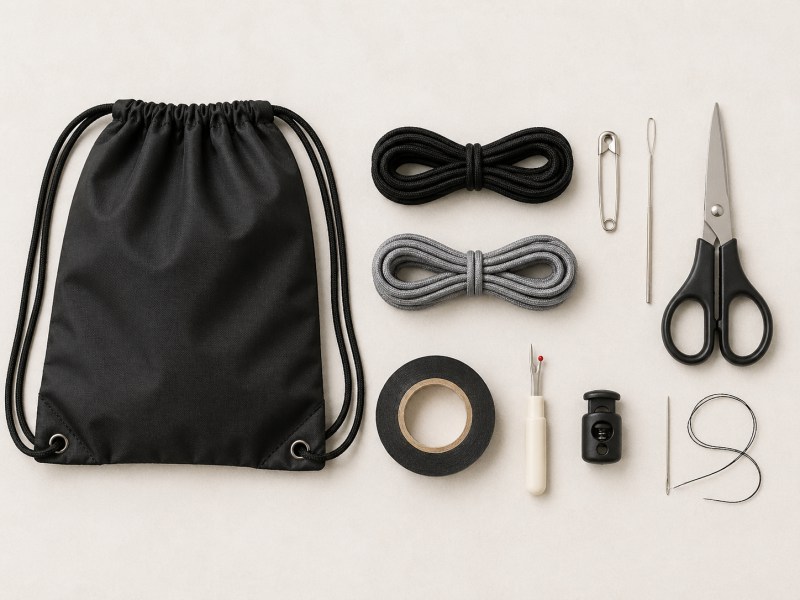
A drawstring backpack looks simple until the cord slips out, breaks, twists inside the channel, or refuses to pull smoothly. Then a basic bag suddenly becomes awkward to use. This happens often with gym sacks, school drawstring bags, beach bags, event bags, sports packs, retail gift bags, and promotional logo backpacks. The repair may look small, but the cause can be very different from case to case.
Sometimes the cord only came loose. Sometimes the knot failed. Sometimes the rope is too thin for the casing. Sometimes the fabric channel is tight, rough, or badly stitched. In heavier drawstring backpacks, the bottom corner loops may carry too much stress, so the cord wears out faster than expected. For brands and importers, this small detail matters because a weak drawstring system can turn a useful bag into a product complaint.
To restring a drawstring backpack, remove the loose or damaged cord, attach one end of the cord to a safety pin, bodkin, or drawstring threader, then guide it slowly through the top casing. For a two-cord backpack, each cord usually travels through both top channels from opposite sides, then connects to the lower corner loops to form shoulder straps. After threading, tie secure knots, test the pull, check both straps for even length, and seal synthetic cord ends to reduce fraying.
This repair usually takes only a few minutes when the casing is clean and the cord is intact. But if the eyelet is sharp, the casing seam is torn, or the lower attachment loop is weak, the better fix is not just “put the string back.” The real fix is to correct the structure. That is also why professional product teams check cord route, cord diameter, knot strength, seam tension, and bottom reinforcement before confirming a custom drawstring backpack sample.
What Is the Easiest Way to Restring a Drawstring Backpack?
The easiest way to restring a drawstring backpack is to use a large safety pin or bodkin as a guide. Attach it firmly to one end of the cord, push it into the casing opening, bunch the fabric over the pin, then pull the fabric back as the pin moves forward. Repeat this push-and-slide motion until the cord exits the other side.
The safety pin method works because it gives the soft cord a firm front end. A loose rope alone folds, twists, and catches inside the casing. A smooth pin, bodkin, or plastic threader turns the cord into something you can control with your fingers through the fabric.
Start by checking the backpack layout. Most drawstring backpacks have a top tunnel, also called a casing. Some have one opening on each side. Some have a split top with two separate channels. Some have small metal eyelets, stitched holes, or fabric loops near the bottom corners. Before pulling anything out, take a quick photo of the original cord path. This helps a lot if the bag uses two cords as shoulder straps.
Here is the simple repair flow:
| Step | What To Do | Why It Matters |
|---|---|---|
| 1 | Remove the old cord if it is tangled or broken | Prevents hidden twists inside the casing |
| 2 | Smooth the cord and seal loose ends | Makes threading easier |
| 3 | Attach a safety pin or bodkin | Gives the cord a firm guide |
| 4 | Push through the casing slowly | Avoids ripping narrow channels |
| 5 | Pull both ends evenly | Keeps the closure balanced |
| 6 | Tie knots and test the pull | Confirms the bag works again |
Do not rush the pin through the casing. If the channel feels blocked, stop and feel along the seam. A hard spot may be a fabric fold, loose thread, broken eyelet, or old knot trapped inside. Forcing the pin can pierce the fabric or widen the opening.
For simple promotional drawstring bags, this repair is usually enough. For heavier backpacks used for sports, school, or travel, also check the lower cord anchors. If the bottom loop tears later, the restringing work will not solve the real problem.
What Tools Do You Need to Replace a Drawstring on a Backpack?
To replace a drawstring on a backpack, you usually need replacement cord, a large safety pin or bodkin, scissors, tape, and a lighter for synthetic cord ends. For deeper repair, keep a seam ripper, needle, thread, cord lock, end caps, and small pliers nearby. The right tool depends on the cord route and damage level.
A simple restringing job does not need a full sewing kit. Still, the repair is cleaner when the tools match the bag structure. A thin cotton cord can pass through a narrow casing with a small safety pin. A thick polyester rope may need a bodkin. A stiff flat drawstring may be easier to guide with tape wrapped around the front end.
| Tool | Best Use | Notes |
|---|---|---|
| Safety Pin | Basic home repair | Choose a smooth, strong pin |
| Bodkin | Narrow or longer casing | Easier to grip than a pin |
| Plastic Threader | Soft fabric channels | Less likely to scratch lining |
| Tape | Wrapping loose cord ends | Helps prevent fraying while threading |
| Lighter | Sealing polyester or nylon cord | Use carefully and only on synthetic fibers |
| Scissors | Cutting damaged cord | Cut cleanly, not at an angle too steep |
| Cord Lock | Adjustable closure | Useful for sports and outdoor styles |
| Needle & Thread | Fixing casing or bottom loop | Needed when fabric damage exists |
Cord end treatment is often ignored. That small step can decide whether the repair feels neat or messy. Synthetic cords such as polyester and nylon can be lightly heat-sealed. Cotton rope should not be melted. Use tape, stitching, or a small end cap instead.
For custom projects, the same logic applies at sample stage. A drawstring backpack should not only look good in photos. The cord should slide smoothly, sit evenly, and stay secure after repeated opening and closing. If your team is reviewing a custom sample, ask for close-up photos of the cord ends, casing openings, bottom loops, and knots before giving approval.
How Do You Thread One Cord vs Two Cords Through a Drawstring Backpack?

A single-cord drawstring backpack usually has one cord running through the top casing to close the opening. A two-cord backpack uses two separate cords, each entering from opposite sides, passing through both top channels, then connecting to lower corners to form shoulder straps. Two-cord routing gives better balance and more practical carrying comfort.
This is where many people get confused. A pouch-style drawstring bag and a backpack-style drawstring bag do not always use the same cord path.
A simple pouch may only need one cord. You pull both ends, the opening closes, and the cord acts only as a closure. A drawstring backpack usually needs more structure because the same cord also works as shoulder straps. That means both sides must be even, smooth, and strong enough to carry weight.
| Structure | Cord Route | Best For |
|---|---|---|
| Single Cord | Through one top channel | Small pouches, packaging bags, gift bags |
| Double Cord | Each cord passes through both top channels from opposite sides | Drawstring backpacks, gym sacks, school bags |
| Cord + Cord Lock | Cord passes through top casing and lock | Sports bags, outdoor bags, adjustable closure styles |
| Flat Strap + Drawcord | Strap carries weight, cord closes top | Higher comfort lifestyle bags |
For a common two-cord drawstring backpack:
- Attach cord A to a safety pin.
- Start from the left opening.
- Pass it through the front top casing.
- Continue through the back top casing.
- Bring both ends of cord A to the left lower corner.
- Tie or secure them through the bottom loop.
- Repeat the same process from the right side with cord B.
- Adjust both sides until the straps are even.
After threading, test the bag as a real user would. Pull the top open and closed at least 10 times. Put light weight inside and wear it for a short moment. If one side feels longer, tighter, or rougher, the cord may be twisted inside the casing.
For retail and brand programs, double-cord routing should be checked before production starts. A beautiful logo print cannot save a bag that feels uncomfortable on the shoulders.
Which Type of Cord Is Best for a Drawstring Backpack?
The best cord for a drawstring backpack depends on bag weight, fabric type, end use, and comfort needs. Polyester cord is common for durability and cost control. Nylon cord feels smooth and strong. Cotton rope gives a softer, natural look. Flat webbing improves shoulder comfort. Heavy-use bags need stronger cord and reinforced lower anchors.
Cord selection is not only a style choice. It affects pull smoothness, shoulder comfort, product lifespan, and perceived value. A cheap cord may pass a first glance, but it can fray, flatten, slip, or dig into the shoulder after real use.
| Cord Type | Strengths | Best Fit | Watch Out For |
|---|---|---|---|
| Polyester Cord | Durable, stable, widely used | Gym sacks, event bags, school bags | Ends need clean sealing |
| Nylon Cord | Smooth, strong, flexible | Sports and outdoor styles | Can feel slippery if too thin |
| Cotton Rope | Soft, natural handfeel | Lifestyle, gift, eco-style bags | Absorbs moisture more easily |
| PP Rope | Lightweight, cost-friendly | Promo and light-use bags | Lower premium feel |
| Flat Webbing | Better shoulder comfort | Daily-use drawstring backpacks | Needs wider channel or separate strap design |
| Satin Cord | Decorative look | Gift bags, beauty packaging | Not ideal for heavy load |
| Leather Cord | Premium visual effect | Fashion or boutique styles | Cost and consistency need control |
| Recycled Cord | Better for eco-minded programs | Retail and lifestyle projects | Must verify strength and color stability |
A gym drawstring backpack may need a smooth synthetic rope that resists sweat and repeated pulling. A beach bag may need cord that tolerates sand, sun, and moisture. A cosmetic gift bag may care more about soft handfeel and color match. A school drawstring backpack needs stronger bottom loops because books, shoes, or sportswear can add more stress than expected.
Cord diameter also matters. Too thin, and it may cut into the shoulder or slip through knots. Too thick, and it may jam in the casing. A good sample should feel easy to close with one hand, without dragging or bunching.
For custom drawstring backpacks, share your fabric choice, bag size, expected load, logo method, and use scene with Jundong at info@jundongfactory.com. The team can suggest a more suitable cord structure before sampling.
Why Does a Drawstring Backpack Cord Keep Slipping, Fraying, or Breaking?

A drawstring backpack cord keeps slipping, fraying, or breaking when the cord, casing, and anchor structure do not match. Common causes include thin rope, rough eyelets, weak knots, sharp metal edges, poor end finishing, overloaded bags, loose bottom loops, or a casing that creates too much friction during pulling.
A failed drawstring rarely fails for only one reason. The cord may look like the problem, but the root cause can sit in the fabric channel, stitching, or lower anchor.
If the cord slips out, check the knots. A small knot may pass through a large eyelet. A smooth synthetic cord may untie itself over time if the knot is weak. A missing cord lock can also make closure unstable.
If the cord frays, check the rubbing surfaces. Rough metal eyelets, sharp plastic parts, unfinished casing seams, or tight fabric channels can slowly grind the cord. The damage may not appear during sample photos, but it can show after repeated use.
If the cord breaks, check load and stress distribution. A thin cord may be fine for a giveaway bag but poor for a gym backpack carrying shoes, water bottle, towel, and sportswear. The lower corner area is especially critical because that is where pulling, carrying, and swinging force meet.
Common failure signals:
- Cord dust or fuzz near the casing opening
- Uneven strap length after normal use
- Hard pulling when closing the bag
- Cord burn marks from friction
- Loose grommets or stretched holes
- Corner stitching gaps
- Knots pulling through loops
A stronger product starts with correct matching. Cord thickness, casing width, stitch density, reinforcement, and cord end treatment should work together. This is why sample testing matters. Pull the cord repeatedly. Hang weight in the bag. Check the lower corners. Open and close the top many times. Weak parts usually reveal themselves before bulk work starts, if the sample is tested like a real product.
How Long Does It Take to Restring a Drawstring Backpack?
A basic restringing job usually takes 5 to 15 minutes when the cord is intact and the casing is open. If you need to replace both cords, add cord locks, repair torn stitching, fix bottom loops, or remove trapped knots, the work may take 20 to 40 minutes or longer depending on bag structure.
Time depends on three things: cord route, casing condition, and damage level.
A simple one-channel bag is fast. Attach the cord to a safety pin, move it through the casing, pull it out, tie the ends, and test. A two-cord backpack takes longer because each side must follow the correct route and end at the correct lower corner.
A damaged casing changes everything. If the seam has come apart, the cord may escape again. If the eyelet is loose, the cord may fray. If the bottom loop is weak, the bag may feel repaired at the top but fail when worn.
| Repair Situation | Typical Time | Difficulty |
|---|---|---|
| Cord slipped out, no damage | 5–10 minutes | Easy |
| One cord replacement | 10–15 minutes | Easy |
| Two-cord backpack restringing | 15–25 minutes | Medium |
| Cord lock replacement | 10–20 minutes | Medium |
| Torn casing repair | 20–40 minutes | Higher |
| Bottom loop repair | 30 minutes or more | Higher |
For product teams, timing also has a business meaning. If a drawstring problem is easy to repair, it may be a minor sample adjustment. If it requires changing casing width, cord diameter, grommet type, or bottom reinforcement, it should be fixed before bulk production. Delaying that decision can create repeated complaints later.
A practical rule: if the repair takes longer than the value of the bag for end users, redesign may be better than repair. This is especially true for promotional bags, event bags, and low-cost retail packs. For higher-value branded drawstring backpacks, a better cord and stronger anchor design are worth the small extra cost.
When Should You Repair the Drawstring vs Replace the Whole Backpack?
Repair the drawstring if the fabric body, seams, logo area, casing, and lower loops are still strong. Replace the backpack if the top channel is torn, eyelets are loose, fabric is badly worn, coating is peeling, stitching is failing, or the bag no longer fits the weight and use scene it was made for.
Not every broken cord means the bag is bad. Cords are replaceable. A good backpack body can often last much longer than the original string. Repair makes sense when the damage is limited and the structure is still reliable.
Repair is usually worth it when:
- The fabric still feels strong
- The top casing is not torn
- The lower corner loops are secure
- The logo or print is still clean
- The bag shape still works for its purpose
- Only the cord, knot, or cord lock has failed
Replacement is smarter when:
- The casing seam is ripped
- Metal eyelets are sharp or loose
- The bottom corners are tearing
- The fabric has heavy abrasion
- The bag feels uncomfortable even after restringing
- The load is too heavy for the original design
For brands, this decision should happen earlier, during development. If the intended use is light packaging, a simple cord may be fine. If the bag is meant for school, gym, outdoor events, retail resale, or travel kits, the structure needs more strength.
Think of the drawstring as part of a system. It connects the top closure, shoulder carrying function, lower anchors, and user comfort. Replacing only the cord can solve the surface issue. Redesigning the cord system can solve the repeat issue.
How Can a Factory Design Better Drawstring Backpacks to Avoid Restringing Problems?

A better drawstring backpack starts with matching cord size, casing width, fabric strength, bottom reinforcement, and intended load. A well-made design uses smooth cord channels, clean eyelets, strong knots, reinforced lower corners, bar-tack stitching, sealed cord ends, and pull testing before bulk work begins.
A drawstring backpack is often treated as a simple bag. That is the first mistake. The structure may be simple, but the stress path is not. The cord closes the bag, forms the shoulder straps, rubs against the casing, carries weight through the lower corners, and affects daily comfort.
The factory should review these details before making a final sample:
| Design Area | Better Practice | Risk If Ignored |
|---|---|---|
| Cord Diameter | Match to casing width and load | Jamming, slipping, shoulder discomfort |
| Casing Width | Wide enough for smooth sliding | Hard pulling, fabric bunching |
| Eyelet / Opening | Smooth edge or stitched finish | Fraying, tearing |
| Bottom Corner | Reinforced with stitching or patch | Strap pull-out |
| Knot / End Stop | Large enough and secure | Cord slips out |
| Cord End | Heat-sealed, capped, or stitched | Fraying |
| Stitching | Bar-tack at stress areas | Seam failure |
| Testing | Pull, wear, load, and open-close checks | Hidden weakness |
Small design upgrades can change the user experience. A slightly wider channel makes the bag easier to close. A stronger bottom loop helps carry heavier contents. Better cord tips make the product look cleaner. A flat cord or soft webbing can improve shoulder comfort for daily-use styles.
Jundong’s advantage is not only in making many bag categories. The stronger value is the ability to connect material choice, structure, sample revision, logo method, packing, and quality checks in one project flow. With development, design, sampling, production, and QC teams in one system, Jundong can help reduce small structural issues before they become bulk problems.
For custom drawstring backpack projects, send size, material, use scene, logo plan, and target quantity to info@jundongfactory.com. A clearer brief helps the team suggest a better cord route and reinforcement plan before sampling.
What Should Teams Check in a Custom Drawstring Backpack Sample?
Before confirming a custom drawstring backpack sample, check cord smoothness, strap comfort, casing alignment, knot strength, bottom loop reinforcement, stitching tension, fabric weight, logo position, packing method, and sample-to-bulk repeatability. A good sample should be tested by pulling, wearing, loading, and opening it repeatedly.
A sample is not only for appearance approval. It is a working model. If the drawstring system feels poor in the sample, it will not magically improve later.
Use this checklist during sample review:
| Check Item | What To Review | Good Result |
|---|---|---|
| Cord Pull | Open and close repeatedly | Smooth, no dragging |
| Strap Length | Compare both sides | Even and comfortable |
| Shoulder Feel | Wear with light load | No sharp pressure |
| Casing | Check alignment and width | Flat and clean |
| Bottom Loops | Pull firmly | No tearing or stitch gaps |
| Knots | Tug both ends | Do not slip |
| Cord Ends | Check finish | No fraying |
| Fabric | Feel thickness and strength | Fits use scene |
| Logo | Check position and durability | Clear and aligned |
| Packing | Review fold and shape | No damage during packing |
For promotional bags, sample checks often focus on logo and price. That is understandable, but not enough. If the cord pulls badly, users may stop using the bag quickly. For retail drawstring backpacks, comfort and durability matter even more because people expect repeat use.
A strong sample review should include real handling. Put common contents inside: shoes, towel, notebook, toy, cosmetic kit, sports gear, or event materials. Pull the top closed. Wear it. Open it again. Check whether the cord twists. Look at the bottom corners after use. These small tests can reveal more than a perfect studio photo.
If your project involves several materials, colors, or cord styles, ask for comparison samples. One cord may look better, another may feel better, and a third may perform better. The right choice depends on the product’s real job.
How Do Custom Details Affect Price, Sample Time, and Bulk Quality?

Custom drawstring backpack cost depends on fabric, size, cord type, lining, reinforcement, logo method, packing, quantity, and testing needs. A simple polyester drawstring bag is faster and more cost-friendly. A retail-ready backpack with stronger cord, thicker fabric, reinforced corners, and custom branding needs more sampling control.
A drawstring backpack can be low-cost or premium. The difference is not only material. It is the number of decisions behind the product.
A basic event bag may use lightweight polyester, round cord, simple screen print, and individual polybag packing. A retail product may need thicker fabric, better handfeel, custom color cord, woven label, reinforced lower corners, hangtag, barcode label, and carton mark control. A sports bag may need water-resistant fabric, stronger rope, metal eyelets, and load testing.
| Custom Factor | Cost Impact | Quality Impact |
|---|---|---|
| Fabric weight | Medium to high | Affects strength and feel |
| Cord type | Low to medium | Affects pull, comfort, durability |
| Reinforcement | Medium | Reduces tearing risk |
| Logo method | Low to high | Affects brand look and wash/rub resistance |
| Cord lock / end caps | Low to medium | Improves function and finish |
| Packing method | Low to medium | Affects retail display and shipping |
| Quantity | High | Affects unit cost and material purchase |
Sample time also depends on clarity. A complete brief shortens back-and-forth. Useful details include bag size, fabric preference, logo file, Pantone color, cord style, carrying weight, packing request, and target delivery window.
Low quantity can be useful for testing a new style. But very small runs often have higher unit cost because sampling, cutting, setup, material sourcing, printing, and checking still require work. For Jundong projects, quantity flexibility can be discussed based on structure, material, and decoration method. Send your draft or reference photo to info@jundongfactory.com for a practical review.
FAQs About Restringing and Custom Drawstring Backpacks
1. How do you restring a drawstring backpack without a safety pin?
You can use a bodkin, plastic threader, bobby pin, paper clip, crochet hook, or a stiff straw with tape. The goal is to create a firm guide at the front of the cord. Wrap the cord end tightly so it does not fray or slip off. Then push the guide through the casing slowly. Do not use a sharp tool that may cut the fabric. For a narrow casing, a thin bodkin or plastic threader is usually easier than a bulky pin.
2. Can you use shoelaces as replacement drawstrings?
Yes, shoelaces can work for light drawstring backpacks if the length, thickness, and flexibility fit the casing. Flat shoelaces may feel more comfortable than thin round cord, but they can twist inside narrow channels. Round athletic laces are easy to thread and tie, but may not look right on retail products. For custom bag projects, shoelaces are usually a temporary repair choice, not the best long-term production option.
3. What size cord is best for a drawstring backpack?
The best cord size depends on casing width and bag load. Thin cords slide easily but may feel uncomfortable on shoulders. Thick cords feel stronger but may jam if the channel is narrow. For light promotional bags, smaller cords may be enough. For school, gym, or travel drawstring backpacks, a stronger cord with better bottom reinforcement is usually safer. Always test cord pull and shoulder feel with real contents inside.
4. Why is my drawstring backpack hard to close?
A drawstring backpack becomes hard to close when the cord is too thick, the casing is narrow, the cord is twisted, the seam is rough, or the fabric bunches unevenly. Dirt, loose threads, and damaged eyelets can also create friction. Remove the cord and check the channel. If the cord slides smoothly outside the bag but not inside the casing, the problem is likely the channel, not the rope.
5. How do you stop drawstring cord ends from fraying?
For polyester or nylon cord, carefully heat-seal the end with a lighter, then press it smooth after it cools enough to handle safely. For cotton cord, use tape, stitching, glue, or metal/plastic end caps. Do not melt natural fibers. In custom production, clean cord ends make the bag look more finished and reduce loose fiber complaints during handling, packing, and daily use.
6. Are flat straps better than round cords for drawstring backpacks?
Flat straps can be more comfortable on the shoulder because they spread pressure better than thin round cords. They are useful for daily-use or higher-value drawstring backpacks. Round cords are easier to use in simple casings and often cost less. The best choice depends on the product role. A light event bag may work well with round cord, while a lifestyle backpack may benefit from flat webbing or soft braided cord.
7. Can a factory customize the cord color and material?
Yes. Cord color, material, diameter, texture, end caps, cord locks, knot style, and lower anchor method can all be customized. The best result comes from matching the cord with fabric, logo, use scene, and target load. For example, a beach drawstring bag may need moisture-friendly materials, while a gift bag may focus on color and handfeel. Cord customization should be confirmed during sample development, not after bulk work starts.
8. What is the best fabric for a custom drawstring backpack?
Polyester is common because it is practical, cost-friendly, and suitable for printing. Nylon gives a smoother, sportier feel. Canvas feels more natural and stronger but may be heavier. Mesh works for breathable sports or beach styles. Oxford fabric is a good choice for more durable drawstring backpacks. The best fabric is the one that matches the product’s load, use scene, logo method, packing needs, and target price.
9. Do drawstring backpacks need reinforced corners?
Yes, if the bag will carry more than very light contents. The bottom corners carry pulling force from the shoulder straps, so weak stitching can tear over time. Reinforcement can include extra fabric patches, denser stitching, bar-tacks, metal eyelets, or stronger loop construction. For gym, school, sports, outdoor, and travel use, reinforced corners are strongly recommended.
10. How should teams confirm drawstring quality before bulk work?
Check the cord route, pull smoothness, strap balance, knot security, cord end finish, casing width, bottom loop strength, and comfort under load. Open and close the sample repeatedly. Wear it with realistic contents. Pull both straps firmly. Check whether the cord frays near the eyelet or casing opening. If several people test the sample and all feel the same smooth function, the structure is much safer to move forward.