 Skip to content
What Is a Hiking Gear Storage Bag? Which Type Is Best for Your Market (OEM Guide)
A lot of people think “gear storage bag” is just a fancy name for “a small sack.” That’s why many outdoor brands get stuck in the same loop: the product looks fine, the price looks fine, but reviews say things like “not really waterproof,” “too flimsy,” or “why does this feel pointless when I already have a backpack?” The real issue isn’t the bag. It’s the job the bag is supposed to do.
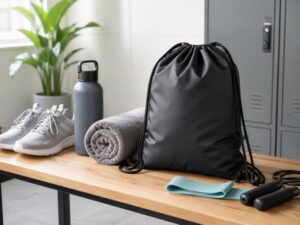
A hiking gear storage bag is a system tool. It helps hikers separate dry vs wet, protect critical items (sleep system, electronics, food), speed up camp routines, and reduce packing chaos. For brands and retailers, it’s also a margin-friendly category—if the specs are honest and the use case is clear. The fastest way to lose trust is to sell one bag as “waterproof” when the seams and closure aren’t built for that level of protection.
Here’s the part many miss: hikers don’t buy “a bag.” They buy a solution to a moment. Rain starts. River crossing. Morning pack-up. Bear country food rules. Rental kit turnover. Once you map those moments, the category becomes simple: dry bags for weather and water risk, stuff sacks for lightweight organization, packing cubes for quick access, mesh bags for wet gear separation, and bear bags/food bags for campsite storage rules.
A hiking gear storage bag is a small organizer used inside or alongside a backpack to protect, separate, and manage gear—especially in rain, humidity, dust, or bear country. Common types include dry bags (roll-top waterproof protection), stuff sacks (lightweight packing control), packing cubes (fast access and organization), mesh bags (wet gear separation), and bear/food bags (odor and wildlife risk management). The “best” type depends on your trip conditions or, for brands, your target market and price tier.
What is a hiking gear storage bag, and what problem does it solve?
A hiking gear storage bag is an organizer that protects and separates gear inside a backpack. It reduces “pack chaos,” keeps key items dry, and speeds up camp routines. It’s different from a backpack (carry system) and different from a true dry bag (waterproof protection level). For brands, it’s a product where clear claims, correct materials, and honest waterproof construction matter more than fancy features.
What counts as a Hiking Gear Storage Bag?
In real outdoor use, “gear storage bag” is a category, not one product. It includes:
- In-pack organizers (stuff sacks, cubes) for clothing and small items
- Protection bags for electronics and sleep systems
- Wet/dry separation bags for socks, rain shells, water shoes
- Food storage bags for campsite organization (often called bear bags, food bags)
The product’s value is simple: you stop digging, you stop losing small items, and you stop getting your critical gear soaked. That last part is the deal-breaker. A wet sleeping bag can turn a fun hike into a miserable night.
Hiking Gear Storage Bag vs Backpack vs Dry Bag: What’s the difference?
These are different tools with different “jobs.” If your product page mixes them, get confused and returns go up.
| Item | Main job | Typical feature focus | What customers complain about |
|---|---|---|---|
| Backpack | Carry weight comfortably | frame, straps, load transfer | discomfort, poor access |
| Gear storage bag | Organize and protect inside the pack | size set, fabric feel, labels | “doesn’t help,” “too small,” “rips” |
| Dry bag | Keep contents dry in wet conditions | roll-top seal, seam method | “leaks,” “not waterproof” |
A gear storage bag can be water-resistant and still be great—if it’s not marketed as “fully waterproof.” A dry bag can also be a storage bag, but not all storage bags are dry bags.
Why hikers use storage bags (and why they keep buying them)
Hikers repeat-buy because storage bags solve daily annoyances:
- Speed: camp setup and pack-up gets faster
- Protection: sleep system and electronics stay safer
- Pack discipline: you can pack by “modules” (sleep kit, cook kit, clothing kit)
- Laundry logic: dirty clothes don’t touch clean layers
- Sharing logic: guided tours and rental kits need quick inventory
And here’s a more critical viewpoint: some hikers refuse storage bags because they add weight and feel “extra.” That’s valid. Your product only wins if it does one of these:
- prevents real damage (water, abrasion, odor contamination), or
- saves real time (fast access, fewer lost items), or
- improves the system for resale/rental (standardized kit layout)
That’s why brands should avoid “feature stacking.” Too many pockets, too many panels, and the bag gets heavier, more expensive, and less durable at seams.
Who uses them, and when are they needed?
This category is used by:
- Weekend hikers (rain protection and quick organization)
- Thru-hikers (weight control + wet/dry discipline)
- Guided tours (standardized systems)
- Rental/outdoor schools (inventory control, durability)
- Outdoor retailers (impulse + add-on sales)
They’re needed most when conditions raise risk: rain season, humid climates, river crossings, snow melt, or bear country food management.
Which type of hiking gear storage bag do you need? (Dry Bag vs Stuff Sack vs Packing Cube vs Mesh Bag vs Bear Bag)
Choose the type based on the risk you’re managing: dry bags for water exposure, stuff sacks for lightweight organization, packing cubes for fast access, mesh bags for wet gear separation, and bear/food bags for campsite food rules. For brand sales, the right lineup is usually a “system set” (2–5 sizes) that matches your market: ultralight hikers, family campers, guided tours, or water-based trekking.
Types of hiking gear storage bags: Which one is right for your market?
From a B2B view, “right type” means: clear use case, stable manufacturing, and low return risk.
- Ultralight market: minimal features, lighter fabrics, simple closures
- General outdoor retail: durable feel, easy sizes, clear labeling
- Water sports + trekking: tougher dry bags, welded seams, stronger buckles
- Guided/rental programs: consistent color coding, strong stitching, repairable parts
A simple “market-fit” table helps you build a product line that makes sense:
| Market | Best core types | Why it sells | What to avoid |
|---|---|---|---|
| Ultralight | stuff sacks + ultralight dry bags | weight matters | heavy buckles, thick fabrics |
| Mainstream retail | mixed set (cubes + dry bag) | easy system | unclear size labeling |
| Wet environments | true dry bags | fewer soaked-gear claims | stitched seams sold as “submersible” |
| Bear country | food/bear bags | rule-driven demand | vague claims that conflict with local guidance |
Dry bag: roll-top waterproof protection (what makes it work)
Dry bags exist for one reason: your gear stays dry when conditions turn bad. The roll-top closure is popular because it creates a seal when rolled enough times and clipped. One widely stated best practice is at least three rolls for a roll-top seal.
For product pages and manuals, this matters: if customers roll it once, it leaks, and they blame the bag.
But here’s the honest engineering point: waterproof performance is not only fabric. Seams and closure method define real waterproofing. If you sew needle holes through coated fabric and don’t seal the seam properly, water can enter. That’s why many heavy-duty dry bags use welding/heat sealing instead of simple stitching for the main seam structure.
Stuff sack vs packing cube vs organizer cube (what’s the real difference?)
- Stuff sack: simple, lightweight, compressible, often drawstring
- Packing cube: structured access and organization (often zippers)
- Organizer cube: more shape control, sometimes clear windows and handles
Backcountry testing discussions often frame them as “organization systems” more than protection tools—especially after wet trips where poor organization leads to damp gear and messy packing.
For hiking, cubes are best when the user wants quick access without dumping the whole pack. Stuff sacks win for light weight and flexible packing.
Mesh bag (wet gear separation)
Mesh bags are underrated. They solve the “wet gear contamination” problem: wet socks, water shoes, rain shells, or swimwear don’t soak the rest of the pack. They’re also useful for rental programs because they allow airflow and reduce odor buildup.
Bear bag / food storage bag (why it’s its own category)
Bear/food bags aren’t mainly about convenience. They’re about wildlife risk management and campsite rules. Hanging a bear bag requires distance and height rules that many outdoor education sources emphasize (distance from camp, height off ground, distance from trunk).
Also note: some guidance increasingly favors bear-resistant canisters or lockers as the first choice where required or recommended, with hangs as a secondary option in permitted areas.
For brands, don’t overpromise. Make the product compatible with common methods, and be careful with claims.
If you’re building a private label set, this is where a factory partner matters: we can help you build a coherent size system (not random sizes) and match each type to a realistic construction method. For OEM development inquiries, email info@jundongfactory.com.
What materials are best for hiking gear storage bags?
The best material depends on the bag type and the risk: light organizers can use nylon/polyester, but true dry bags need coatings/laminates and seam strategy. TPU-coated fabrics support heat sealing/welding for waterproof seams, while Dyneema Composite Fabric (DCF) is inherently waterproof and popular in ultralight dry bags. Hardware and seam design often matter as much as the fabric.
Common materials: nylon, polyester, coated and laminated fabrics
Most hiking storage bags start with woven fabrics:
- Nylon: good strength-to-weight, common in outdoor gear
- Polyester: stable, often cost-friendly, common in retail organizers
- Coated fabrics: PU/silicone coatings add water resistance
- Laminates: films bonded to fabric for higher waterproofing
For simple organizers, you don’t need extreme waterproof performance. You need abrasion control and stable seams. For dry bags, the material system changes completely.
Waterproof vs water-resistant (why claims get messy)
People buy based on words. But “water-resistant” can mean light rain protection, and “waterproof” implies much higher protection. If your bag is stitched through coated fabric, water can still enter through needle holes unless the seam is sealed well. This is why “fabric waterproof rating” alone doesn’t equal “bag waterproof.”
A practical way to reduce refunds is to write claims that match build method:
- stitched organizer: water-resistant, splash protection
- stitched + seam tape: improved protection, still not for submersion
- welded dry bag: higher confidence for heavy water exposure
TPU-coated fabrics and heat sealing (why factories use it)
TPU (thermoplastic polyurethane) coatings can fuse under heat and pressure, which supports welded seams. DIY packraft material guidance explains that properly made TPU welds can be extremely strong, sometimes stronger than the bonded fabric layer itself.
This matters for product planning: welding changes the factory equipment requirements, the process route, and often the cost structure. It can reduce leak risk because there are fewer needle holes.
DCF (Dyneema Composite Fabric) in ultralight dry bags
DCF is used heavily in ultralight gear because of its weight-to-strength benefits, and it’s commonly described as a laminate with Dyneema fibers inside a membrane that is inherently waterproof and does not require coatings.
For brands, the key is to match DCF to realistic wear. It can be very strong in tensile terms, but abrasion zones still need attention. A storage bag that is dragged on granite needs different protection than a bag that lives inside a pack.
Hardware that matters more than people expect
Even a great fabric fails if the small parts fail:
- roll-top stiffeners that crease badly
- buckles that crack in cold
- cord locks that slip
- webbing that frays
- seams that pop under compression stuffing
This is where “cheap” becomes expensive. A storage bag often gets pulled hard, overstuffed, and twisted. Hardware needs to match that abuse level.
B2B tip: standardize hardware across your set. It simplifies the BOM, reduces supplier risk, and makes reorders more stable.
How do you choose the best hiking gear storage bag for travel, hiking, or brand sales?
Pick the “best” hiking gear storage bag by matching user moments (rain, river crossing, camp setup, bear country) to the right type + size + closure + material system. For brands, the best product is the one with clear claims, consistent sizing, low return risk, and repeatable manufacturing. Start with a simple set (2–5 sizes), standardize hardware, and design for real packing behavior—not empty-bag measurements.
The quickest way to choose the right storage bag—without getting lost in features—is to ask one question: What problem are we solving at the moment it matters most?
Because hikers don’t judge these bags on a desk. They judge them when hands are cold, rain is coming, the trail is muddy, and they need something fast.
Who is it for, and how will it be used?
Different users create different “must-have” requirements:
- Day hikers: quick access and light organization (keys, headlamp, snack kit). They tolerate “water-resistant,” but hate flimsy zippers and annoying shapes.
- Backpackers (2–7 days): wet/dry separation becomes a system. They care about weight, packability, and “does this stop my sleeping bag from becoming a sponge?”
- Thru-hikers: their bag system becomes routine. They prefer fewer parts and fewer failure points. If the closure is annoying, they won’t use it.
- Guided tours / outdoor schools: they need standardization: color coding, consistent sizes, and durability that survives repeated handling.
- Rental programs: they need easy inventory and cleaning logic. Mesh separation and strong seams matter more than “ultralight bragging rights.”
From a brand angle, this is where you decide your SKU strategy: do you sell a single hero product, or a “system set” that increases AOV and reduces confusion?
What size do you need? (Liters, shape, packing list method)
Liters are useful, but hikers pack shapes, not numbers. A better approach is packing-list sizing:
- Sleep system bag: sized for sleeping bag/quilt + dry sleep clothes (this bag must be the most protected).
- Clothing bag: mid-size for layers; often the second most-used item.
- Electronics bag: small, protected, easy to find.
- Cook kit bag: medium, abrasion-resistant, handles smell and soot.
- Food bag: depends on method (bear hang vs canister region vs day-hike snacks).
A simple product page table helps customers self-select (and cuts returns):
| Bag role | Typical contents | What matters most |
|---|---|---|
| Sleep kit | sleeping bag, base layers | water protection, low leaks |
| Clothing | spare layers, socks | organization, light durability |
| Electronics | phone, battery, headlamp | soft lining, easy access |
| Cook kit | stove, pot, fuel | abrasion resistance, shape control |
| Food | meals, snacks | closure reliability, hang points |
Which closure is best: roll-top vs zipper vs drawstring?
Closures are where reality hits marketing.
- Roll-top: best for water protection and fewer failure points. But it’s slower and user technique matters.
- Zipper: fastest access, best for cubes and organizers, but zippers become the #1 complaint if you pick the wrong grade or sew it poorly.
- Drawstring: simple, light, cheap, easy to use—but it’s not for serious water protection.
For brand sales, you don’t need one closure to do everything. You need the right closure per bag role. For example: roll-top for sleep kit, zipper for clothing cube, mesh drawstring for wet gear.
What features matter most (and which ones quietly increase returns)?
Useful features:
- Grab handle (especially for rental kits and camp routines)
- Clear window or label panel (helps organization without dumping contents)
- Attachment loops (for hanging or clipping)
- Compression straps (only if built to handle real tension)
Features that often cause returns if done cheaply:
- low-grade buckles that crack in cold
- shiny “waterproof” zippers that jam with dust
- heavy internal dividers that add weight but don’t add value
- too many seams (more leak and tear points)
“Best for” scenarios: rain, snow, humidity, desert dust, canoe/packraft
A real-world “best for” map keeps claims honest:
- Rain / high humidity: prioritize roll-top dry bag for sleep system + electronics.
- Snow / cold: avoid brittle plastics; keep buckles and cord locks cold-resistant.
- Desert dust: zippers can become gritty; simpler closures + dust-resistant designs help.
- Water-based trekking: higher-grade dry bags, stronger seams, and abrasion protection.
If you want to build a private label lineup, a reliable formula is: one high-protection bag (sleep kit) + one fast-access organizer + one wet-gear separator. That trio solves most user pain without overcomplicating the BOM.
Waterproof performance: what actually keeps gear dry (and what fails in the field)?
Real waterproof performance is a system: fabric + seams + closure + user behavior. Most failures come from needle holes, seam fatigue, abrasion, and poor roll-top use—not the fabric label. If you sell “waterproof,” align the claim with your construction method (stitched vs taped vs welded). For B2B programs, define a simple test plan and acceptance rules so “waterproof” doesn’t become a refund machine.
Let’s be blunt: “waterproof” is one of the most abused words in outdoor products. And it’s also the fastest way to create angry reviews. Customers don’t care about coating names—they care whether their sleeping bag is dry at night.
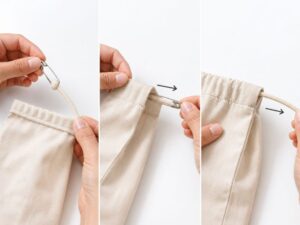
Why roll-top works (and what users do wrong)
Roll-top works because it creates a folded barrier that resists water entry better than a single drawstring opening. But roll-top performance depends on:
- enough roll folds (users often under-roll),
- not overstuffing (prevents proper sealing),
- clipping correctly and not twisting.
Brands can reduce complaints with one simple move: include a printed instruction icon that shows how to roll and clip. It’s cheap, and it cuts “user error refunds.”
Seam types and failure points (pinholes, abrasion, fold fatigue)
Field failures usually appear in three places:
Needle holes and stitch lines
Stitching punches holes in coated fabrics. If the seam isn’t sealed properly, water can enter. Even if the bag survives a light splash, persistent rain + pressure can push moisture through.
Abrasion zones
A bag dragged inside a backpack against rough items (stove, pot edges, trekking poles) will wear at corners and folds. Abrasion doesn’t look dramatic at first—then suddenly it leaks.
Fold fatigue at the roll-top
Repeated rolling in the exact same line can weaken material over time, especially if the stiffener is too hard or too thin. You’ll see cracks or “whitening” lines.
So a product can have “waterproof fabric” and still fail because the build isn’t matched to the use.
How to test waterproof performance for B2B programs (factory checks + acceptance)
You don’t need a lab to catch most issues early. You need consistent checks.
Here’s a practical, factory-friendly test plan brands often use:
| Test | What it checks | When to run it |
|---|---|---|
| Visual seam check | missed sealing, skipped steps | every batch |
| Simple water-hold test | leak points at seams/closure | sample units per lot |
| Roll-top closure check | user seal reliability | pre-production + final |
| Abrasion rub check | early wear risk | sampling stage |
| Load/overstuff simulation | seam stress behavior | PP sample stage |
For acceptance, define what “pass” means. Example: “No visible leakage after X minutes under Y condition” (your team can set the exact method). Without a pass/fail definition, waterproof becomes an argument instead of a standard.
Spec pitfalls: “waterproof fabric” but weak seams
This is where many sourcing projects go wrong. Someone picks an impressive-sounding fabric, but:
- seams aren’t taped consistently,
- closure isn’t designed for sealing,
- stitching tension damages coatings,
- the bag is marketed as “submersible” when it’s not.
A safer approach is to use tiered language:
- Water-resistant organizer (for light rain, inside-pack use)
- Dry bag for rain exposure (roll-top, stronger seams, intended for wet days)
- High-water-exposure bag (only if construction genuinely supports it)
If you’re planning an OEM line, this is the section where you should align marketing with engineering. That alignment is what keeps reviews clean.
How long do hiking gear storage bags last, and what affects lifespan?
Lifespan depends less on “brand name” and more on abrasion, UV, cold brittleness, seam design, and hardware quality. Storage bags often fail at corners, fold lines, cord-locks, and buckles. A longer-lasting product uses smart reinforcement mapping, standardized components, and repair-friendly design (patchable panels, replaceable buckles). For brands, durability is the cheapest way to reduce returns and warranty costs.
A hiking storage bag is small, but it takes a surprising amount of abuse. It gets stuffed, yanked, dragged, rolled, and compressed. If your design assumes “gentle use,” it will fail in real life.
Abrasion zones and real wear triggers
The highest wear points are predictable:
- bottom corners (rubbing against pack interior and hard gear),
- edge folds (where material creases repeatedly),
- attachment loops (pulled under load),
- drawstring channel (cord saws the fabric over time),
- zipper ends (stress concentrates at end stops).
A useful design discipline is to map stress zones and apply reinforcement only where it matters. That keeps weight down while improving durability.
UV, cold, and saltwater exposure (hidden aging drivers)
Outdoor gear ages even when it looks fine:
- UV breaks down polymers; fabrics get weaker and coatings degrade.
- Cold makes some plastics brittle (buckles crack, cord locks snap).
- Saltwater accelerates hardware corrosion and can stiffen fabrics if not rinsed.
If your market includes winter hiking or coastal trekking, don’t treat hardware as an afterthought. Hardware is often the first failure point.
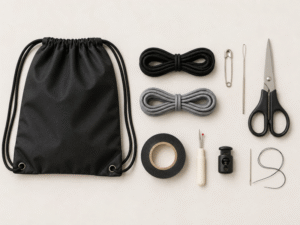
Repair options (patch kits, seam tape, replacing buckles)
Durability is also about what happens after damage. A smart brand sells fewer “perfect claims” and more repair reality:
- Patchable panels for small punctures
- Replaceable buckles (standard sizes)
- Simple seam structures that can be re-taped
- Minimal proprietary parts
For rental and education programs, repairability is a buying trigger. They don’t want to throw away bags for one small tear.
How to reduce warranty claims with smarter specs
Here’s the pattern we see in warranty-heavy products:
- too many seams,
- weak buckles,
- confusing claims (“waterproof” when it’s not),
- inconsistent production (sample vs bulk drift).
Here’s what reduces claims:
- standardize buckles, webbing, cord locks across the set,
- reinforce only high-stress zones (handle roots, corner panels),
- specify minimum seam strength rules (stitch density, bar-tacks),
- write claims that match construction.
If you’re building a private label system, durability should be designed into the BOM from day one. It’s easier than “fixing it later” after bad reviews.
How much does a hiking gear storage bag cost? (Price & cost breakdown for OEM/private label)
OEM cost is driven by material system (coating/laminate), construction method (stitched vs taped vs welded), hardware grade, printing/branding, and packaging. Dry bags typically cost more than simple stuff sacks because waterproof seams and closures demand more control. The best cost strategy is to standardize components, simplify parts, and protect performance where it matters (seams, closure, abrasion zones) instead of cutting corners that trigger returns.
When ask “How much does it cost?” the honest answer is: it depends on what you’re promising customers. If you promise real waterproofing, your cost structure changes.
What drives cost: fabric system, coatings/lamination, hardware grade, printing/branding
Your main cost drivers usually sit in five buckets:
| Cost bucket | What makes it expensive | What you can control |
|---|---|---|
| Fabric system | laminates, TPU coatings, premium weaves | choose tier by market |
| Construction | seam tape, welding, complex panels | simplify shape |
| Hardware | cold-resistant buckles, strong cord locks | standardize SKUs |
| Branding | big prints, multiple placements | fewer placements, smarter design |
| Packaging | sets, inserts, hangtags | upgrade after validation |
A common sourcing mistake is spending on branding and under-spending on seam quality. Customers will forgive a simple look. They won’t forgive wet gear.
Price differences by type (dry bag vs packing cube vs bear bag)
Different types have different “non-negotiables”:
- Stuff sack: cost is mostly fabric + sewing.
- Packing cube: zippers and structure add cost; zipper quality matters.
- Mesh bag: cheaper, but seam strength must handle wet, heavy gear.
- Dry bag: closure + seam control often dominate cost.
- Bear/food bag: fabric strength, closure reliability, and hang points matter.
So if you want a price-friendly product line, mix types: one premium dry bag in the set, plus lighter organizers.
How to hit a target price without killing durability
Good cost engineering is not “cheaper everything.” It’s “cheaper where it doesn’t hurt.”
Smart reductions:
- reduce panel count (fewer seams = fewer failure points),
- standardize buckles and cord locks,
- limit colorways in the first order,
- keep branding to one main placement,
- package as a simple set, then upgrade.
Bad reductions (usually lead to returns):
- lowering zipper grade on cubes,
- weak buckles on roll-top closures,
- thin fabrics in abrasion zones,
- inconsistent seam sealing.
Cost-control vs performance: where brands should NOT cut corners
Here’s a quick “don’t cut here” list:
- closure reliability (roll-top stiffener, buckle strength)
- seam strategy for any product called waterproof
- corner abrasion zones
- cord lock stability (slipping locks ruin usability)
If your goal is a stable private label program, the cheapest unit price is rarely the best deal. A slightly higher-spec product that avoids refunds often wins on total profit.
If you’d like accurate OEM pricing guidance, send your target market, set configuration (how many bags per set), and performance claims to info@jundongfactory.com. We’ll suggest a cost structure that matches your positioning.
How are hiking gear storage bags made? (Factory manufacturing process)
Factory manufacturing follows a controlled route: material inspection → cutting → printing/branding → assembly/sewing → seam treatment (if needed) → hardware install → in-line QC → final inspection → packing. The key difference between “cheap sacks” and reliable products is process control: BOM lock, seam/closure standards, and QC checkpoints that prevent sample-to-bulk drift. For dry bags, seam method and closure build are the most critical steps.
This is where B2B should pay attention. Two bags can look similar in photos but behave totally differently in the field because the manufacturing route and QC discipline are different.
How Are Hiking Gear Storage Bags Manufactured? (Factory process explained)
A clean factory process isn’t complicated—it’s consistent. Here’s a simple process flow you can use in internal planning:
- Incoming material inspection (fabric, coating, mesh, webbing, buckles, zippers)
- Cutting (manual or automated; controls size consistency)
- Branding (printing, label sewing, patches)
- Assembly (sewing, binding, reinforcement)
- Seam treatment (taping/sealing/welding if required)
- Hardware installation (buckles, cord locks, stiffeners)
- In-line QC (critical checkpoints during assembly)
- Final inspection (measurements + function checks)
- Packing (shape protection, set collation, carton marks)
For “set products,” packing is a bigger deal than people expect. Mixing sizes incorrectly is a common warehouse complaint.
Material inspection → cutting → printing/branding → sewing/assembly
A reliable factory checks materials before cutting. If coatings are inconsistent, or mesh has weak edges, the bag will fail later.
Cutting controls:
- dimensions,
- panel symmetry,
- repeatability.
Branding should be scheduled before final assembly when possible, because late-stage printing increases rejection risk and slows output.
Assembly rules matter:
- stitch density standards,
- reinforcement placement (handle roots, hang loops),
- zipper-end reinforcement (for cubes).
Waterproof build steps (seam treatment, roll-top reinforcement, leak-risk control)
If the product is marketed as a dry bag or high water protection, the critical steps are:
- seam strategy (taped, sealed, or welded),
- roll-top stiffener placement,
- buckle installation alignment,
- closure function checks.
Leak risk control is about consistency:
- no missed seam sections,
- no contamination on sealing surfaces,
- controlled fold lines and reinforcement mapping.
In-line checks that prevent “sample vs bulk” drift
Bulk drift usually happens because:
- components are substituted,
- operators interpret sewing routes differently,
- seam allowances change slightly,
- different batches behave differently.
So the solution is simple but strict:
- BOM lock with component codes and photos,
- “golden sample” reference,
- in-line QC checkpoints.
Here’s a practical checkpoint table:
| Checkpoint | What QC checks | What it prevents |
|---|---|---|
| After cutting | panel size & symmetry | size inconsistency |
| After branding | placement & adhesion | crooked logos, peel risk |
| During sewing | stitch density, reinforcement | seam pops, loop tears |
| After seam treatment | coverage completeness | hidden leaks |
| Final | function + measurement | returns and complaints |
Final inspection + packing logic (shape protection, carton marks)
Final inspection should match real use:
- drawstring pull test,
- buckle function test,
- zipper run test,
- roll-top seal check.
Packing logic should protect products and reduce warehouse confusion:
- each size labeled clearly,
- set collation verified,
- carton marks include SKU/color/qty.
If you’re sourcing for retail or programs, ask for simple documentation: QC report template + packing spec sheet. It makes reorders cleaner and reduces misunderstandings.
If you’re planning an OEM/private label hiking storage bag program, send your reference images and target performance level to info@jundongfactory.com. We can propose a sampling route (prototype → revisions → PP sample) and a QC plan that protects repeatability.
How to choose a hiking gear storage bag manufacturer? (OEM/ODM checklist)
The best manufacturer is the one whose process control matches your claims: consistent materials, stable cutting/sewing routes, reliable seam strategy (taped/welded where needed), and a QC system that prevents sample-to-bulk drift. Verify capability with documents (BOM, spec sheet, QC plan), real production evidence, and a repeatable sampling route. For “true dry bags,” prioritize factories with welded-seam capability because welding avoids needle holes and improves waterproof integrity.
Choosing a manufacturer is not about who says “we can do it.” It’s about who can do it the same way every time, with the same components, and the same checkpoints. For hiking gear storage bags, that repeatability matters because use these products in moments that punish weak builds: rain, mud, cold, sand, rough pack interiors, and rushed camp routines.
What type of manufacturer do you actually need: OEM, ODM, or mixed?
Ask yourself: Do you already have a design, or do you need the factory to develop it?
- OEM (you provide the design/spec): best when you have clear requirements and want tight brand control.
- ODM (factory develops based on your brief): best when you want speed and the factory has proven patterns and sizing systems.
- Mixed (common in reality): you pick a proven base + customize size set, branding, and materials.
For most private label programs, “mixed” is practical: it reduces development risk and still keeps your branding distinct.
Which capabilities matter most for this category?
A real “gear storage bag manufacturer” should show capability across:
- Pattern & sizing system design (not random sizes)
- Material system handling (coatings/laminates, mesh edge stability)
- Closure builds (roll-top reinforcement, zipper-end stress control)
- Waterproof seam strategy (only if you claim waterproof)
- In-line QC discipline (not only final inspection)
For “dry bags,” ask about seam technology. Many sources note that welding creates continuous bonds and avoids stitch/needle holes that can compromise water integrity.
Also, outdoor brands discuss RF welding specifically as a durable process for heavy coated fabrics in dry bag construction.
What should you ask the factory to show (not just tell)?
Request evidence that is hard to fake:
- Production photos/videos of the exact seam/closure method
- BOM with component codes (buckles, webbing, cord locks, fabrics)
- Process route (cutting → branding → assembly → seam treatment → QC)
- QC checkpoint list (incoming / in-line / final)
- A defined golden sample / reference sample policy
If they can’t show a BOM or component codes, you have a high risk of “same look, different parts” in bulk.
A practical supplier scorecard (fast procurement screening)
Use a weighted scorecard to reduce emotional decisions:
| Area | What to verify | Weight |
|---|---|---|
| Claim-fit | build method matches “waterproof/water-resistant” wording | 20% |
| Materials control | fabric batch records, incoming inspection | 15% |
| Seam/closure capability | roll-top reinforcement, zipper-end control, seam method | 20% |
| QC system | in-line checkpoints + final functional checks | 20% |
| Sampling discipline | revision control, PP sample, spec lock | 15% |
| Packing consistency | set collation, labeling, carton marks | 10% |
This makes vendor discussions clearer: you’re not arguing opinions—you’re comparing proof.
The biggest red flags (why “cheap” becomes expensive)
- “Waterproof” claim but only simple stitching with no seam strategy
- No component codes (buckles/cord locks swapped quietly)
- No in-line QC (only final inspection)
- No plan to control roll-top fold zone reinforcement
- Unclear packing rules (set products easily get mixed)
If you want, send your target market, the type of set you want (dry bag + cubes + mesh, etc.), and your expected claims to info@jundongfactory.com. We’ll recommend a spec + process route that matches your positioning without creating refund risk.
Custom sampling, MOQ, and lead time: what should expect?
Expect a structured route: brief → prototype sample → revisions → PP sample (pre-production) → bulk. Sampling speed depends on how complete your brief is and whether materials/hardware are standard or custom. MOQ is usually driven by fabric minimums, colorways, printing, and packaging sets. Lead time depends on material sourcing, production capacity, and QC requirements. The fastest programs are the ones with locked BOM and clear acceptance tests.
This category is “simple” only when the brief is simple. The moment you add real waterproof claims, special coatings, welded seams, or multi-size sets, you’re managing a product system—not a pouch.
What information does a factory need to quote accurately?
If you want a fast and realistic quote, prepare:
- Type of bag (dry bag / cube / mesh / bear bag)
- Size set (liters or flat dimensions + intended contents)
- Target market (ultralight vs mainstream vs wet trekking)
- Material direction (nylon/polyester/coated/laminate)
- Closure style (roll-top, zipper type, drawstring)
- Branding (logo method, placement count, color count)
- Packaging (set collation, hangtags, polybag, insert card)
- Claim level (“water-resistant organizer” vs “dry bag for heavy rain”)
When skip claim level, quotes look cheap—then the first sample forces upgrades and the project drifts.
How long does sampling take, and what slows it down?
Sampling time is not only “factory speed.” It’s also decision speed. Typical slow points:
- waiting for special fabrics/coatings
- changing sizes after seeing a prototype
- changing closure style late (zipper → roll-top, etc.)
- adding multiple logo placements after sample #1
A clean sampling plan usually looks like:
| Stage | What you validate | Output |
|---|---|---|
| Prototype | size + basic construction | first sample |
| Revision | closure function + usability | sample #2/#3 |
| PP sample | BOM locked + QC plan | approval sample |
| Bulk | repeatability + packing rules | final production |
The best way to move faster is to treat the prototype as a test of use behavior (how people actually pack) rather than “does it look nice.”
What drives MOQ in hiking storage bags?
MOQ is rarely “just a number.” It’s driven by:
- fabric minimums per color/coating
- number of colorways in one order
- specialized hardware (custom buckles, custom zipper pulls)
- printing/branding setup
- set configuration (2pc, 3pc, 5pc kits)
If you want low MOQ, start with:
- fewer colors
- standardized buckles/cord locks
- one branding placement
- a “core set” first (validate demand), then expand.
Lead time: what’s normal, and why does it change?
Lead time depends on:
- material procurement (standard vs custom-coated)
- production complexity (more seams/panels = slower)
- seam method (taping/welding adds steps and QC)
- packaging complexity (sets require collation checks)
For waterproof products, don’t rush QC out of the schedule. Welding or seam sealing consistency is exactly where leaks happen if you push too hard. Many industry sources emphasize that welding avoids needle holes and improves watertight bonding—great for performance, but it still needs disciplined process control.
If you want a fast evaluation, email your target set configuration + claim level + reference photos to info@jundongfactory.com. We can propose a sampling route and a “spec lock checklist” to protect your timeline.
Best practices for hikers: how to pack and store gear efficiently
Use storage bags as a system: protect the sleep kit and electronics first, separate wet gear, and pack by “modules” (sleep, clothing, cook, food). The best setup is the one you can repeat when tired or in rain. In bear country, food storage rules matter—many guidelines recommend hanging food high and away from the trunk, or using bear-resistant canisters/lockers where appropriate.
This section isn’t about being “organized for fun.” It’s about making hiking easier when conditions are messy.
Who uses hiking gear storage bags, and when are they needed most?
Who uses them? Almost everyone eventually—because weather and fatigue don’t care about your packing style.
- New hikers use them to stop losing small items.
- Experienced hikers use them to protect the sleep kit and keep routines fast.
- Guides use them to standardize client kits.
- Rental programs use them to reduce missing-item losses.
When do you need them most?
- rain starts mid-day
- river crossing or packraft day
- snow melt and wet ground
- multi-day trips where damp gear accumulates
- bear country where food management becomes non-negotiable
A simple “3-bag” system that works for most people
If you want a practical setup without overthinking:
- Sleep kit bag (highest protection)
- sleeping bag/quilt + dry sleep layers
- ideally a roll-top dry bag if weather is risky
- Clothing bag (fast access)
- mid-layer, socks, rain shell
- cube or stuff sack depending on preference
- Wet-gear separator (stops contamination)
- wet socks, water shoes, rain gear
- mesh or water-resistant bag
This reduces the “domino effect” where one wet item turns into five wet items.
Pack by “modules,” not by “empty spaces”
A lot of people pack by filling gaps. That feels efficient until you need one thing and explode the whole backpack. Packing by modules means each bag has a job:
- Cook module: stove + pot + lighter + fuel
- Electronics module: power bank + headlamp + cable
- First-aid module: always in the same pocket, always easy to grab
- Food module: snacks separate from smellables (trash, toothpaste)
This is also exactly how brands can sell sets: each bag has a named role.
Bear bag basics: what to store and how to think about the “hang”
Food storage isn’t only food. Many national park and backcountry guidelines treat anything with scent—toiletries, deodorant, trash—as “store with food.”
For hanging technique, Leave No Trace’s guidance includes hanging food about 12 feet off the ground, 6 feet from the trunk, and 6 feet below the supporting limb, and it also mentions using bear-resistant canisters or lockers when available.
Different organizations and regions describe different numbers and preferred methods, so brands should avoid overpromising “bear-proof.” Instead, design for compatibility: strong hang points, reliable closure, and clear use instructions.
Dry bag closure habits that prevent user complaints
If you sell roll-top bags, teach the habit. SealLine’s guidance recommends a minimum of 3 folds/rolls to properly seal a roll-top dry bag.
That single instruction, printed clearly, can reduce “it leaked” reviews that are really “it wasn’t sealed.”
FAQ
Below are classic questions that customers and procurement teams actually ask. Each answer is written to be practical, and to help you decide what to spec, what to claim, and what to test.
FAQ 1 — What is a hiking gear storage bag, and is it different from a dry bag?
Yes—a hiking gear storage bag is a broad category that includes organizers (stuff sacks, packing cubes, mesh bags) and protection bags used inside or alongside a backpack. A dry bag is a specific type of storage bag designed to keep contents dry in wet conditions. The difference isn’t the name; it’s the construction and the claim. If a product is marketed as “waterproof,” customers expect it to survive heavy rain and repeated exposure. That requires a closure system (commonly roll-top) and a seam strategy that reduces leak paths. Organizers can be water-resistant and still be great—especially for packing speed and gear separation—but they should not be sold as “true dry bags” unless the build supports it. For brands, the safest approach is to define the use case clearly: “organizer for inside-pack use” vs “dry bag for wet trekking days,” and then match the BOM and QC checks to that promise.
FAQ 2 — Which type of hiking gear storage bag sells best for private label brands?
The best-selling lineup is usually a system set, not a single bag—because customers don’t buy “a bag,” they buy a solution. A common high-conversion set is: (1) one roll-top dry bag (sleep kit protection), (2) one fast-access cube (clothing or small items), and (3) one wet-gear separator (mesh or water-resistant pouch). This set works for weekend hikers, backpackers, and guided trips, so your market is wider. For retail, sets reduce decision fatigue: customers understand roles quickly. For OEM cost control, sets allow you to standardize buckles and fabrics across multiple SKUs and still present “variety” through size and labeling. The key is to avoid fake differentiation (too many pockets, too many panels). Keep roles clear, size labels obvious, and claims honest. That’s what protects reviews and repeat orders.
FAQ 3 — What materials are best for hiking gear storage bags?
“Best material” depends on the job. For basic organization, durable nylon or polyester works well because the bag mainly faces abrasion and handling. For serious water protection, you need a material system that supports waterproof seams and a reliable closure. Dyneema Composite Fabric (DCF) is widely described as a waterproof laminate (Dyneema fibers sandwiched between thin films), valued for strength-to-weight but more vulnerable to abrasion—so it’s great for ultralight sacks when used thoughtfully.
For coated fabrics and heavier dry bags, welded seams (RF/heat welding) are often used because they avoid needle holes and create continuous bonds.
For private label programs, don’t choose material from marketing words alone. Choose by scenario: wet trekking, dust, cold, rough handling, and expected price tier.
FAQ 4 — How much does a hiking gear storage bag cost to produce (OEM)?
Cost is driven by what you’re promising. A simple stuff sack is mostly fabric + sewing. A structured cube adds zippers and more sewing time. A true dry bag adds closure reinforcement and a seam strategy (taping or welding), plus additional QC checks. In other words, price isn’t only “fabric cost”—it’s also process cost. A practical way to plan is to lock your claim level first: water-resistant organizer vs dry bag for heavy rain. Then the factory can recommend the right seam method and hardware grade. For cost control, standardize components across the set: one buckle style, one cord lock style, shared webbing widths. Also reduce colorways in the first order and limit logo placements. The biggest “false savings” are cheap zippers, weak buckles, and inconsistent seam treatment—those savings often come back as returns and warranty replacements.
FAQ 5 — How do I know if a dry bag is truly waterproof?
“Waterproof” should be proven by construction and checks—not just a fabric label. The weak points are usually seams and closures. Many industry sources explain that welding can eliminate needle holes and create continuous waterproof bonds in thermoplastic-coated fabrics, which is why RF/heat welding is widely used in waterproof products.
For roll-top bags, user technique matters too: SealLine recommends a minimum of 3 rolls/folds for proper sealing.
From a B2B standpoint, define a simple pass/fail test in your sampling stage (e.g., controlled water-hold or leak check) and repeat that check during production. If your supplier can’t describe their seam method, closure build, and QC checkpoints clearly, that’s a warning sign. The best waterproof product is the one where engineering and marketing use the same definition of “waterproof.”
FAQ 6 — Hiking gear storage bag vs backpack: do customers still need both?
Yes, because they solve different problems. A backpack is a carry system—frame, straps, load transfer, comfort. A storage bag is an internal system—protect, separate, and speed up access. Customers buy both when they’ve experienced the pain of wet gear or packing chaos. Even minimalist hikers often use at least one “pack liner” or dry bag for the sleep kit because that’s the most failure-sensitive gear. Brands should position storage bags as “the inside system” rather than as a replacement for a backpack. This also reduces returns: if you market a storage bag like it should carry weight externally, customers will misuse it and complain about durability. The highest conversion messaging is simple: “Keep your sleep kit dry, keep wet gear separate, find things fast.” That’s what customers understand.
FAQ 7 — What size set should I offer for retail or Amazon sales?
A strong starter set is typically 3–5 pieces because it feels like a “system” without overwhelming. The key is role-based sizing, not random liters. Offer one larger bag for sleep kit/clothing, one medium for layers or cook kit, and one small for electronics/first aid. Add a mesh separator if your market includes water exposure. For Amazon and retail, clear size labeling is part of the product—customers hate guessing. Include a printed usage chart on the insert card (“Sleep Kit / Clothing / Electronics / Cook Kit”). For private label, keep the first set conservative: fewer colors, standardized hardware, and one logo placement. Once reviews confirm market fit, expand sizes or add premium materials for upsell.
FAQ 8 — How should we write product claims to reduce returns?
Use claim language that matches build method. If the bag is stitched and not seam-treated, call it water-resistant and position it as an organizer for inside-pack use. If it is a roll-top bag with a seam strategy designed for wet conditions, position it as a dry bag for rain and water exposure. Avoid words like “submersible” unless your construction and testing truly supports it. A lot of return pain comes from expectation mismatch, not physical defects. Also include one simple “how to use” instruction (roll-top technique, what the bag is for). SealLine’s minimum roll guidance is a good example of a small instruction that prevents “leak” complaints caused by under-rolling.
Honest claims protect reviews, and reviews protect repeat orders.
FAQ 9 — What QC checkpoints matter most for mass production?
For these products, QC should focus on repeatability: cutting accuracy, seam consistency, closure function, and set collation. A practical checkpoint list includes: (1) incoming material inspection (fabric and hardware match BOM), (2) post-cutting measurement checks, (3) in-line sewing checks (stitch density, reinforcement placement, zipper-end finishing), (4) seam treatment checks (coverage completeness for taped/welded areas), and (5) final functional checks (zipper run, buckle strength, roll-top seal function). For sets, add a packaging checkpoint to prevent mixed sizes. The biggest bulk problems are usually “small drifts” that don’t look dramatic in photos but cause complaints in use: slightly shifted logo placement, weaker substitute buckles, or inconsistent seam treatment.
FAQ 10 — Bear bags: what do customers expect, and what should we avoid claiming?
Customers expect a bear/food bag to help them store food and smellables responsibly, but the “right method” varies by region and land manager. Many guidelines treat toiletries and trash as smellables to store like food.
Leave No Trace provides a commonly cited hang guideline (about 12 ft off the ground, 6 ft from trunk, 6 ft below the supporting limb) and also notes bear-resistant canisters or on-site lockers as options.
So the safest brand approach is: don’t claim “bear-proof.” Instead, claim compatibility: strong hang points, durable fabric, reliable closure, and clear user instructions. Also consider that some areas require canisters rather than hangs—so your product should be positioned as part of a responsible food storage system, not a universal solution.
FAQ 11 — How do we reduce “sample approved but bulk feels different” risk?
Control comes from documentation and checkpoints. Lock the BOM (fabric, buckles, webbing, cord locks, zipper model), keep a golden sample, and require the factory to use component codes in production records. Then set in-line QC checkpoints that verify the things customers notice: hand-feel, thickness, seam stiffness, zipper smoothness, buckle function, roll-top alignment. Bulk drift usually happens when a factory substitutes a similar-looking part or when different operators interpret sewing routes differently. Prevent that by using photos in the spec pack, defining seam allowances, and requiring PP samples before full production. It’s not “extra paperwork”—it’s how you protect reviews and reorder stability.
FAQ 12 — What’s the best way to start a private label hiking storage bag program with low risk?
Start with a risk-reduction pilot, not a huge SKU explosion. Pick one core set configuration and one target market. Keep colors simple, standardize hardware, and use one branding placement. Validate: (1) closure behavior, (2) seam durability, (3) packing logic, and (4) customer comprehension (do understand what each bag is for?). Then scale. If you want to compete on value, invest in the parts that prevent returns: reliable zippers, strong buckles, and honest claim language. If you want to compete on premium, invest in better materials and more consistent seam strategy—but still keep the SKU system clean. If you share your target price tier, channel (retail/Amazon/program), and required performance level, we can propose a sampling route and spec pack. Email info@jundongfactory.com.
Let's work together
With over 10 years of OEM/ODM bag industry experience, I would be happy to share with you the valuable knowledge related to leather products from the perspective of a leading supplier in China.

Factory catalogue
Latest blogs
Make A Sample First?
If you have your own artwork, logo design files, or just an idea, please provide details about your project requirements, including preferred fabric, color, and customization options, we’re excited to assist you in bringing your custom bag designs to life through our sample production process.