 Skip to content
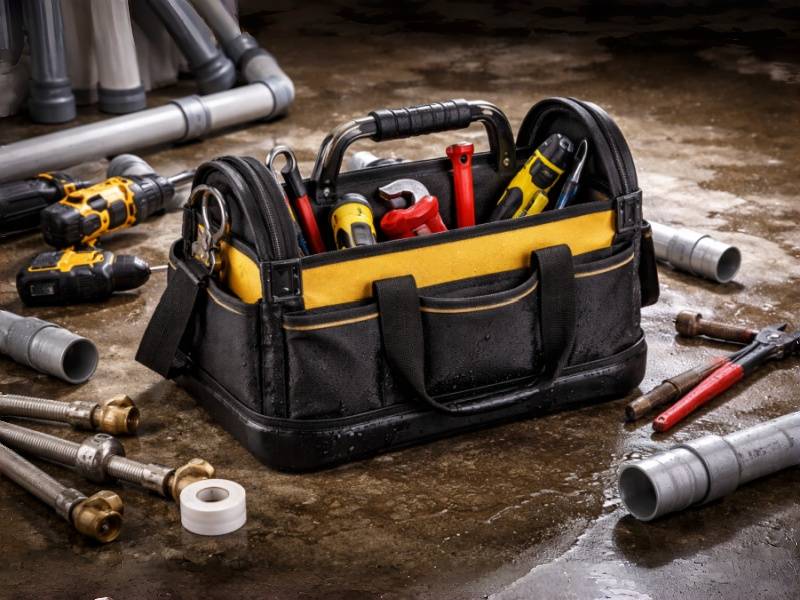
Plumbing work is hard on bags. Tools are heavy. Floors are wet. Service calls are fast. A bag may be set down on concrete, tile, mud, a wet van floor, or inside a dark cabinet where water has already pooled. That is why many tool bags fail long before the fabric itself looks worn out. The weak spot is often not the body panel. It is the bottom structure, the seam path, the zipper area, the edge construction, or the way the bag handles tool weight after repeated exposure to moisture.
A lot of people still treat waterproofing as a fabric choice alone. That is too narrow. In real plumbing use, a bag does not stay dry because the fabric has a coating. It stays usable because the full structure works together: raised base, reinforced corners, controlled seam layout, moisture-resistant trims, stable compartments, and a shape that does not collapse when the bag is loaded with metal tools. A tool bag that only looks rugged in a studio photo is not enough. The real test is whether it keeps tools cleaner, drier, easier to reach, and safer to carry after months of field use.
A waterproof structure for plumbing tool bags is not just a waterproof fabric shell. It is a coordinated build system that uses a water-resistant outer material, a protective base, controlled seam construction, reinforced stress zones, and closure details that reduce water entry during daily service work. For plumbing jobs, the best structure usually combines a raised molded bottom, coated or laminated fabric, protected stitching or welded sections, and an interior layout that keeps heavy tools from distorting the bag. This matters because wet floors, leaking fittings, and repeated tool weight create failure in the structure long before the bag looks old.
In other words, the smart way to think about this topic is not, “Which fabric is waterproof?” The better is, “Which structure keeps a loaded plumbing bag working in wet, dirty, high-pressure job conditions?” That shift changes how a bag should be designed, sampled, tested, quoted, and produced.
What Is a Waterproof Structure for Plumbing Tool Bags, and Why Does It Matter?
A waterproof structure for a plumbing tool bag means the bag is designed as a system to reduce water entry, resist moisture damage, and stay stable during wet service work. It usually includes a water-resistant shell, a protective bottom, reinforced seams, and closure details that keep tools off wet ground and reduce damage during daily use. This matters because plumbing bags face a mix of standing water, damp tools, dirt, metal abrasion, and repeated lifting that quickly exposes weak construction.
Many bag discussions start in the wrong place. They start with fabric. Fabric matters, but plumbing work is more structural than many people realize. A plumber may carry pipe wrenches, channel locks, test equipment, valves, fittings, tapes, sealants, gloves, and small hardware in one bag. That load is dense, uneven, and often sharp-edged. Once moisture is added, weak areas fail faster. A bag with a coated outer shell but a poor base design can still wick water upward from the floor. A bag with decent panels but exposed seams can still allow moisture into stress areas.
This is why the word structure matters so much. A proper structure considers how the bag meets the ground, how the sides hold shape, where water collects, where load pressure concentrates, and how opening-and-closing affects long-term durability. The job is not just to keep rain off the bag. The job is to keep the bag functioning after daily contact with wet and dirty work zones.
Another reason this matters is tool care. Plumbing tools are expensive. Rust does not always come from total soaking. It can come from repeated exposure to a damp interior, wet bottoms, trapped moisture, or slow seepage through the wrong seam line. That is why a better bag can protect both the equipment and the work rhythm. The user does not just want a bag that survives. The user wants a bag that helps them move faster and stay organized without carrying a rigid hard case into every tight job site.
For companies developing a branded tool bag line, this is also a trust issue. End users quickly notice whether a bag feels thought through. A wet, sagging, unstable bag sends the wrong signal. A well-built one suggests field knowledge. If you are planning a custom plumbing tool bag project and want to translate real service conditions into a workable bag structure, Jundong can review your concept and support sample development at info@jundongfactory.com.
Which Types of Waterproof Plumbing Tool Bags Are Most Common?

The most common options are open-top tool totes, zip-top tool bags, and tool backpacks with waterproof bottoms. For plumbing work, no single type is always best. The right choice depends on tool mix, jobsite access, carry style, and how often the bag is set on wet ground. Open-top styles give faster access, while zip-top and backpack structures usually give better weather and spill protection.
The first common type is the open-top tool tote. This style is popular because tools are easy to see and grab. For a service plumber moving in and out of homes or job sites, that speed matters. But open-top does not mean careless design. A serious version can still include a molded waterproof base, elevated interior floor, reinforced side walls, and drain-aware compartment layout. The weakness is obvious: the upper opening is more exposed. So this style works best when speed matters more than full closure, and when the base and side protection are strong enough to compensate.
The second type is the zip-top tool bag. This structure gives better control over water splash, dirt, and transport movement. It also reduces the chance of tools falling out in vehicles. For crews that move between multiple sites or store the bag in damp service vans, zip-top designs can be a safer option. The problem is that a zip-top can become frustrating if the opening is too narrow or if the zipper path interferes with oversized tools. Good design solves that with a wide-mouth frame, protective zipper cover, and strong opening geometry.
The third major type is the tool backpack. This is often useful when the user climbs stairs, ladders, or carries equipment over longer distances. A backpack structure also supports better weight distribution. In plumbing work, though, the real challenge is not the shoulder straps. It is the lower body. If the base is weak, the bag may absorb moisture every time it is placed on the ground. So the best waterproof backpack designs usually rely on a hard or semi-rigid molded base, stable center of gravity, and compartments that prevent heavy tools from shifting.
Here is a simple comparison:
| Type | Best Use | Main Strength | Main Risk |
|---|---|---|---|
| Open-Top Tote | Fast service access | Quick tool visibility | More exposed upper opening |
| Zip-Top Tool Bag | Mobile service, van storage | Better closure protection | Slower access if opening is narrow |
| Tool Backpack | Stair work, longer carry | Better weight distribution | Needs very strong waterproof base |
There is also the tool bag vs tool box decision. A rigid box may resist water better in some situations, but it can be heavier, harder to fit under sinks, and less adaptable in tight residential work. A well-designed soft-sided bag can often serve the plumber better, provided the structural waterproofing is real, not cosmetic.
How Is a Waterproof Plumbing Tool Bag Built?
A waterproof plumbing tool bag is usually built by combining a coated or laminated outer shell, a raised or molded bottom, reinforced seams and corners, and a closure system that reduces water entry. The strongest designs protect the bag where plumbing work is hardest on it: the base, the lower side panels, the seam transitions, and the opening path.
Start with the bottom structure. This is often the true heart of the bag. Plumbing bags spend a lot of time on wet floors, unfinished concrete, tile, mud, van surfaces, and mechanical rooms. If the base is only another fabric panel, it can wear through, absorb moisture at the seam edge, and let the full bag sag. A better approach is a molded waterproof base, often with raised feet or a lifted profile. This creates separation from standing water and also improves load stability.
Then comes the panel-to-base connection. This is where many bags quietly fail. The lower edge sees flexing, dragging, impact, and repeated stress from tool weight. If the seam is exposed, moisture can work its way into stitching holes or the seam tape can separate over time. A better build may use wrapped seam placement, protected edge geometry, reinforced tape, or partial welded construction depending on the material and target cost.
The next issue is seam strategy. There is no universal winner between welded seams, taped seams, and stitched seams. Each has trade-offs. Welded seams can reduce stitch perforation and are attractive when working with suitable thermoplastic materials. Taped seams can improve certain stitched constructions, especially when combined with coated fabrics. Stitched seams still have value because they allow flexible structure, better attachment strength in some zones, and simpler repair logic. The right choice depends on the bag body, the load pattern, and how much true water exposure is expected.
The opening system matters too. A bag can have a strong body but still invite moisture through the top. Protective zipper flaps, water-resistant zipper types, structured wide-mouth openings, and raised upper panels can all help. But over-sealing the bag may reduce usability. Plumbing work needs speed. So the best result often comes from balancing access and protection rather than chasing an extreme waterproof claim.
Here is a practical structural breakdown:
| Structural Zone | What It Should Do |
|---|---|
| Bottom Base | Lift bag off wet ground and resist abrasion |
| Lower Side Panels | Prevent sagging and splash exposure |
| Corner Construction | Reduce wear concentration and seam stress |
| Opening Path | Limit water entry without slowing access too much |
| Interior Support | Keep heavy tools from collapsing the bag |
A good sample should never be judged by looks alone. It should be loaded, set on damp ground, lifted repeatedly, and checked for shape retention. That is when structural quality becomes visible.
Which Materials Are Best for Waterproof Plumbing Tool Bag Making?
The best materials usually depend on the target use, but strong options often include coated polyester, TPU-laminated fabrics, PVC-based materials, and some forms of high-denier nylon when paired with the right coating and structure. The best choice is rarely about one fabric being “the strongest.” It is about balancing water resistance, abrasion resistance, flexibility, weight, cost, and seam compatibility.
A lot of people assume higher denier automatically means better performance. That is too simple. A 1680D fabric may feel tougher than 600D or 900D, but denier alone does not explain waterproof behavior, coating performance, seam stability, or how the bag handles repeated field use. A lower denier fabric with a smarter coating and stronger base structure can outperform a heavier fabric used in the wrong build.
PVC-based materials are often chosen when strong water protection and easy wipe-clean performance matter. They can work well in bags that face dirty, wet job conditions. The trade-off may be feel, flexibility in cold conditions, or a heavier appearance depending on construction style. TPU-laminated materials are attractive when a cleaner technical finish, better flexibility, or a more premium feel is desired. They can be excellent for more advanced waterproof structures, though cost can rise. Coated polyester can be a very practical choice when the project needs cost control and balanced performance. Ballistic nylon or other higher-strength nylons can also perform well, especially when abrasion resistance is a priority, but they still depend on coating quality and structural detailing.
Material choice should also include lining, reinforcement, and base composition. A bag that carries plumbing tools needs more than a good face fabric. It may need additional bottom reinforcement, foam or board support in selected walls, moisture-tolerant lining zones, and stronger webbing or handle anchors. Even hardware matters. A waterproof body is not enough if metal parts rust quickly or if zipper teeth fail after repeated contact with wet gloves and dirty environments.
Here is a simplified comparison:
| Material Type | Good For | Watch Out For |
|---|---|---|
| PVC-Based Fabric | Strong water barrier, easy cleaning | Heavier feel, less premium in some builds |
| TPU-Laminated Fabric | Technical finish, strong moisture protection | Higher cost |
| Coated Polyester | Balanced cost and performance | Coating quality varies widely |
| High-Denier Nylon | Abrasion resistance, rugged look | Needs proper coating to resist moisture well |
How Should Waterproof Structure Match Real Plumbing Workflows?
A waterproof plumbing tool bag should match how plumbers actually move, store, open, load, and set down their tools during daily work. That means the structure must support fast access, heavy metal tools, small fittings organization, and frequent contact with wet or dirty surfaces without collapsing or slowing the user down.
This is where many products miss the mark. They look “tactical” or “heavy-duty,” but they do not reflect actual plumbing workflow. A plumber often needs a mix of large tools, mid-size hand tools, and small consumables. That means the bag must separate weight without becoming rigid and annoying. Too few compartments create clutter. Too many create wasted volume and snagging. The right layout is not the one with the most pockets. It is the one that matches the sequence of work.
Think about the job rhythm. The bag may be carried in one hand, placed beside a sink, opened quickly, and accessed while the user is kneeling or leaning into a cabinet. In that moment, opening angle, compartment visibility, base footprint, and side-wall stability matter more than visual styling. If the bag tips easily, tools spill. If the side walls collapse, small parts disappear into the bottom. If the bag cannot stand upright when partly loaded, the workflow breaks down.
Another real issue is clean-to-dirty separation. Plumbing jobs can involve wet gloves, old fittings, sealants, and residues. Some users need a bag with wet-zone tolerance or easy-clean compartments. Others need a stable base and accessible exterior loops for tools that should not be stored inside with clean items. This is not always about waterproofing alone. It is about operational logic.
A plumbing bag also needs to account for vehicle handling. The bag may live in a service van, be moved several times a day, and sit on surfaces that are not clean or dry. A better waterproof structure can reduce both moisture problems and service frustration. That is why custom development should start with a tool list and use-case map, not just a sketch.
How Long Does a Waterproof Plumbing Tool Bag Last, and What Affects Durability?
A professional plumbing tool bag should last a meaningful service cycle under daily use, but real lifespan depends less on claimed toughness and more on base design, seam protection, load distribution, hardware quality, and how well the structure fits the actual tool set. Most failures begin in stress zones, not in the middle of the fabric panel.
The first common failure is bottom fatigue. This may appear as cracking, abrasion wear, deformation, or water-related breakdown around the lower edge. The reason is simple: the base experiences ground contact, impact, dragging, and repeated loading. If the structure is weak there, the whole bag ages faster.
The second common failure is seam breakdown. Heavy plumbing tools pull outward, especially when the bag is lifted unevenly or overfilled. Add moisture, dirt, and repeated flexing, and small construction weaknesses begin to show. Corners and handle anchor zones are especially vulnerable. A bag can look fine from the front and still be close to failure where the stress is concentrated.
The third issue is closure and hardware wear. Zippers, pullers, buckles, and metal accessories do not fail all at once. They often fail slowly through friction, dirt, corrosion, and user frustration. That is why a durability review should include hardware logic, not just body materials.
A smart pre-production evaluation can reduce risk a lot. Load the bag with realistic plumbing tools. Set it on damp ground. Lift it repeatedly. Open and close it with one hand. Place it into and out of a vehicle. Observe how the base holds shape, whether the walls collapse, and whether moisture gathers where it should not. A good bag does not just survive a clean lab-style test. It stays functional during repeated messy handling.
For teams developing a new line, durability should be translated into clear sample checks and production controls before bulk work begins. That includes load condition, base wear review, stitch inspection, opening fatigue, and consistency between approved sample and production standard.
How Do Custom Waterproof Plumbing Tool Bags Go from Idea to Sample to Bulk?
The usual process starts with use-case definition, then moves into structure planning, material selection, prototype development, sample revision, and finally production preparation. The strongest projects do not begin with decoration. They begin with a realistic tool list, target use conditions, and a clear decision on what the bag must protect, carry, and endure.
Step one is defining the bag’s role. Is it for residential service plumbers, industrial maintenance crews, or retail distribution under a branded line? Is the bag meant for premium daily field use or cost-controlled promotional utility? That decision affects almost everything: body material, base structure, opening style, pocket quantity, logo method, and price direction.
Step two is tool mapping. This is where the project becomes real. What tools must fit? How tall are they? Which are heavy? Which need vertical access? Which should stay separated from fittings or sealants? A plumbing bag should not be designed like a general tote and then renamed. The load map has to come first.
Step three is the first sample. That sample should check shape, layout, carry comfort, bottom construction, and tool fit. It does not need to be perfect in cosmetic detail at first, but it must reveal structural truth. Many good projects need more than one sample round. That is normal. Especially in a waterproof structure bag, one round may expose issues in opening angle, base rigidity, zipper interference, or balance when fully loaded.
Step four is locking the final details before production work starts. This includes fabric, coating, color, base material, reinforcement, logo method, packaging, and quality checkpoints. If these details are vague, the risk of mismatch between sample and production rises sharply.
A clean custom path often looks like this:
| Stage | Main Focus |
|---|---|
| Concept Review | Use conditions, target bag type, core structure |
| Tool Mapping | Internal layout, size logic, access needs |
| Material Review | Fabric, base, trim, closure, reinforcement |
| First Sample | Shape, fit, balance, structural function |
| Revised Sample | Corrections to workflow and durability issues |
| Production Prep | Final approval, packaging, QC standard |
This stage is where many good bag projects are won or lost. A bag that performs well in the field usually comes from disciplined sample work, not guesswork.
What Affects Cost, MOQ, and Factory Selection for Waterproof Plumbing Tool Bags?

Cost is mainly affected by material choice, bottom construction, closure system, internal organization complexity, reinforcement level, logo method, and total order quantity. MOQ is influenced by structure complexity, fabric sourcing, trim customization, and whether the design uses standard components or newly developed parts.
The biggest cost driver is often the base system. A simple stitched fabric base is cheaper than a custom molded or highly reinforced waterproof bottom. But the cheaper route may not survive real plumbing use. This is why cost should be reviewed against failure risk, not just quotation totals. Spending more on the right bottom structure can reduce complaints, returns, and reputation damage later.
The second cost driver is the material package. A premium coated shell, moisture-resistant lining, stronger webbing, reinforced side support, and better hardware can all improve the bag, but they also raise total cost. That does not mean the highest-cost spec is always right. It means the bag should be built around actual use rather than vague ruggedness.
The third driver is organization complexity. More pockets, loops, dividers, panels, and structure parts mean more labor, more material handling, and more variability risk. A good plumbing tool bag should be purposeful, not overbuilt. Useful complexity is worth paying for. Decorative complexity is not.
MOQ tends to rise when the project uses unusual colors, unique trims, highly customized base parts, or new tooling. Simpler structures with standard materials usually allow more flexibility. That is why early structure decisions matter. A bag designed with realistic production logic is easier to quote, sample, and scale.
When choosing a factory for this kind of project, the best sign is not a long product list. The better sign is whether the team can discuss base construction, tool load behavior, sample revision logic, and production consistency in a practical way. If a project is reduced to fabric swatches and logo placement too early, the waterproof structure will likely be underdeveloped.
If you are comparing development options and want to review cost direction, MOQ feasibility, sample flow, or custom structure ideas for plumbing tool bags, you can reach Jundong at info@jundongfactory.com for a project-based discussion.
What Should Teams Ask Before Choosing a Waterproof Plumbing Tool Bag Partner?
Before choosing a bag development partner for a waterproof plumbing tool bag, teams should ask about base structure capability, sample revision process, material understanding, tool-load testing logic, and how production consistency is controlled after sample approval. The goal is not just to find someone who can make a bag. The goal is to find a team that understands how and why the bag may fail.
One useful is: How do you protect the lower structure? If the discussion immediately goes back to fabric thickness, that is a warning sign. The lower structure should include conversation about molded bottoms, seam placement, reinforcement strategy, and how the bag sits on wet ground.
Another strong is: How do you evaluate a sample? A serious team should talk about realistic loading, shape retention, tool access, stress review, and construction checks. A sample is not just a color preview. It is a performance review.
It also helps to ask: How do you control the transition from approved sample to production? This matters because many bag problems happen when a sample looks good but structural details shift later. The discussion should include material locking, component specification, trim confirmation, stitching control, and packaging clarity.
Lastly, ask whether the team can support the full branded program: logo execution, labeling, packaging, and export handling where needed. Plumbing tool bags may be work products, but they still represent the line behind them. A better project partner understands that field performance and product presentation are connected.
The most dependable relationships are built when both sides speak clearly about use, structure, testing, and revision early. That is when a bag stops being a generic product and starts becoming a reliable working tool.
Top FAQs About Waterproof Structure for Plumbing Tool Bags
FAQ 1: Is a waterproof fabric enough to make a plumbing tool bag truly reliable in wet working conditions?
No. A waterproof fabric alone is not enough. In plumbing work, the real issue is rarely just surface splash. The bag is usually placed on wet tile, muddy concrete, damp van floors, or leaking service areas, so the lower structure takes the hardest hit. That is why many serious tool bags rely not only on water-resistant body materials, but also on molded bottoms, impact-resistant base structures, or reinforced lower walls to protect tools from moisture and wear. Milwaukee describes its jobsite backpack with an impact- and water-resistant molded base, while Klein highlights molded bottoms and water-resistant bodies across multiple tool bag formats.
A plumbing tool bag needs to handle weight, moisture, abrasion, and repeated lifting at the same time. If the outer shell looks strong but the base seam sits directly in standing water, the bag may still fail early. If the zipper path is exposed, water can still enter from above. If the walls collapse under heavy tools, the interior becomes harder to manage, which also affects daily use.
A better way to judge a bag is to ask whether the full structure works together: base height, seam protection, closure path, tool layout, and load stability. In real use, a bag stays useful not because one material sounds tough, but because the whole build system matches the job.
FAQ 2: Which bag style works better for plumbing use: open-top tote, zip-top bag, or backpack?
The best style depends on how the tools are used, moved, and set down during the day. There is no single perfect style for every plumbing crew. An open-top tote is often better for quick access. A zip-top bag gives better closure and cleaner transport. A backpack can work well when the user climbs stairs, ladders, or carries gear longer distances. The more important issue is whether the chosen style has the right water-resistant lower structure and enough internal support for heavy plumbing tools.
Klein’s tool backpack line shows how this logic works in practice. Some styles focus on full-opening zipper access, while others emphasize hard molded bottoms, multiple pockets, and stronger upright structure. Veto’s tool backpack messaging also emphasizes vertical storage, hands-free carry, and a base that doesn’t tip over, which reflects a real jobsite need rather than a cosmetic feature.
For plumbing use, the style decision should start with workflow. If a technician needs to reach tools quickly in tight spaces, an open-top tote with a strong waterproof base may be more practical. If the bag rides in a van and needs cleaner closure, a zip-top layout may be safer. If mobility matters more than speed of access, a backpack may be the better route.
So the real choice is not just tote vs backpack vs zip-top. It is which structure supports the actual service routine without making access, balance, or moisture exposure worse.
FAQ 3: What is the most important structural area in a waterproof plumbing tool bag?
The base is usually the most important structural area. In plumbing work, the bottom of the bag takes direct contact with water, dirt, abrasion, and impact almost every day. That is why the lower build often matters more than the upper shell. A strong bag can still fail early if the base is too soft, too flat, or poorly connected to the body panels.
This is not just theory. Major trade-tool brands repeatedly highlight the lower structure in their product descriptions. Milwaukee refers to an impact- and water-resistant molded base. Klein frequently mentions durable molded bottoms and, in one tote style, even includes drain holes to prevent water retention. These features matter because they deal with the exact problem plumbers face: the bag sits in bad places, and the ground is often less forgiving than the rain.
A good lower structure should do four things well:
| Base Function | Why It Matters |
|---|---|
| Lift the bag off wet ground | Reduces direct water contact |
| Resist abrasion and impact | Extends working life |
| Support heavy tool weight | Prevents sagging and distortion |
| Protect seam transitions | Reduces early failure at edges |
If a bag project is being developed for custom use, the first sample should always be judged with real tools inside and with the bag placed on damp, rough surfaces. Many weak structures still look acceptable when empty.
FAQ 4: Which materials are usually better for waterproof plumbing tool bags: PVC, coated polyester, TPU, or ballistic nylon?
The better material depends on the job, because no single material wins in every category. For plumbing tool bags, material selection should balance moisture resistance, abrasion resistance, structure support, flexibility, cleaning ease, and cost control. That means the right choice is rarely about one fabric sounding more “heavy-duty.” It is about how the material works with the base, seams, pocket layout, and the weight of the tools.
In the current trade-tool space, 1680D ballistic weave materials appear often in backpack and tool bag products from brands like Klein, usually paired with molded bottoms rather than used alone. Milwaukee also combines 1680D fabric with a molded water-resistant base, which suggests that high-denier fabric is being used as part of a system, not as the only defense.
A simple comparison looks like this:
| Material | Common Strength | Watch-Out Area |
|---|---|---|
| PVC-based material | Strong moisture barrier, easy cleaning | Heavier feel |
| Coated polyester | Balanced cost and performance | Coating quality varies |
| TPU-laminated material | Good technical finish and flexibility | Higher cost |
| Ballistic nylon | Strong abrasion resistance | Needs coating support for moisture control |
For plumbing use, the shell material should never be selected by fabric name alone. The same fabric can perform very differently depending on coating quality, seam handling, reinforcement method, and base design. That is why material review should happen together with structural review, not as a separate decision.
FAQ 5: How can a brand or tool program check whether a sample is truly ready for bulk production?
A sample is ready only when it proves structure, access, balance, and moisture handling under realistic use—not when it simply looks good on a table. For a plumbing tool bag, visual approval is never enough. The bag has to be loaded with actual tools, opened repeatedly, carried in different ways, and placed on damp or dirty surfaces to show how the build behaves under pressure.
A useful sample review should cover more than color, logo, or pocket count. It should check whether the bag still stands upright when partly loaded, whether the base twists under uneven weight, whether long tools interfere with zipper movement, and whether small fittings fall into unusable corners. This is especially important for waterproof structures, because the biggest problems often show up at the bottom edge, seam transitions, opening path, and handle anchor zones.
A practical review checklist may look like this:
| Sample Check | What to Observe |
|---|---|
| Base Contact Test | Does the lower structure stay stable on wet ground? |
| Load Test | Does the bag hold shape with real plumbing tools inside? |
| Access Test | Can tools be reached quickly without collapse or snagging? |
| Moisture Review | Are the lower seams and openings exposed too easily? |
| Carry Test | Do the handles, straps, and balance feel right when fully loaded? |
A strong custom project usually needs at least one serious review round focused on actual job use. Rushing from a pretty sample to bulk work often causes the same complaints later: base wear, seam stress, poor access, and shape loss. That is why the smartest teams treat the sample as a working test piece, not a display piece.
FAQ 6: What usually affects MOQ for a custom waterproof plumbing tool bag?
MOQ is usually driven less by the bag category itself and more by how custom the structure becomes. A simple tool bag with commonly available fabrics, standard trims, and a familiar base shape is usually easier to launch at a lower quantity. But once the project moves into special molded bottoms, custom color matching, uncommon waterproof materials, unique zipper systems, branded hardware, or fully new internal layouts, the starting quantity often rises because material sourcing, setup time, and production control become more demanding.
This is especially true for plumbing tool bags because they are not light-duty promo items. They often need heavier body materials, more reinforcement, stronger handle attachment, and a lower structure that can survive wet floors and tool weight. Product examples from Milwaukee and Klein show how much structure matters at the lower body. Milwaukee’s jobsite backpack highlights an impact- and water-resistant molded base, while Klein’s Tradesman Pro backpack uses a hard molded polypropylene bottom and water-resistant 1680d ballistic weave material. Those kinds of details are not just styling choices. They change sourcing, assembly, and consistency control.
A practical way to think about MOQ is this:
| Project Type | MOQ Tendency | Why |
|---|---|---|
| Standard structure + stock materials | Lower | Easier sourcing and faster setup |
| Semi-custom structure + changed layout | Medium | More sampling and process control |
| Custom molded base + special trims | Higher | New tooling, tighter consistency needs |
So when someone asks, “Why can’t this start at the same quantity as a basic tote bag?” the honest reason is that a waterproof plumbing tool bag is a structural project, not just a cut-and-sew bag with a logo added. The more the lower body, reinforcement method, and trim package move away from standard components, the more the starting quantity tends to move upward.
FAQ 7: How many sample rounds are normal for a waterproof plumbing tool bag?
Two to three serious sample rounds is often normal for a well-developed waterproof plumbing tool bag, especially when the structure is new. One round may be enough for a simple item, but for a plumbing tool bag with a molded lower section, heavy-duty pocket arrangement, protected opening path, and real load-bearing demands, expecting everything to be perfect in one sample is usually unrealistic.
The first sample should mainly prove size, shape, access, and structural direction. At this stage, the most useful feedback is not cosmetic. It is practical. Does the bag stand properly? Does the base twist when loaded unevenly? Do long tools block the opening? Do the side walls collapse too easily? These are the kinds of issues that often show up only when real tools go inside.
The second round usually refines the details that make the bag truly usable: pocket depth, divider spacing, handle placement, zipper travel, strap comfort, and lower edge protection. If the project includes special waterproof features or a newly developed base, this round is often where the structure becomes noticeably better.
A third round is not a failure. In many cases, it is the sign of a serious project. It gives the team time to lock down the differences between “looks acceptable” and “works properly in the field.” This is especially important when the bag is meant to support a professional tool line, because plumbing users notice small frustrations quickly.
A useful way to review sample rounds is:
| Sample Round | Main Goal |
|---|---|
| Round 1 | Prove structure, shape, and tool fit |
| Round 2 | Fix access, balance, and construction details |
| Round 3 | Finalize durability, finish, and repeatability |
The more functional the bag, the less helpful it is to rush. A bag that gets approved too early may still look rugged, but later create complaints around base wear, poor access, unstable shape, or awkward carry behavior.
FAQ 8: Are welded seams always better than stitched seams for a waterproof plumbing tool bag?
No. Welded seams are not always better. They can be very useful in some waterproof structures, especially when paired with the right thermoplastic materials, but a plumbing tool bag carries heavy metal tools, sharp edges, uneven weight, and repeated lifting stress. In that kind of product, seam choice should be based on both water control and load performance, not on waterproof language alone.
A welded seam can reduce stitch perforation and may help in areas where direct moisture exposure is more likely. That sounds attractive. But a tool bag is not a rain poncho or a light-duty dry pouch. In a working tool bag, some zones need to handle pull force, abrasion, repeated flexing, and dimensional stability. In those areas, a properly engineered stitched seam, especially when protected by layout, overlap, reinforcement, or seam covering, may perform better over time.
The better view is to stop treating this as welded vs stitched in a simplistic way. A stronger plumbing tool bag often uses a hybrid structure. One area may benefit from stitched strength. Another area may benefit from seam shielding or a different material transition. The lower body and the opening path should not be judged by the same rule if their load patterns are different.
This is also why material selection matters so much. Milwaukee and Klein both emphasize molded lower structures together with rugged woven body materials, which suggests that the strongest real-world solution is often not “seal every seam,” but rather protect the high-risk zones with the right structure and material pairing.
So the better is not, “Are welded seams better?” The better is, “Which seam method makes sense for each area of this bag once weight, access, moisture, and wear are all considered together?”
FAQ 9: How can we judge durability before placing a bulk order?
The best way to judge durability is to test the bag as a working tool bag, not as a display sample. That means using real plumbing tools, realistic load weight, repeated lifting, wet-surface contact, and actual access behavior. A bag that looks excellent on a clean table may still fail quickly once it is loaded with wrenches, fittings, cutters, meters, sealants, and small repair items.
The first thing to look at is whether the base stays stable and upright under real weight. Milwaukee describes its molded base as protecting contents and helping the backpack stand up, while Klein highlights a curved, fully molded bottom designed to protect contents from the elements. Those details matter because a bag that cannot stay stable under load becomes harder to use and more likely to wear unevenly.
The second thing to review is stress concentration. This usually appears at:
- handle anchor areas
- top opening corners
- lower side-to-base transition
- exterior pockets that carry metal tools
- zipper entry and exit
The third thing is workflow durability, which many teams forget. A bag may survive a short strength test and still perform badly in daily service. For example, if the opening is too narrow, users will force tools in and out. If the dividers are too soft, heavier tools will deform the interior. If the base is stable but too heavy, the bag may be avoided altogether. Durability is not only about not breaking. It is also about staying practical after repeated use.
A smart pre-bulk review may include:
| Durability Check | What It Reveals |
|---|---|
| Loaded carry test | Handle strength, weight balance, wall collapse |
| Wet-floor placement test | Base protection, seam exposure, stability |
| Repeated open-close test | Zipper path stress and access comfort |
| Pocket loading test | Divider behavior and tool retention |
| Van in/out handling test | Real transport wear and impact risk |
The more realistic the test, the more useful the result. Bags rarely fail because they were never lifted. They fail because they were lifted badly, overloaded unevenly, dropped wet, and used in a hurry.
FAQ 10: Why can two plumbing tool bags that look similar have very different prices?
Because what looks similar on the outside can be very different inside the structure. Two plumbing tool bags may appear close in shape, size, and even material description, but one may include a far stronger lower build, better reinforcement, a more stable opening system, and a much more thoughtful internal layout. Those hidden differences change both cost and long-term value.
The lower body is often the clearest example. A simple flat fabric bottom and a hard molded water-resistant base do not cost the same, and they do not perform the same either. Milwaukee specifically highlights an impact- and water-resistant molded base, while Klein lists a hard molded polypropylene bottom plus durable water-resistant 1680d ballistic weave material. Those are not small upgrades. They affect tooling, assembly method, weight support, and how consistently the bag performs once loaded with real tools.
Other price differences often come from:
- body material grade and coating quality
- zipper type and opening design
- number and complexity of internal dividers
- reinforcement at handles, corners, and pocket edges
- base height, shape, and stiffness
- branding method and packaging requirements
A simple comparison helps:
| Cost Driver | Lower-Cost Direction | Higher-Cost Direction |
|---|---|---|
| Base structure | Flat stitched bottom | Molded protective base |
| Body material | Standard coated fabric | Heavier technical material |
| Interior layout | Simple compartments | Structured, tool-specific organization |
| Opening system | Basic zipper or open top | Wide-access, reinforced opening path |
| Brand details | Basic print label | Custom trims, molded logos, special packing |
That is why quoting this kind of product should never stop at “same size, same fabric.” In plumbing use, the hidden structure often decides whether the bag feels cheap after three months or keeps performing much longer.