 Skip to content
Staying properly hydrated is the linchpin of any outdoor adventure—whether you’re hiking a rugged mountain trail, cycling thousands of miles, or simply exploring your favorite city on foot. Traditional water bottles can slow you down: you have to stop, fish out the bottle, open it, drink, reseal it, and tuck it away again. Enter the hydration pack backpack, a game‑changing piece of gear that integrates your water reservoir directly into your pack, allowing hands‑free, on‑the‑move drinking through a simple hose and bite valve.
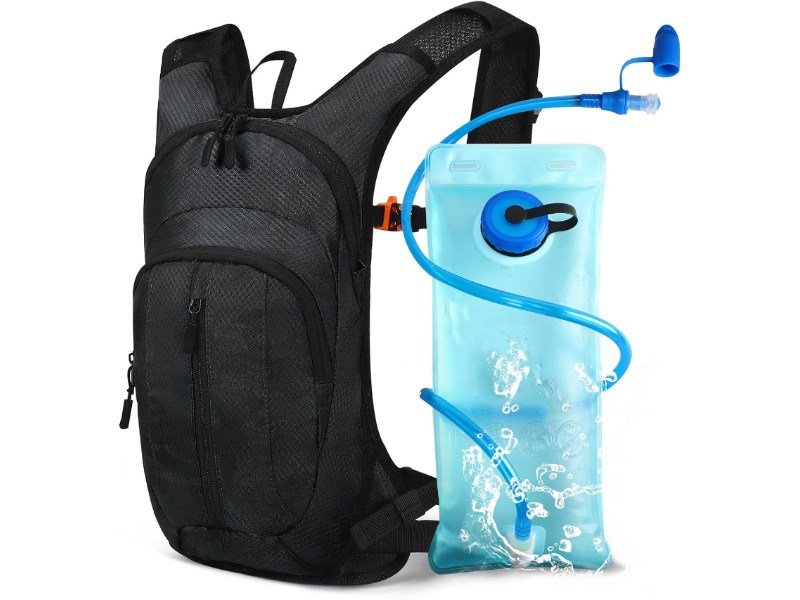
A hydration pack backpack is a specialized pack featuring an integrated flexible water reservoir (1–3 L), a drinking tube routed over the shoulder, and a bite‑valve mouthpiece for hands‑free hydration. These packs use leak‑proof materials and secure seals to deliver water on demand, keeping you fueled during high‑intensity activities. Unlike standard backpacks, they combine storage space with a convenient drinking system, making them essential for outdoor performance and safety.
Last summer, I watched a group of marathon runners breeze past water stations, sipping seamlessly from their packs without breaking stride. Meanwhile, my friends and I fumbled with bulky bottles, losing momentum—and morale—at every stop. Let’s dive into why hydration pack backpacks are essential gear, what makes the best models stand out, and how to choose, care for, and even customize one that’s perfect for your next expedition.
What Is a Hydration Pack Backpack and How Does It Work?
A hydration pack backpack is a backpack with a built‑in water bladder (reservoir) connected to an insulated tube and bite valve. You fill the reservoir up to 1–3 L, secure it in a designated sleeve inside the pack, route the tube through shoulder‑strap ports, and drink on demand without pausing your activity. High‑quality packs use leak‑proof, BPA‑free materials and secure closures to ensure reliable, hygienic flow.
Hydration packs revolutionize how athletes and adventurers manage fluid intake:
- Reservoir Design & Materials Capacities: Standard bladders hold 1 L, 1.5 L, 2 L, or 3 L of water. Smaller reservoirs suit short runs, larger ones cover multi‑hour treks. Material: Most are made from thermoplastic polyurethane (TPU) or polyethylene, both BPA‑free, odorless, and flex‑resistant. Shape & Sleeve: Reservoirs are slim to lie flat against your back; a dedicated hydration sleeve inside the pack prevents sloshing and stabilizes weight.
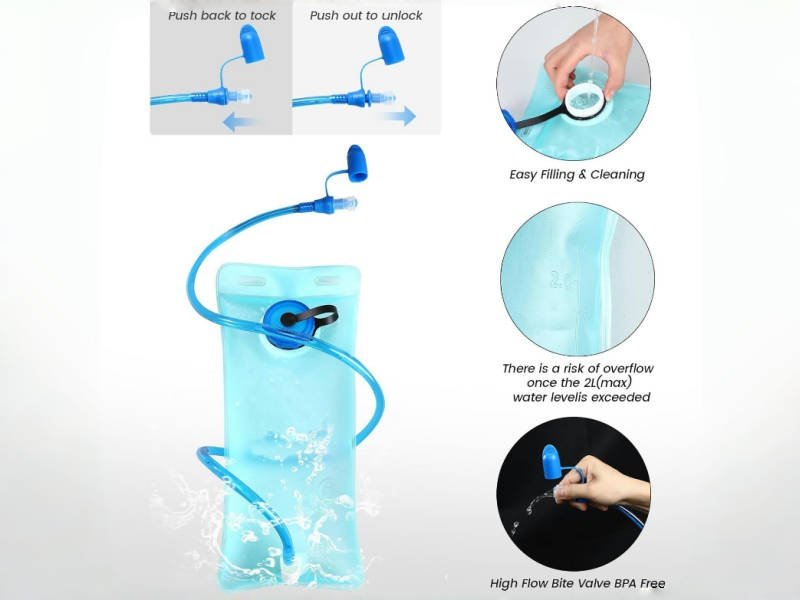
- Tube Routing & Bite Valve Mechanics Shoulder‑Strap Ports: Reinforced openings at the top of the pack let you feed the drink tube up to your shoulder. Tube Insulation: Foam or neoprene coverings prevent fluid from freezing in cold weather or overheating in the sun. Bite Valve Valve: A silicone valve opens when you bite down, delivering a steady flow; many have a self‑sealing design to prevent drips.
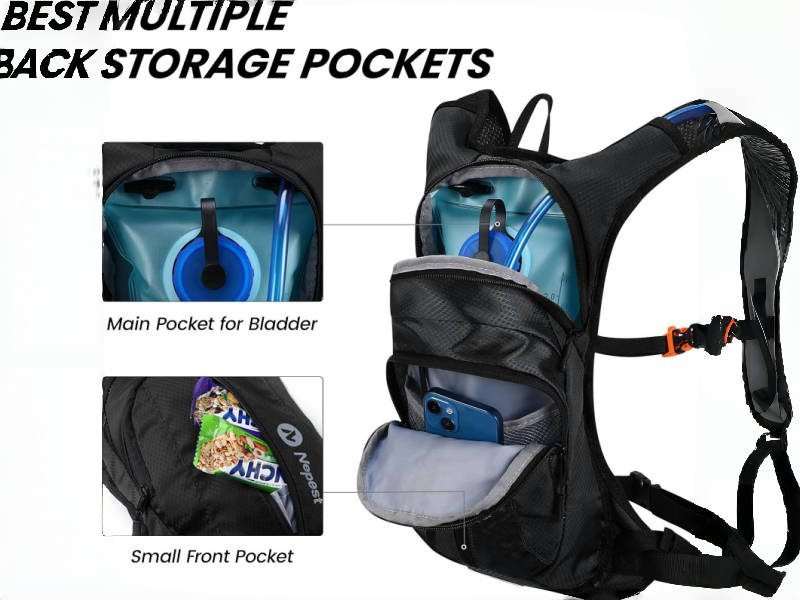
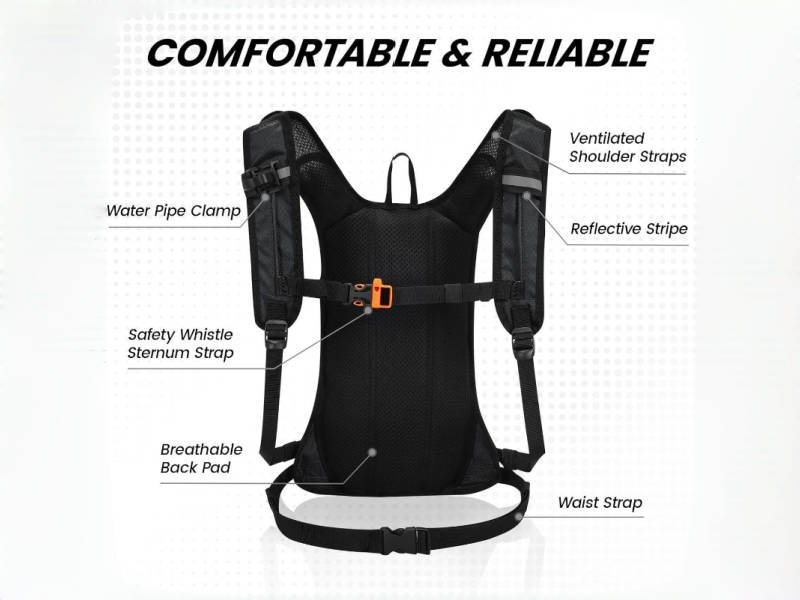
- Pack Integration & Storage Multi‑Compartment Layout: Typical packs combine the reservoir sleeve with compartments for snacks, tools, and first aid. Load‑Bearing Straps: Adjustable sternum and waist straps stabilize the pack, shifting weight from shoulders to hips. Ventilation: Mesh back panels and airflow channels reduce sweat and increase comfort on hot days.
- Leak‑Proof Sealing & Filling Systems Slide‑Seal or Clamp Top: Reservoirs seal via sliding tracks or removable clamps; both ensure tight closures. Wide‑Mouth Opening: Many packs feature U‑shaped reservoirs for easy filling, cleaning, and ice insertion. Quick‑Fill Systems: Some newer models offer Magnetic Quick‑Disconnect systems for easily detaching the tube without spilling.
- Real‑World Workflow
- Insert Reservoir: Slide the filled bladder into its sleeve.
- Route Tube: Feed through port and clip along shoulder strap.
- Adjust Fit: Secure waist and chest straps for a snug carry.
- Hydrate On‑Demand: Bite the valve to release water—no stopping required.
By integrating water storage, delivery, and pack organization into one compact system, hydration packs eliminate interruptions and let you focus on the trail ahead.
Which Activities Require a Hydration Pack Backpack?
Hydration pack backpacks are indispensable for high‑endurance and hands‑busy sports: hiking, trail running, mountain biking, skiing, and rock climbing. They also prove useful for urban cycling, festivals, and marathons, where pausing for a water station costs time. Different pack volumes and feature sets—like tool organizers or insulated tubes—cater to each activity’s unique demands, making sure you stay hydrated and agile no matter the terrain.

- Hiking & Trekking Volume Needs: Day hikes typically require 1.5–2 L to cover 2–4 hours; multi‑day treks pair hydration packs with larger backpacks for camping gear. Feature Integration: Gear loops for trekking poles, ice‑axe attachments in alpine conditions, and rain covers for unexpected downpours.
- Trail Running & Ultra‑Running Lightweight Design: Ultra‑slim profiles (10–12 L packs) with bungee cord lash points for jackets and minimal storage for nutrition gels. Stability: Compression straps and close‑fit harness systems keep bounce to a minimum.
- Mountain Biking & Cycling Ventilation: Mesh back panels to prevent back sweat on hot climbs. Crash‑Resistant Build: Durable materials (high‑denier nylon) and abrasion‑resistant bases to withstand falls. Tool Storage: Integrated multitool pockets and chain‑breaker compartments.
- Skiing & Snowboarding Insulated Tubes: Prevent freezing at sub‑zero temperatures. Avalanche Safety: Some packs incorporate air‑bag systems for added security in backcountry skiing.
- Festival & Commuter Use Urban Utility: Hands‑free hydration while navigating crowds or city streets. Discreet Style: Low‑profile, sleek designs that blend into casual environments.
- Water Sports & Boating Floatation: Buoyant pack materials double as emergency floatation aids. Saltwater Resistance: Corrosion‑resistant zippers and quick‑drain fabrics.
Each activity drives specific capacity, fit, and feature requirements—understanding these needs ensures you pick a hydration pack backpack that not only carries water but also complements your adventures.
What Are the Key Components of a Hydration Pack Backpack?
Key components include the reservoir (1–3 L flexible bladder), drinking tube with bite valve, and dedicated hydration sleeve inside the pack. High‑quality packs add insulated tubing, quick‑disconnect fittings, bite‑valve covers, plus storage pockets for gear, ventilated back panels, and adjustable harness systems—all designed to deliver leak‑proof, ergonomic drinking on the move.
- Reservoir Selection Sizes & Shapes: 1 L & 1.5 L: Short runs or commuters. 2 L: Standard day hikes. 3 L+: Extended adventures and team‑shared reservoirs. Material Properties: Ensure durability across –20 °C to 50 °C, UV resistance to prevent material breakdown, and taste‑neutral liners that won’t absorb flavors.
- Drinking Tube & Valve Technology Tubing Diameter: 8–12 mm inner diameter for optimal flow rate. Insulated Covers: Neoprene foam sleeves reduce freeze risk in winter and glare in sun. Quick‑Disconnect Couplings: Allow bladder removal without detaching the entire tube assembly. Bite Valve Variations: On/Off Switch: Prevents dripping when pack is inverted. Self‑Sealing Valve: Seals instantly after sip. Magnetic Clip: Holds the valve in place on your strap, preventing dangles.
- Pack & Harness Integration Hydration Sleeve: Vertical or U‑shaped sleeve to secure bladder; some packs use Z‑clip systems for easy bladder removal. Tube Routing Channels: Zippered or velcro channels on shoulder straps for tidy tube management. Adjustable Harness: Sternum and waist straps that fine‑tune load transfer; ventilated mesh for breathability.
- Additional Storage & Utility Features Tool Pockets: Zippered compartments for multitools, patches, and CO₂ cartridges. Nutrition Mesh Pockets: Quick‑access mesh on shoulder straps for gels. Reflective Accents: Safety on dawn/dusk runs. External Attachment Points: Daisy chains, bungee cords for helmets and layers.
- Durability & Weatherproofing Fabric Choices: 210D–420D nylon or polyester with polyurethane coatings for water resistance. Seam Taping & Reinforcements: Welded seams on the reservoir; bartacked stress points on pack panels.
Component Comparison Table
| Component | Key Specs | Importance |
|---|---|---|
| Reservoir | 1–3 L TPU/PE, slide‑seal or clamp closure | Core hydration source |
| Tube & Valve | 8–12 mm ID, insulated, quick‑disconnect | Flow control & hygiene |
| Hydration Sleeve | Dedicated, clip or sleeve mount | Stabilizes reservoir |
| Harness System | Adjustable sternum/waist straps, mesh | Load transfer & ventilation |
| Utility Pockets | Zipped/tool/gels, external lash points | Gear organization |
| Fabric & Seams | 210–420D, PU coating, seam‑taped | Weatherproofing & longevity |
By dissecting each component, you can assess quality, functionality, and how well a hydration pack backpack will stand up to your intended use.
How Do You Choose the Right Hydration Pack Backpack for Your Needs?
Select a hydration pack by matching reservoir capacity to activity duration, choosing the right fit (torso length, strap adjustability, hip belt), and prioritizing feature sets (insulated tube, quick‑disconnect, utility pockets). For team or brand orders, JunDong’s OEM/ODM customization offers bespoke fabrics, logos, and tailored compartments—perfect for corporate outings or sports clubs.
- Activity & Capacity Matching Short Activities (≤2 hrs): 1–1.5 L reservoir; minimal pack 5–8 L. Daylong Adventures (2–6 hrs): 2 L reservoir; mid‑size pack 8–15 L. Extended Trips (>6 hrs): 3 L+ reservoir; larger pack (15–25 L) with space for snacks and layers.
- Ergonomic Fit & Comfort Torso Length: Measure from C7 vertebra to iliac crest; select pack with adjustable back panel or fixed size matching your torso. Shoulder & Sternum Straps: Should rest comfortably on trapezius muscle; sternum strap prevents strap splay. Hip Belt: Transfers 60–80% of weight to hips; essential for heavier packs over 10 L.
- Feature Prioritization Insulated Tubes: Vital for cold climates; optional for warm weather. Quick‑Disconnect Valves: Facilitate rapid bladder removal. Modular Attach Points: Daisy chains for gear, front pockets for easy‑reach items.
- Customization & OEM/ODM Benefits Branding: Debossed logos, custom color panels, unique pattern prints. Fabric Choices: From lightweight ripstop to heavy‑duty Cordura. Private Label Runs: Low MOQs for startups; scalable production for large teams.
- Budget vs. Performance Entry‑Level Packs (<$50): Basic bladders, limited features. Mid‑Range ($50–$120): Better materials, more pockets, adjustable fit. Premium ($120+): High‑end fabrics, advanced valves, full customization.
Selection Checklist
✅ Reservoir Volume Matches Activity
✅ Back Panel Fits Your Torso
✅ Strapping System Provides Stability
✅ Tube & Valve Features Prevent Drips
✅ Utility Pockets Meet Gear Needs
✅ Customization Options if Required
By systematically evaluating these factors, you ensure your hydration pack enhances—not hinders—your adventures.
What Maintenance and Safety Practices Keep Hydration Packs Healthy?
Snippet (75 words):
To prevent mold and bacteria, clean reservoirs and tubes after each use with warm water and baking‑soda solution, then air‑dry fully. Disassemble bite valves and store packs unassembled in a cool, dry space. Use BPA‑free, antimicrobial-treated bladders and replace reservoirs annually. Regular inspection of seals, hoses, and bite valves ensures leak‑proof performance and safe drinking throughout the pack’s life.
- Daily Cleaning Routines Rinse: Flush tube and bladder with warm water after each use. Baking‑Soda Soak: Mix 1 Tbsp baking soda per liter; fill bladder, shake, let sit 15 min, then rinse thoroughly. Valve Disassembly: Remove bite valve, rinse interior to clear debris and biofilm.
- Deep‑Clean Protocols Sterilize: Use dilute hydrogen peroxide or UV‑light wands designed for hydration bladders. Brush Kits: Flexible brushes for tube interiors; long‑handled brushes for bladder corners. Drying: Hang bladder upside down with tube clipped open; use drying racks or ball‑inflating devices to maintain shape.
- Seasonal Storage Completely Dry: Ensure no moisture remains to prevent mold growth. Loose Storage: Keep bladder unseated in pack to avoid compression and mildew. Temperature: Store between 10–25 °C; avoid UV exposure to prevent material degradation.
- Component Inspection & Replacement Seals & Clamps: Check for cracks or stiffness; replace annually. Bite Valves: Replace when elasticity decreases or flow slows. Fabric & Seams: Inspect pack fabrics and seams for wear; patch or reinforce as needed.
- Material Considerations BPA‑Free & Antimicrobial Treatments: Resist bacterial growth; increase lifespan. UV‑Resistant Coatings: Protect bladders from sun damage during summer outings.
Maintenance Schedule Table
| Interval | Task | Tools/Materials |
|---|---|---|
| After Each Use | Rinse bladder & tube with warm water | Clean water, soft cloth |
| Weekly | Baking‑soda soak & rinse | Baking soda, brush kit |
| Monthly | Deep UV or peroxide sterilization | UV wand or peroxide solution |
| Annually | Replace valves & inspect fabrics | Spare valves, seam sealer |
| Seasonal | Full dry & pack disassembly | Dry rack, storage bag |
Regular maintenance not only ensures safe hydration but extends the life and performance of your pack—crucial when you depend on it in remote environments.
Which Are the Leading Hydration Pack Backpack Brands and Innovations?
Top brands include CamelBak (pioneers of hydration reservoirs), Osprey (innovative fit systems), Platypus (ultra‑light reservoirs), and JunDong (OEM/ODM custom solutions). Cutting‑edge features such as magnetic bite‑valve mounts, fast‑fill wide-mouth openings, and smart dosing loops lead the market. For private‑label brands, JunDong offers bespoke fabric choices, logo placement, and tailored capacity—perfect for corporate events or team sponsorships.
- CamelBak History: Introduced the first portable bladder in 1989. Key Innovations: Antidote reservoirs with self‑sealing Quick Stow valve; Crux™ bite valve boosts flow by 20%.
- Osprey Fit Technology: AirScape™ back panels with custom‑fit harness adjustment; LightWire™ frames for stability. Hydraulics™ Reservoir Integration: Insulated sleeve and tube routing systems.
- Platypus Ultralight Reservoirs: Hydraulics Osmos™ with 1.5 mm TPU film, weighing <100 g. Filter Integration: Reservoirs compatible with inline filters for backcountry use.
- JunDong (OEM/ODM) Customization: Low MOQs down to 100 pieces, free design mockups, rapid sampling (7–10 days). Materials: From Cordura® to ripstop nylon; waterproof zippers; custom patterned fabrics. Brand Options: Debossed PU patches, woven labels, PMS‑matched colors.
- Emerging Innovations Smart Hydration Monitors: Electronic sensors tracking intake and reminding to drink. Eco‑Materials: Recycled PET fabrics and plant‑based TPU for green hydration solutions. Modular Systems: Interchangeable reservoirs and accessory pouches for multi‑sport versatility.
Why Is a Hydration Pack Backpack Essential for Performance and Health?
Consistent hydration maintains muscle function, cognitive clarity, and core temperature regulation. A hydration pack backpack ensures you drink regularly—research shows just 2% dehydration can impair endurance and decision‑making. Hands‑free bladders eliminate interruptions, helping athletes sustain peak performance and reducing risk of heat‑related illness.
- Physiological Impact of Hydration Muscle Performance: Water is critical for nutrient transport and waste removal in muscles; dehydration leads to cramps and fatigue. Cognitive Function: Brain volume drops with dehydration, affecting focus, reaction time, and mood—vital for navigation and safety.
- On‑The‑Move Drinking Frequency: Sipping small amounts every 10–15 minutes keeps fluid levels stable. Hands‑Free Efficiency: Reduces downtime—vital in races, technical climbs, or busy trails.
- Thermoregulation Sweat & Cooling: Adequate hydration sustains sweat rates needed for evaporative cooling; prevents heat exhaustion. Cold Weather: Hydration protects against hypothermia by supporting blood circulation.
- Health & Safety Guidelines Scientific Recommendations: ACSM: 400–800 mL per hour during exercise. NATA: Pre‑hydrate 5 mL/kg 2 hrs before activity. Individual Factors: Body weight, climate, altitude, exertion levels.
- Case Study: Marathon vs. Through‑Hike Marathon Runners: Rely solely on 1–1.5 L reservoirs plus race station supplements. Backpackers: Carry 2–3 L reservoirs plus backup bottles for remote trails.
Conclusion
A hydration pack backpack is more than a novelty—it’s an essential companion for any activity where uninterrupted access to water can mean the difference between peak performance and preventable setbacks. From reservoir design to tube routing, fit systems to maintenance routines, every detail matters.
For businesses, teams, and outdoor brands seeking private‑label hydration solutions, JunDong offers OEM/ODM expertise: customizable fabrics, logo branding, bespoke capacities, and rapid prototyping with low MOQs. Contact us today to design your perfect hydration pack backpack—engineered for adventure, tailored to your brand.