 Skip to content
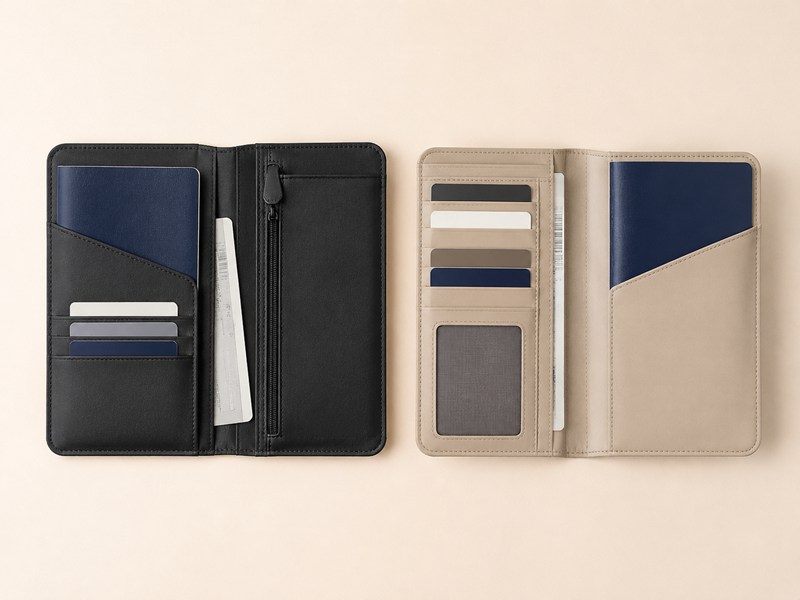
A travel wallet seems simple when it is empty. Put two passports, eight cards, foreign currency, folded tickets, hotel confirmations, and a few receipts inside, and the design reveals its real quality. Card slots may become too tight, the zipper may pull against the corners, papers may crease, and a slim-looking wallet may become too bulky for a jacket pocket or small handbag.
A travel wallet for passports and cards is a compact organizer built to protect identity documents, payment cards, cash, tickets, and small travel items without slowing access. The right design balances capacity, security, thickness, and carrying comfort. Slim bifolds suit one traveler, while zip-around formats work better for couples or families. Material, pocket layout, closure, and full-load performance should be confirmed before production begins.
Appearance matters, but travel use is unforgiving. People open these wallets at check-in counters, immigration desks, hotel receptions, shops, train stations, and security queues. Every pocket must have a purpose, and every item must remain easy to find.
Picture a parent standing at passport control with four passports, several boarding documents, two currencies, and children asking where to go next. A well-planned wallet keeps that moment calm. A poorly planned one turns a small accessory into a source of stress. The difference is usually hidden in millimetres, pocket order, material thickness, and decisions made before the first sample is approved.
What Is a Travel Wallet?
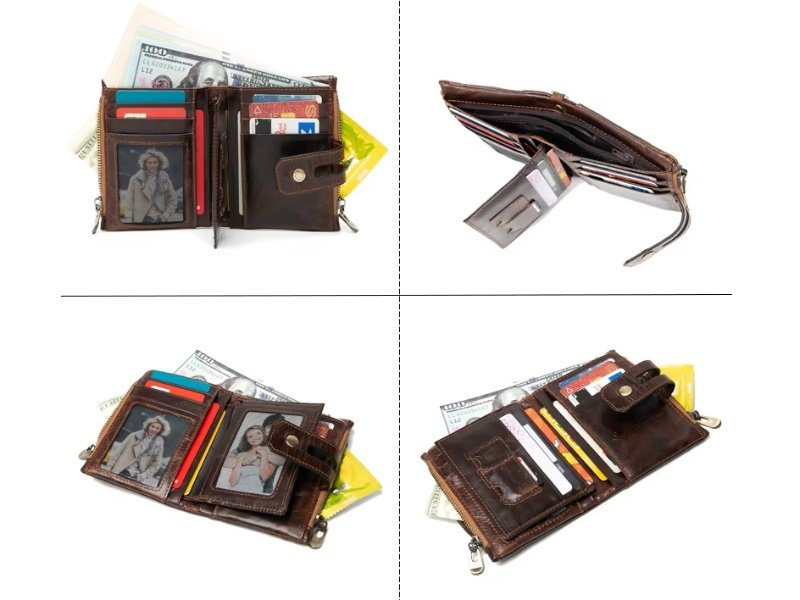
A travel wallet is a compact organizer designed to hold passports, payment cards, identification, cash, tickets, and essential travel documents in one controlled layout. Unlike an everyday wallet, it is built around larger document sizes, faster airport access, and secure storage during movement. Its quality depends less on the number of pockets and more on whether every item remains visible, protected, and easy to remove when the wallet is fully loaded.
A well-designed travel wallet should solve three practical problems at the same time: keeping important documents together, reducing the time needed to find them, and preventing loose items from falling out inside a bag. It may be as simple as a slim bifold for one passport or as structured as a zip-around organizer for an entire family.
The term covers several different constructions, so size, capacity, and intended use should be clearly defined before appearance, color, or logo details are settled. A serious custom wallet project should review dimensions, materials, card layout, hardware, edge finishing, branding, packing, quantity, and target cost as connected decisions rather than separate details.
| Travel Wallet Format | Passport Capacity | Card Capacity | Common Closure | Suitable Use |
|---|---|---|---|---|
| Slim passport sleeve | 1 | 0–3 | Open fold | Light personal travel |
| Compact bifold | 1 | 3–6 | Open fold or snap | Business and weekend trips |
| Zip-around wallet | 1–2 | 6–10 | Full zipper | Frequent international travel |
| Couple organizer | 2 | 6–10 | Three-sided or full zipper | Shared trip documents |
| Family organizer | 3–6 | 8–14 | Full zipper | Family and group travel |
| Travel document pouch | 2–6 | 4–10 | Zipper | Passports, papers, phone, and keys |
These figures are useful starting references rather than fixed limits. The finished capacity depends on the thickness of the exterior material, lining, reinforcement, card layers, zipper construction, and how the passport sections are arranged.
What Does a Travel Wallet Hold?
A travel wallet normally carries one or more passports, several cards, cash, boarding documents, and travel receipts. Larger models may also include space for coins, a pen, SIM cards, keys, insurance papers, hotel confirmations, or a compact tracking device.
The most important issue is not whether every item can physically fit. The real test is whether the wallet remains easy to use after all intended contents have been inserted.
A standard payment card measures approximately 85.60 × 53.98 mm. One plastic card is usually around 0.76 mm thick. Eight cards therefore add roughly 6 mm of solid thickness before the card-pocket materials are counted. If the wallet also carries two passports, cash, and folded documents, the finished thickness can increase quickly.
A design that looks slim while empty may become difficult to close when loaded. This is especially common when several card slots overlap in one area or when passports sit directly opposite a thick card panel.
The contents should be arranged by access frequency:
| Storage Zone | Suitable Contents | Design Requirement |
|---|---|---|
| Fast-access zone | Current passport and boarding document | Wide opening and easy visibility |
| Payment zone | Main cards and current currency | Secure but easy card removal |
| Protected zone | Backup cards, identification, and reserve cash | Deeper or concealed storage |
| Document zone | Tickets, visa papers, receipts, and insurance records | Flat storage with minimal creasing |
| Small-item zone | SIM card, key, pen, coins, or tracker | Closed or shaped pocket |
Fast-access items should sit close to the main opening. Reserve cash and backup identification can sit deeper inside. Small rigid items should not press directly against passport covers or card surfaces.
Capacity descriptions should reflect comfortable operation rather than the highest number that can be forced inside. A wallet described as holding ten cards should close smoothly with ten cards inserted. The card openings should remain straight, and each card should be removable without pulling out the cards beside it.
The same applies to passports. A pocket may accept four empty passport-sized templates but become too tight when real booklets are used. Physical passports have covers, laminated identity pages, visas, and stamps that create more thickness than paper test pieces.
A useful full-load review should include:
- The stated number of real passports
- One plastic card in every intended slot
- Several banknotes
- Folded tickets or travel papers
- Receipts
- Any tracker, pen, coin, or SIM accessory shown in the product description
The wallet should then be opened and closed repeatedly, held in one hand, placed inside the intended bag pocket, and left loaded overnight. This reveals whether the outer panels bow, the zipper becomes tight, the snap pulls against the material, or the internal pockets lose shape.
Who Uses Passport and Card Wallets?
Travel wallets are used by solo travelers, business travelers, couples, families, students studying abroad, airline crews, tour leaders, and people carrying more than one passport or identification document.
These groups do not need the same structure.
A frequent business traveler may carry one passport, four cards, a small amount of cash, and a few receipts. The wallet may need to fit inside a jacket pocket, briefcase, or laptop bag. Low thickness, clean edges, and quick access may matter more than high capacity.
A family organizer is different. One person may need to control four passports, several boarding documents, insurance information, hotel records, and multiple cards. Visibility becomes more important than minimal thickness. A full zipper, wider opening, and clearly separated sections may be more useful than a slim profile.
A student may need space for foreign currency, transport cards, student identification, bank cards, and visa documents. Lightweight nylon or PU may suit this type of use better than a formal leather bifold.
A tour leader or airline crew member may open the wallet many times a day. Zipper movement, card access, pocket durability, and one-handed operation become critical. A small design inconvenience repeated fifty times during a trip quickly becomes a serious usability problem.
| User Type | Main Contents | Preferred Structure | Main Concern |
|---|---|---|---|
| Solo traveler | 1 passport, 3–6 cards, cash | Slim bifold | Low thickness |
| Business traveler | Passport, cards, receipts, documents | Structured bifold or zipper | Fast access and refined finish |
| Couple | 2 passports, cards, tickets | Compact zip-around | Shared organization |
| Family | 3–6 passports and several papers | Large zip-around | Visibility and containment |
| Student abroad | Passport, visa, currency, transport cards | Lightweight zip wallet | Security and weight |
| Tour leader | Multiple documents and repeated access | High-capacity zipper organizer | Durability and retrieval speed |
Carrying location also changes the design.
A wallet intended for a jacket should remain slim and smooth. A wallet placed inside a handbag can be slightly larger and may use a zipper. A family organizer carried inside a backpack can accept greater depth, but the closure must prevent papers from sliding out.
A wrist strap can be useful when the wallet is carried independently at an airport or event. The strap anchor then becomes a load-bearing area and should be reinforced. A decorative strap attached only through a thin outer layer may tear after repeated pulling.
A product should have one primary use profile. Trying to combine a jacket-size executive wallet with family-level capacity usually creates an item that is too bulky for one traveler and too small for several people.
Why Do Travel Brands Offer Them?
Travel wallets fit naturally into luggage, leather goods, travel accessories, corporate gifts, airline programs, and lifestyle collections. They are compact, useful, easy to pair with other products, and handled repeatedly throughout a trip.
They can be sold individually or combined with:
- Luggage tags
- Card holders
- Toiletry bags
- Packing cubes
- Cable organizers
- Travel pouches
- Carry-on bags
- Passport sleeves
- Pen sets
- Gift boxes
Their commercial value comes from repeated use. A travel wallet may be handled at check-in, security, immigration, boarding, hotel registration, currency exchange, shopping, and ground transportation. A discreet embossed logo or small metal fitting may therefore receive frequent exposure without dominating the product.
The category also supports several price positions.
A lightweight nylon organizer can work for airline programs, group travel, employee kits, or accessible travel collections. PU offers broad control over color, texture, and cost. Microfiber leather can provide a more refined hand feel than many standard PU materials. Genuine leather supports executive gifts and premium travel lines when the grade, stitching, edge finish, lining, and packaging support that level.
| Product Position | Common Material | Structure | Packing Direction |
|---|---|---|---|
| Entry-level travel accessory | Nylon or standard PU | Simple zipper organizer | Individual bag or paper sleeve |
| Mainstream retail | PU or microfiber | Bifold or zip-around | Printed folding carton |
| Corporate gift | PU, microfiber, or leather | Clean bifold or zipper | Gift box with logo |
| Premium travel collection | Genuine leather | Refined bifold or zip-around | Rigid box or soft pouch |
| Family travel collection | Nylon or structured PU | Large zipper organizer | Compact carton or reusable pouch |
The exterior material alone does not determine perceived quality. People notice whether the card slots are straight, whether the passport can be removed smoothly, whether the zipper moves around the corners, and whether the lining sits flat.
A higher price needs support from the complete product:
- Consistent exterior texture
- Controlled material thickness
- Clean card-slot openings
- Straight stitching
- Smooth edge finishing
- Reliable zipper movement
- Correct hardware color
- Neat lining
- Accurate logo placement
- Well-fitted packing
An expensive exterior combined with loose lining or poor card access creates a weak impression. A moderately priced material with excellent construction may feel more convincing.
Travel wallets also work well for coordinated collections because one internal structure can sometimes be offered in several exterior materials or colors. However, changing the exterior may require pattern or process adjustments. Thick leather, thin PU, and flexible nylon do not fold, stitch, or hold shape in the same way.
A shared visual design does not always mean the same internal specification can be used without review.
What Is the History of Travel Wallets?
Travel wallets developed from document cases, ticket covers, passport sleeves, and traditional cash wallets. Earlier international travelers often carried paper tickets, several currencies, visas, vaccination records, identification papers, and handwritten travel details.
These documents were larger and more numerous than the contents of an ordinary wallet. Dedicated cases became useful because they kept papers flat and reduced the chance of leaving an important document behind.
As payment cards became widely used, card storage became more important. Later styles added:
- Multiple card slots
- Zippered coin sections
- Pen loops
- Removable inserts
- Wrist straps
- Separate passport sleeves
- Divided currency pockets
More recent versions may include RFID-shielding layers, tracking-device pockets, SIM storage, memory-card sections, or family passport layouts.
Digital travel has changed some needs but has not removed physical documents. Mobile boarding passes are common, yet travelers may still carry printed visas, immigration forms, train tickets, baggage receipts, hotel confirmations, insurance papers, and emergency contact details.
This creates an important design decision. Older organizers often include long paper-ticket sections. That feature may still be useful, but it should not make a compact wallet unnecessarily tall when most intended users carry digital boarding passes.
A practical modern travel wallet often combines older proven functions with current travel habits:
| Traditional Function | Current Value |
|---|---|
| Passport protection | Still essential |
| Full-length ticket storage | Useful for printed documents and receipts |
| Currency section | Important for international trips |
| Pen loop | Helpful for immigration forms |
| Coin pocket | Relevant in cash-based destinations |
| Multiple card slots | Important for payment and identification |
| SIM storage | Useful for international mobile use |
| Tracker pocket | Helpful for loss recovery |
Historical features should be kept when they solve a real problem, not simply because they are familiar.
A pen loop, for example, can be useful at immigration, but its location matters. Placed near the fold, it may make the wallet difficult to close. Positioned beside the document section, it can remain useful without creating a hard centre.
The strongest designs do not try to preserve every feature developed over several decades. They keep what remains useful and remove what creates unnecessary bulk.
Passport Holder vs Travel Wallet
A passport holder mainly protects one passport and may include two or three card slots. A travel wallet organizes a broader group of items, usually including cards, cash, tickets, receipts, identification, and sometimes several passports.
The difference affects size, structure, cost, weight, and how the product should be described.
| Product Type | Main Purpose | Common Capacity | Construction Level |
|---|---|---|---|
| Passport sleeve | Protect one booklet | 1 passport, 0–2 cards | Simple |
| Passport holder | Protect and lightly organize | 1 passport, 2–4 cards | Low to moderate |
| Travel wallet | Organize key travel items | 1–2 passports, 4–8 cards | Moderate |
| Family travel wallet | Centralize several document sets | 3–6 passports, 8–14 cards | High |
| Travel document pouch | Store documents and small accessories | Several passports, papers, phone, keys | Moderate to high |
A passport sleeve usually has fewer pattern pieces and less internal layering. It may use turned edges, painted edges, or a folded leather construction. It is suitable when protection, minimal thickness, and a refined appearance are the main goals.
A travel wallet needs more internal planning. It may include lining, layered card panels, ticket storage, cash sections, zipper tape, reinforcement, and several passport sleeves. Every addition affects thickness and labor.
The product name should match its real function.
A thin sleeve should not be described as a complete document organizer when it only holds one booklet. A large family wallet should not be presented simply as a passport cover, because that description hides its broader use.
Clear product names make comparison easier:
- Slim passport sleeve
- Bifold passport holder
- Passport and card wallet
- Zip-around travel wallet
- Couple passport organizer
- Family travel document wallet
- Travel document pouch
The final decision should begin with the intended contents.
Choose a passport sleeve when the main need is protection and low thickness.
Choose a compact travel wallet when one traveler needs cards, cash, and travel papers together.
Choose a zip-around organizer when loose documents or several passports need secure containment.
Choose a family format when one person must manage several travelers’ records.
A useful travel wallet is not defined by how many pockets appear in a photograph. It is defined by how calmly and quickly someone can find the correct document when the trip becomes busy.
Which Type of Travel Wallet Is Best?

The best travel wallet is the one that matches the real carrying load, travel pattern, security preference, and intended price level. A slim passport sleeve works well for one booklet and a few cards. A bifold suits frequent access and low thickness. A zip-around organizer is more suitable for several passports, loose papers, and family travel. Material, closure, card capacity, and full-load thickness should be considered together.
The wrong format often becomes obvious only after it is packed. An elegant bifold may refuse to close after six cards and two passports are inserted. A large family organizer may hold everything but feel too bulky for a handbag. A leather version may look premium but become stiff if the internal layers are too thick. A lightweight nylon design may travel comfortably but need extra structure to prevent documents from bending.
Before selecting a format, define five details:
- Number of passports carried at one time
- Number of cards used during travel
- Need for cash, tickets, receipts, or insurance documents
- Where the wallet will be carried
- Whether fast access or full containment matters more
The following table gives a practical starting direction:
| Travel Situation | Suitable Format | Passport Capacity | Card Capacity | Expected Closed Thickness |
|---|---|---|---|---|
| Short solo trip | Slim sleeve | 1 | 2–4 | 8–14 mm loaded |
| Frequent business travel | Bifold wallet | 1–2 | 4–8 | 14–22 mm loaded |
| Couple travel | Compact zip-around | 2 | 6–10 | 20–30 mm loaded |
| Family holiday | Family organizer | 3–6 | 8–14 | 28–45 mm loaded |
| Group or tour documents | Large document wallet | 4–8 | 6–12 | 35–55 mm loaded |
These figures are development references rather than fixed limits. Material thickness, lining, folded edges, reinforcement, passports with visas, and the number of paper documents can all change the finished result.
A card is usually about 0.76 mm thick. Eight cards add roughly 6 mm before the pocket layers are counted. Two passports can add another 8–12 mm depending on their condition and number of visa pages. A design expected to hold ten cards and four passports should therefore not be developed around the profile of an empty sample.
Passport Sleeve vs Travel Wallet
A passport sleeve is most suitable when protection, low weight, and minimal thickness are the main priorities. A full travel wallet is more useful when passports need to be stored with cards, cash, boarding documents, receipts, and other small items.
A sleeve generally holds one passport and two to four cards. It is easy to place inside a jacket, crossbody bag, briefcase, or small handbag. Its simple construction also creates a clean surface for debossing, foil stamping, a woven label, or a small metal detail.
A travel wallet normally contains several internal zones. It may include:
- One or two passport sleeves
- Four to ten card slots
- A banknote section
- A ticket pocket
- A zippered coin area
- A SIM or tracker pocket
- A pen loop
- A wrist strap
The choice should depend on how much organization is truly needed. A person carrying one passport, two cards, and digital boarding passes may find a large organizer unnecessary. Someone carrying two passports, several currencies, printed visa papers, and travel receipts will quickly outgrow a basic sleeve.
| Feature | Passport Sleeve | Full Travel Wallet |
|---|---|---|
| Passport capacity | Usually 1 | Usually 1–4 |
| Card storage | 0–4 slots | 4–12 slots |
| Paper storage | Very limited | Moderate to high |
| Closure | Open fold or snap | Bifold, snap, or zipper |
| Loaded thickness | Low | Medium to high |
| Access speed | Very fast | Depends on layout |
| Gift presentation | Clean and compact | More substantial |
| Main risk | Too little storage | Excess bulk |
A sleeve becomes less effective when too many functions are forced into it. Adding six layered card pockets, a cash section, and a pen loop to a narrow passport cover may create a stiff product that does not fold properly.
A full wallet has the opposite risk. Adding every available feature can produce excessive thickness and slow access. Each pocket should have a defined purpose.
For a refined personal travel item, a sleeve or compact bifold is usually more convincing. For family travel or document-heavy trips, a larger zippered organizer provides better control.
Zipper vs Bifold
A zipper offers stronger containment, while a bifold provides faster access and a slimmer profile. The correct choice depends on the amount of loose content, carrying location, and how often the wallet will be opened during a trip.
A full zipper works well when the wallet contains:
- Several passports
- Loose receipts
- Coins
- Multiple currencies
- Small tickets
- Keys or SIM cards
- Insurance documents
- A tracking device
Once closed, the contents remain enclosed even if the wallet moves around inside a backpack or cabin bag. This makes zip-around formats especially suitable for families, group travel, and long international trips.
A bifold is more suitable when the wallet is opened repeatedly. Passport control, hotel check-in, railway inspection, and card payment all become faster when there is no zipper to pull.
Its slim structure also works well for formal travel accessories. Leather and microfiber bifolds can fit naturally into executive gift collections or coordinated luggage sets.
| Decision Factor | Zipper Wallet | Bifold Wallet |
|---|---|---|
| Containment | High | Medium |
| Access speed | Moderate | High |
| Suitable passport count | 1–6 | 1–2 |
| Loose paper control | Strong | Limited |
| Finished thickness | Higher | Lower |
| Suitable material | Nylon, PU, leather | Leather, PU, microfiber |
| Main construction risk | Poor corner movement | Excess thickness at the spine |
The zipper should move smoothly when the wallet is fully loaded. Several details influence this:
- Corner radius
- Zipper gauge
- Tape width
- Slider size
- Lining clearance
- Stitching distance from the teeth
- Passport position
- Thickness near the outer edge
A sharp 90-degree corner can make the slider difficult to pull. A softer curve generally improves movement. The pattern must leave enough distance between the passport corners and the zipper teeth.
A practical zipper test includes:
- Load every card slot.
- Insert the stated number of passports.
- Add cash and papers.
- Close and open the zipper 50–100 times.
- Check both corners for resistance.
- Inspect whether the lining moves toward the teeth.
- Leave the wallet loaded overnight.
- Check for distortion the next day.
A bifold needs different checks. The centre fold should remain flexible after all layers are assembled. If card slots, passport sleeves, and reinforcement meet at the same location, the spine may become thick and stay partly open.
The best bifold structures keep heavy layers away from the centre. Pocket seams can be staggered, internal backing can be reduced where safe, and selected edges can be thinned to improve folding.
Individual vs Family Wallet
An individual wallet is designed around fast access and low thickness. A family wallet is designed around separation, visibility, and secure storage for several document sets.
A personal format usually carries:
- One passport
- Three to eight cards
- One currency section
- One ticket or receipt pocket
A family version may need:
- Three to six passports
- Eight to fourteen cards
- Several boarding papers
- Insurance documents
- Hotel records
- Two currencies
- A pen
- Small accessories
The family format should not be created by simply enlarging a personal wallet. Several passports create a thick, rigid stack. If all booklets sit on one side and all cards sit on the other, the organizer may become uneven and difficult to close.
A more balanced family layout can divide passports between two panels or use separate vertical sections.
| Format | Passport Layout | Card Layout | Paper Storage | Preferred Closure |
|---|---|---|---|---|
| Solo | One side sleeve | 3–6 slots opposite | One slim section | Bifold or snap |
| Couple | Two facing sleeves | 6–8 divided slots | Two paper sections | Compact zipper |
| Small family | 3–4 stepped sleeves | 8–10 divided slots | Two or three sections | Full zipper |
| Large family | Two passport banks | 10–14 distributed slots | Wide document section | Zip-around with gusset |
Stepped passport sleeves improve visibility because part of each cover remains exposed. This helps the person holding the wallet identify the correct booklet without removing the whole stack.
However, stepped sections require more pattern pieces and sewing operations. They also increase thickness. A simpler alternative is a wide compartment with fabric dividers or two separate passport groups.
Color can support organization. Different lining tones, pocket trims, or small woven markers can separate document sets without using complicated hardware.
For family use, one-handed handling is important. The wallet may be opened while holding luggage or helping a child. The opening should be wide enough to display documents without allowing them to fall out.
The final size also needs control. A very large organizer may hold everything but become difficult to place in a handbag or cabin backpack. For most family formats, a closed width of roughly 190–230 mm and height of 120–145 mm is often workable, though the final dimensions depend on passport count and paper format.
A family wallet should be tested while standing, not only on a table. This reveals whether passports can be removed cleanly and whether the open structure becomes unstable in one hand.
Leather vs PU vs Nylon
Leather, PU, and nylon can all produce reliable travel wallets, but they create different weight, appearance, flexibility, durability, and price characteristics.
Genuine leather suits premium collections, executive gifts, and products intended to develop a natural patina. It offers a distinctive feel, but its quality depends on more than the word “leather.”
Important details include:
- Leather type
- Grade
- Usable thickness
- Grain consistency
- Surface finish
- Color variation
- Edge-paint compatibility
- Fold behavior
- Embossing response
A leather that works well on an exterior panel may be too thick for layered card pockets. Internal pieces may need thinning to keep the wallet flexible.
PU offers more control over color, texture, and thickness. It is suitable for coordinated collections, seasonal colors, corporate gifts, and price-sensitive travel accessories.
PU quality varies considerably. Review:
- Surface film
- Backing fabric
- Thickness
- Softness
- Fold resistance
- Abrasion behavior
- Odor
- Adhesion between layers
- Response to heat and pressure
A soft PU may feel pleasant but need reinforcement to hold shape. A stiff PU may produce clean panels but become uncomfortable around the fold.
Nylon is lightweight, flexible, and naturally suited to zip-around organizers. It works well for family travel, airline programs, outdoor collections, and casual accessories.
Fabric specifications should consider:
- Yarn density
- Weave
- Coating
- Water resistance
- Abrasion resistance
- Fraying
- Lining quality
- Binding method
- Seam appearance
| Material | Main Strength | Suitable Format | Main Concern |
|---|---|---|---|
| Genuine leather | Natural feel and premium character | Bifold and premium zip wallet | Thickness and grade variation |
| PU | Controlled color and cost | Bifold, zipper, gift styles | Surface durability |
| Microfiber leather | Refined and consistent feel | Mid-to-premium formats | Cost and edge response |
| Nylon | Lightweight and practical | Family and zip organizers | Structure and seam finishing |
| Canvas | Casual and natural appearance | Lifestyle travel wallets | Staining and edge fraying |
Weight can also affect the choice. A slim leather wallet may remain comfortable, but a large family organizer made from thick leather can become heavy before any contents are inserted.
For higher-capacity formats, nylon or medium-weight PU often provides a better balance. For compact personal styles, leather and microfiber can create a more polished result.
Material should be selected with the internal structure in mind. The same pattern may not perform equally in leather, PU, and nylon. A change in material can require adjustments to seam allowance, reinforcement, pocket opening, edge treatment, and overall dimensions.
Is RFID Blocking Necessary?
RFID blocking can be useful when protection for contactless cards or electronic documents is part of the intended function. It should be treated as an added layer rather than the main definition of security.
A shielding layer may be placed:
- Across the full interior
- Behind the card section
- Around selected passport pockets
- Inside a removable card insert
Each position creates a different result.
Full coverage offers broader shielding but can increase stiffness and weight. A protected card panel reduces material use but limits the function to one area. Product descriptions should match the actual construction.
RFID material may affect:
- Folding flexibility
- Sewing performance
- Edge thickness
- Lining adhesion
- Hand feel
- Noise during handling
- Zipper clearance
- Unit cost
Before adding it, determine whether the intended travel wallet benefits from the feature. A premium business wallet may include it naturally. A basic passport sleeve may gain little value if the extra layer makes the product stiff.
RFID should not distract from more immediate security details:
- Cards should remain inside their slots.
- Passports should not slide out when the wallet is inverted.
- The zipper should remain closed under full load.
- A wrist strap should have reinforced anchoring.
- Outer pockets should not expose sensitive cards.
- The product should be comfortable enough to remain close to the traveler.
The following decision table helps separate useful inclusion from unnecessary complexity:
| Travel Wallet Type | RFID Value | Main Consideration |
|---|---|---|
| Slim passport sleeve | Low to moderate | Extra stiffness may be noticeable |
| Business bifold | Moderate to high | Fits premium feature positioning |
| Couple organizer | Moderate | Useful if cards are stored together |
| Family wallet | Moderate to high | Several passports and cards are centralized |
| Promotional wallet | Low to moderate | Cost and real use should be reviewed |
| Outdoor nylon organizer | Moderate | Layer must remain flexible |
When shielding performance forms part of the product claim, the exact material and required verification should be agreed before volume production.
RFID is not a substitute for a reliable closure, sensible pocket direction, and strong construction. A secure travel wallet works as a complete system.
Which Format Fits the Price Position?
The format should support the intended retail or gift position. A low-cost nylon organizer, a refined PU bifold, and a genuine leather executive wallet should not use the same feature list or packing.
| Product Position | Suitable Structure | Material Direction | Packaging |
|---|---|---|---|
| Entry-level | Simple zipper wallet | Nylon or standard PU | Individual bag or paper sleeve |
| Mainstream | Bifold or compact zip-around | PU or microfiber | Folding carton |
| Corporate gift | Clean bifold or zipper | PU, microfiber, or leather | Printed gift box |
| Premium | Refined bifold | Genuine leather | Rigid box or soft pouch |
| Family travel | Large zip organizer | Nylon or structured PU | Compact carton or reusable pouch |
A premium item needs more than expensive material. Card-slot accuracy, stitching, edge finish, hardware, lining, logo execution, and packing must all support the same level.
An entry-level product should still be easy to use. Cost control should come from a simpler layout, standard material, fewer components, and efficient packing rather than undersized pockets or unreliable hardware.
How Should the Final Choice Be Made?
The selection can be narrowed down using a simple weighted check.
Score each format from 1 to 5 for the criteria below:
| Criterion | Suggested Weight |
|---|---|
| Passport capacity | 20% |
| Card and paper organization | 15% |
| Carrying comfort | 15% |
| Access speed | 10% |
| Closure security | 10% |
| Material suitability | 10% |
| Finished thickness | 10% |
| Price position | 5% |
| Packaging fit | 5% |
A business bifold may score highly for access, comfort, and presentation but poorly for family capacity. A zip-around family organizer may score highly for containment and organization but lower for compactness.
The strongest design is not the one with the highest feature count. It is the one that performs well in the situations it is expected to face.
For one passport and light travel, choose a sleeve or slim bifold.
For frequent travel with several cards and papers, choose a structured bifold or compact zipper wallet.
For two travelers, choose a zip-around format with balanced passport and card sections.
For family trips, choose a larger organizer with visible passport separation and a gusseted zipper.
For premium gifting, choose material, edge finishing, logo treatment, and packaging that work together.
A good travel wallet should remain calm under pressure: easy to open, easy to read, easy to close, and comfortable to carry after every intended item has been packed.
How Should a Custom Travel Wallet Be Designed?
A custom travel wallet should be designed around its fully loaded condition rather than its empty appearance. Passport quantity, card count, cash format, paper documents, carrying location, closure, and material thickness must be confirmed before the outer shape is finalized. A strong design keeps important items visible, closes without strain, and remains comfortable to hold after every intended item has been inserted.
Most design problems begin when the exterior is approved before the internal load is calculated. A slim silhouette may look attractive in a drawing, yet become difficult to close once two passports, eight cards, banknotes, and folded papers are added. A large organizer may offer generous storage but feel awkward inside a handbag or cabin backpack.
The design process should settle six matters first:
- Who will use it
- How many passports it must carry
- How many cards will be inserted
- Which documents need fast access
- Where the wallet will be carried
- How thick it may become when loaded
A standard payment card measures approximately 85.60 × 53.98 mm and is usually around 0.76 mm thick. Eight cards alone add about 6 mm of solid thickness. A passport can add roughly 4–6 mm depending on its age, visa pages, and cover. Once pocket materials, lining, reinforcement, stitching, and folded edges are included, a design holding two passports and eight cards may reach 18–28 mm in actual loaded thickness.
| Intended Use | Passport Capacity | Card Capacity | Suggested Closed Size | Suitable Closure |
|---|---|---|---|---|
| Solo travel | 1 | 3–6 | 140–155 × 100–115 mm | Bifold or snap |
| Frequent travel | 1–2 | 6–8 | 150–170 × 105–125 mm | Bifold or zipper |
| Couple travel | 2 | 6–10 | 170–195 × 115–130 mm | Full zipper |
| Small family | 3–4 | 8–12 | 195–220 × 120–140 mm | Zip-around |
| Large family | 5–6 | 10–14 | 215–240 × 130–150 mm | Gusseted zipper |
These dimensions are development references, not universal standards. Material thickness, zipper tape, gusset depth, pocket construction, and paper format can change the finished size.
For wallet and leather-goods projects, useful starting information includes dimensions, material, card layout, logo method, hardware, edge treatment, quantity, packaging, and target cost.
What Size Fits a Passport?
Many passports are close to 125 × 88 mm when closed, but dimensions and cover thickness differ between countries. A passport sleeve should therefore include working clearance rather than matching the booklet dimensions exactly.
A pocket that appears large enough on a flat pattern may become too tight after several construction factors are added:
- Seam allowance
- Turned edges
- Edge paint
- Lining thickness
- Reinforcement
- Material compression
- Stitching position
For many leather, PU, or microfiber structures, 3–6 mm of usable clearance around the booklet is a reasonable starting area. Thick materials, padded exteriors, or stacked family sections may need more.
Pocket direction also changes the fit.
A top-loading sleeve allows quick removal but needs enough opening width for the passport spine. A side-loading section offers stronger retention but must be deep enough to prevent the booklet from sliding out. Corner slots expose more of the passport and keep the design light, though they provide less complete protection.
| Passport Pocket Type | Main Advantage | Main Risk |
|---|---|---|
| Full top-loading sleeve | Easy access | Booklet may move upward |
| Side-loading sleeve | Better retention | Can feel tight after sewing |
| Corner-slot holder | Low material use | Limited protection |
| Stepped family sleeves | Fast identification | More layers and sewing |
| Wide shared compartment | Simple and economical | Passports may be harder to separate |
A useful physical check is to insert and remove the passport ten times with one hand, then repeat after every other pocket has been filled. The sleeve should still operate smoothly without bending the booklet cover or pulling the lining outward.
The passport should sit below the zipper path in a zip-around format. If the booklet corners press against the teeth, the zipper may catch or become difficult to move around the curve.
How Many Card Slots Are Practical?
Four to eight card slots are usually suitable for a personal travel wallet. Eight to twelve may work for a couple or family organizer, provided thickness is distributed across the structure.
More slots do not always create greater value. Each slot adds:
- A separate cut component
- Folded or painted edges
- Backing material
- Stitching
- Alignment work
- Additional thickness
- Another area requiring inspection
Card slots must hold cards securely without making removal difficult. A visible exposure of approximately 12–20 mm often provides a workable balance between visibility and retention.
If too little of the card is exposed, identification becomes slow. If too much remains visible, the card may move or fall out when the wallet is tilted.
| Card Layout | Suitable Capacity | Main Strength | Main Concern |
|---|---|---|---|
| Vertical stacked slots | 3–6 | Compact | Thickness near the fold |
| Horizontal stacked slots | 4–8 | Easy visibility | Requires more width |
| Opposing card panels | 6–10 | Balanced capacity | Cards may press together |
| Hidden backup pocket | 1–3 | Better separation | Less immediate access |
| Removable card insert | 4–8 | Flexible use | Extra loose component |
One card per slot should be the normal loading assumption unless double-card storage is deliberately planned. Two cards placed in one pocket increase pressure and may stretch the opening permanently.
Every stated slot should be tested with a real plastic card. After loading, inspect whether:
- The wallet closes without force
- The outer panel remains even
- Slot openings stay straight
- Each card can be removed separately
- Stitching is not under tension
- The spine remains flexible
- The zipper still moves smoothly
A design advertised for twelve cards should perform correctly with twelve cards inserted, not merely show twelve empty openings.
How Should the Interior Be Organized?
The inside should follow the order in which documents are used. Passport and boarding papers generally need faster access than reserve cash, receipts, or backup identification.
A useful layout may be divided into four zones:
| Zone | Contents | Recommended Position |
|---|---|---|
| Fast access | Current passport and boarding document | Near the opening |
| Payment | Main cards and current currency | Visible central section |
| Protected storage | Backup cards, identification, reserve cash | Deeper internal pocket |
| Small items | SIM card, coins, key, tracker, pen | Closed or shaped compartment |
Items used together should sit close to each other. Passport and boarding document storage may share one side. Cards and current currency may occupy the opposite side. Receipts and reserve cash can sit behind the main panels.
A common mistake is placing every thick component in one area. Six layered card slots opposite two stacked passports can cause the wallet to twist. When closed, the zipper may pull toward one side and the exterior may develop a permanent curve.
Thickness should be distributed as evenly as possible.
A balanced couple layout may include:
- Two passport sleeves on one side
- Four card slots on the opposite side
- Two additional card slots behind the passport section
- One full-height cash sleeve
- One slim ticket section
A family format may divide passports between two panels instead of placing four or six booklets in one deep compartment.
Do You Need Cash and Ticket Pockets?
Cash and paper storage remain useful even when many travel documents are digital. Foreign currency, visa papers, baggage receipts, rail tickets, hotel records, insurance documents, and immigration forms are still carried on many trips.
The design should decide whether banknotes will be stored flat or folded.
A full-height section protects notes and papers from creasing but increases the overall height. A folded-cash pocket keeps the wallet compact but creates a thicker stack near the centre.
For multi-currency use, two separate sleeves may be helpful. The divider should remain light so it does not add unnecessary bulk.
| Pocket Type | Suitable Contents | Important Detail |
|---|---|---|
| Full-height sleeve | Flat cash and papers | Opening should remain wide |
| Divided currency section | Two currencies | Divider should be thin |
| Ticket pocket | Boarding and rail papers | Place near fast-access area |
| Receipt pocket | Expense records | Use a wide opening |
| Zipper coin pocket | Coins and small loose items | Keep away from passport pressure zones |
A long paper section should only be added when it supports the intended use. It may be unnecessary for a compact business wallet but valuable for family travel, tour leaders, or international trips requiring printed records.
Which Closure Works Best?
A zipper offers the strongest containment. A snap provides quick access and a clean exterior. An open bifold remains the lightest and fastest option.
The closure should be selected according to load and use frequency.
| Closure | Security | Access Speed | Suitable Use | Main Check |
|---|---|---|---|---|
| Full zipper | High | Moderate | Family and high-capacity formats | Corner movement |
| Snap | Medium | Fast | Compact bifolds | Closing force |
| Magnet | Medium | Fast | Clean modern styles | Holding strength |
| Elastic | Medium | Fast | Casual fabric designs | Recovery after use |
| Open bifold | Low to medium | Very fast | Slim personal styles | Pocket direction |
For a zip-around design, the following details affect performance:
- Zipper gauge
- Tape width
- Slider size
- Corner radius
- Lining clearance
- Stitch distance
- End reinforcement
- Full-load pressure
Rounded corners generally provide smoother zipper movement than sharp 90-degree corners. Passport corners and thick pocket stacks should remain clear of the zipper path.
A full-load zipper check should include 50–100 opening cycles. Resistance around one corner often indicates that the curve is too tight, the internal stack is uneven, or the lining is moving toward the teeth.
A snap should be positioned after the wallet has been loaded. If its position is fixed while the product is empty, it may become difficult to close later. Soft PU, thin leather, and textile exteriors often need reinforcement beneath the snap.
Magnets provide a neat appearance, but their holding force must match the loaded thickness. A magnet that is too weak opens during carrying. One that is too strong may cause excessive pulling on the surrounding material.
How Should Material Thickness Be Controlled?
Material thickness has a direct effect on flexibility, card access, edge buildup, zipper pressure, and finished weight.
A thick exterior may create a premium feel, but using the same thickness for every internal component often produces a stiff wallet. Internal card pockets, dividers, and folded edges usually need lighter material or selective thinning.
A simplified thickness map may look like this:
| Area | Common Layer Count | Main Risk |
|---|---|---|
| Outer panel | 2–3 | Usually manageable |
| Card-slot overlap | 5–9 | Excess stiffness |
| Passport pocket edge | 3–6 | Tight insertion |
| Centre fold | 4–8 | Poor closing |
| Snap area | 4–7 | Visible lump |
| Zipper corner | Several folded layers | Slider resistance |
Several methods can reduce bulk:
- Use lighter lining
- Thin selected leather edges
- Stagger pocket seams
- Reduce unnecessary backing
- Avoid overlapping every slot at the same height
- Move reinforcement away from the fold
- Use fabric dividers instead of thick PU layers
- Keep hardware backing outside major pressure zones
Material must match the structure. Genuine leather, PU, microfiber, nylon, and canvas do not fold or recover in the same way. The same pattern may need adjustment when the exterior changes.
Are Tracker and SIM Pockets Worth Adding?
Tracker and SIM storage can be useful when they solve a clear travel need. They should not interfere with passport fit, card access, or closure movement.
A tracker is thicker and more rigid than a card. Placing it behind the passport may create a visible bump. Positioning it near the fold may prevent the wallet from closing flat.
A suitable tracker compartment is often located on an outer-side internal panel, away from the zipper curve and passport pressure zone.
Before adding one, confirm:
- Device dimensions
- Pocket opening direction
- Retention method
- Removal access
- Effect on exterior shape
- Effect on loaded thickness
- Whether the device can be felt during carrying
SIM storage requires much less room. A small visible sleeve, stitched mini-slot, or transparent pocket may work. Deep unmarked pockets should be avoided because tiny items are easily lost.
A small travel-accessory area may include:
- Nano-SIM storage
- SIM ejector pin loop
- Memory-card slot
- Emergency contact note
- Small key section
Metal ejector tools should not sit loose beside passport covers or cards, as they may scratch surfaces or damage lining.
How Should Logo Placement Be Planned?
Logo size, method, and position should be settled with the finished structure in mind. A mark should remain visible after the wallet is loaded and should not interfere with stitching, folding, or hardware.
Common positions include:
- Front lower centre
- Front corner
- Closing strap
- Internal panel
- Lining label
- Zipper puller
- Gift box
| Logo Method | Suitable Material | Visual Result | Main Detail |
|---|---|---|---|
| Debossing | Leather, PU, microfiber | Subtle and refined | Depth and clarity |
| Embossing | Leather and selected PU | Raised tactile effect | Material response |
| Foil stamping | Leather, PU, paper box | Metallic contrast | Adhesion and fine lines |
| Screen print | Nylon and canvas | Clear color | Ink durability |
| Woven label | Fabric and lining | Private-label finish | Artwork simplicity |
| Metal plate | Leather, PU, textile | Strong visibility | Weight and backing |
| Rubber patch | Nylon and casual fabric | Raised durable effect | Patch thickness |
A front-panel logo should be checked after full loading. The centre of an empty panel may shift visually once the product becomes rounded.
Fine lines and small text may not reproduce clearly through debossing, woven labels, or metal casting. Artwork should be adjusted to the selected process rather than applied unchanged.
What Should Be Tested Before Approval?
The sample should be reviewed with every intended item inserted. Empty appearance alone is not enough.
A practical check includes:
- Insert the stated number of passports.
- Fill every card slot.
- Add cash and folded papers.
- Add any tracker, pen, coins, or SIM items.
- Open and close the wallet 50–100 times.
- Remove the passport with one hand.
- Select one card without disturbing adjacent cards.
- Place the wallet in the intended bag or jacket pocket.
- Leave it fully loaded overnight.
- Inspect shape, closure, stitching, and pocket tension.
| Review Item | Acceptable Result |
|---|---|
| Passport fit | Smooth insertion and removal |
| Card retention | Secure without excessive tightness |
| Closure | Operates without strain |
| Zipper corners | Smooth movement |
| Outer shape | No severe bowing or twisting |
| Stitching | Straight and free from tension |
| Lining | Flat and clear of zipper teeth |
| Logo | Correct size and position |
| Edge finish | Even and clean |
| Packing fit | No pressure marks or movement |
Comments should be measurable. “Increase the passport opening by 3 mm” is useful. “Make it easier to use” is too vague.
A strong custom travel wallet is created through accurate dimensions, balanced layer placement, controlled thickness, and repeated full-load checks. The best design feels simple during use because the difficult decisions were resolved before production began.
How Does the Custom Process Work?

A custom travel wallet normally moves through requirement review, structural planning, material selection, sample development, full-load testing, revision, approval, and volume production. Each stage should turn a visual concept into measurable instructions for dimensions, passport capacity, card layout, closure, logo, edge finish, packaging, and inspection. The process is complete only when the loaded wallet performs as intended and every approved detail can be repeated consistently.
A travel wallet contains many small components. A difference of 2–3 mm can affect card access, passport fit, zipper movement, or the finished shape. For this reason, development should not begin with color alone. Capacity, construction, material thickness, and handling need to be settled first.
| Stage | Main Work | Approval Needed |
|---|---|---|
| Project review | Confirm use, capacity, quantity, cost level, and schedule | Clear product direction |
| Structural planning | Arrange passports, cards, cash, tickets, and accessories | Agreed internal layout |
| Material review | Select exterior, lining, zipper, hardware, and reinforcement | Approved material direction |
| Sample development | Create patterns, cut parts, assemble, finish, and apply logo | Physical prototype |
| Full-load testing | Insert real passports, cards, cash, and papers | Functional confirmation |
| Revision | Correct dimensions, pockets, closure, logo, or finishing | Revised approval |
| Pre-production control | Record all specifications and compare production materials | Sealed reference |
| Volume production | Cutting, logo work, assembly, finishing, and packing | Finished order |
| Quality inspection | Check materials, workmanship, function, quantity, and packing | Release for shipment |
The schedule becomes easier to control when each approval has a clear record. Verbal comments such as “make the pocket slightly larger” should be converted into exact changes, such as “increase the usable passport-pocket width by 3 mm.”
What Should You Send Before Development?
A reference photo can start the discussion, but it is not enough to calculate an accurate sample or unit cost. The project brief should describe what the wallet must hold, how it will be carried, and how it should look when finished.
Useful information includes:
- Front, back, and open reference images
- Closed and open dimensions
- Number of passports
- Number of card slots
- Card direction and exposure
- Cash and paper-storage requirements
- Exterior material preference
- Lining preference
- Closure type
- Zipper and hardware finish
- Logo artwork
- Logo size and position
- Edge treatment
- Intended quantity
- Packing method
- Required delivery period
- Destination
- Target cost level
For card-slot development, a simple sketch should show whether cards are vertical, horizontal, staggered, hidden, or removable. It should also state whether each slot is intended for one card or more than one.
For passport storage, the brief should confirm:
| Requirement | Example |
|---|---|
| Passport quantity | 1, 2, 4, or 6 |
| Pocket direction | Top loading or side loading |
| Access style | Full sleeve, corner slots, or stepped sections |
| Visibility | Fully covered or partly exposed |
| Security | Open fold, snap, or zipper |
| Other papers | Visa pages, boarding documents, insurance records |
Material descriptions should be specific. “Soft premium PU” can mean different things to different teams. A physical reference, thickness target, texture image, color code, or intended product position gives clearer direction.
Logo artwork should be supplied in a usable vector format where possible. The file should also state:
- Finished logo width and height
- Color
- Location
- Process
- Required depth or metallic effect
- Minimum clear space from stitching and hardware
Wallet and leather-goods development should confirm card layout, material, stitching, edge treatment, embossing, hardware, packaging, quantity, and target cost before sampling begins.
How Is the Structure Reviewed?
The internal arrangement is checked before patterns are completed. The aim is to make sure that all intended contents fit without creating one thick or rigid area.
The main calculations include:
- Passport dimensions and thickness
- Card dimensions and total card stack
- Number of overlapping pocket layers
- Fold allowance
- Zipper clearance
- Gusset depth
- Material thickness
- Reinforcement position
- Hardware backing
- Paper-pocket height
A payment card is approximately 85.60 × 53.98 mm and about 0.76 mm thick. Ten cards create around 7.6 mm of solid card thickness before pocket materials are counted. If several cards sit opposite two or four passports, the wallet may become uneven unless the layers are distributed carefully.
A thickness map is useful for identifying crowded areas:
| Area | Possible Layer Build-Up | Common Problem |
|---|---|---|
| Outer panel | 2–3 layers | Usually manageable |
| Card-slot overlap | 5–9 layers | Stiffness and raised edges |
| Centre fold | 4–8 layers | Wallet does not close flat |
| Passport-pocket edge | 3–6 layers | Tight insertion |
| Zipper corner | Several folded layers | Slider resistance |
| Snap position | 4–7 layers | Visible lump or weak fixing |
The structure can be improved by using lighter lining, thinning selected leather edges, staggering card-slot seams, reducing unnecessary backing, or moving reinforcement away from the centre fold.
A high-capacity wallet may also need a gusset. The gusset gives the contents room to expand without placing all pressure on the zipper. Its depth should match the loaded thickness rather than the appearance of the empty wallet.
How Is a Sample Developed?
Once the structure is agreed, the design is converted into patterns and individual components. These may include exterior panels, lining, card pockets, passport sleeves, currency sections, zipper tape, reinforcement, edge strips, and hardware backing.
A common sample sequence is:
- Confirm dimensions and layout.
- Select exterior, lining, zipper, and hardware.
- Create the paper or digital pattern.
- Cut each component.
- Thin or prepare selected edges where needed.
- Apply the logo to the correct panel.
- Assemble card slots and passport sections.
- Install the zipper, snap, magnet, or strap.
- Complete stitching and edge finishing.
- Check dimensions and appearance.
- Load the finished wallet with real contents.
The sample often reveals details that were difficult to judge in a drawing. Examples include:
- Passport opening is 3 mm too narrow.
- Cards sit too deeply and are hard to identify.
- The centre fold is too stiff.
- The zipper catches near one corner.
- The tracker creates a visible bump.
- The closing strap is too short at full capacity.
- Edge paint cracks when the wallet folds.
- The metal plate pulls against soft material.
- The gift-box insert leaves pressure marks.
These findings should be recorded with photographs and measurements. A revision should change only the necessary areas unless the entire concept is being reconsidered.
A first sample is most valuable when it tests a defined product. If important information remains undecided, the result may only test the assumptions made during construction.
How Long Does Sampling Take?
A standard sample usually takes 5–7 days after the main details and materials are confirmed. Some simple passport sleeves or basic bifolds may take 2–3 days. More complex zip-around organizers can require additional time when they include special materials, custom hardware, several logo methods, repeated edge coating, or extensive internal sections.
The complete sample schedule normally includes more than sewing:
| Time Period | Main Work |
|---|---|
| Requirement confirmation | Dimensions, material, layout, logo, and packing |
| Material preparation | Select available materials or arrange sourcing |
| Pattern work | Create or adjust all components |
| Construction | Cutting, logo work, assembly, and finishing |
| Internal review | Check size, workmanship, closure, and function |
| Revision | Correct agreed details |
| Delivery | Send the physical sample for final review |
Physical delivery time is separate from sample-making time.
The following details may extend the schedule:
- Material not available in the required color
- Custom zipper puller or metal plate
- New debossing or embossing tool
- Multi-color printing
- Custom woven label
- Special edge-paint color
- Several coats of edge paint
- Unusual tracker compartment
- Rigid gift-box prototype
- More than one revised version
When a fixed launch date is involved, planning should work backward from final delivery. Sample review, revision, volume production, packing, inspection, and transportation all need their own time.
Jundong’s usual volume-production period is approximately 20–30 days after the specification and sample are approved, with transportation calculated separately.
What Should the Sample Test?
A sample should test appearance, capacity, access, closure, balance, and finish. It should be reviewed with every promised item inserted.
The test load should include:
- The stated number of real passports
- One plastic card in every listed slot
- Banknotes
- Folded papers
- Receipts
- Any pen, tracker, SIM card, coin, or key shown in the specification
Paper cutouts should not replace actual cards and passports. Real contents have thickness, stiffness, covers, laminated sections, and irregular edges.
A practical review can follow this sequence:
- Measure the empty wallet.
- Fill every card slot.
- Insert the stated number of passports.
- Add cash and travel papers.
- Close the wallet without forcing it.
- Open and close it 50–100 times.
- Remove one passport with one hand.
- Select one card without pulling out nearby cards.
- Hold the open wallet while standing.
- Place it inside the intended bag or jacket pocket.
- Leave it loaded overnight.
- Check shape recovery after unloading.
| Review Item | Suitable Result |
|---|---|
| Passport fit | Smooth insertion and removal |
| Card retention | Secure without excessive tightness |
| Card visibility | Easy to identify each card |
| Zipper movement | Smooth around all corners |
| Snap closure | Closes without pulling the exterior |
| Wallet balance | No severe twisting or one-sided bulk |
| Outer shape | Remains controlled after loading |
| Lining | Flat and clear of zipper teeth |
| Logo | Correct position, size, and clarity |
| Stitching | Straight and free from visible tension |
| Edge finish | Even, clean, and flexible |
| Packing fit | No crushing, rubbing, or loose movement |
For zipper models, pay special attention to the corner radius. A zipper may move well while empty and become difficult after passports press outward.
For bifold versions, check whether the wallet remains partly open after filling the card slots. This usually indicates excessive material buildup near the spine.
For leather or PU designs, fold the wallet repeatedly and inspect the surface and edge finish. Cracking, whitening, or separation should be investigated before approval.
How Should Revisions Be Controlled?
Revision comments should be precise and grouped by category. This reduces the risk of one change being missed or another approved detail being altered unintentionally.
A clear revision sheet can use the following format:
| Area | Existing Condition | Required Change | Measurement |
|---|---|---|---|
| Passport pocket | Too tight | Increase usable width | +3 mm |
| Card slots | Cards sit too deep | Increase exposure | +4 mm |
| Logo | Too close to edge | Move inward | 8 mm |
| Zipper corner | Slider resists | Increase curve radius | As marked |
| Closing strap | Tight at full load | Extend strap | +6 mm |
| Gift-box insert | Presses edge paint | Increase cavity width | +2 mm each side |
Photographs with arrows are useful, but they should be supported by measurements.
Before a revised sample is made, confirm whether the change affects:
- Pattern size
- Material use
- Sewing steps
- Logo position
- Hardware location
- Packaging size
- Unit cost
- Completion date
Moving a snap by 5 mm may look like a small alteration, yet it can require a new exterior panel. Increasing the wallet width may also change the zipper length, lining, box insert, and carton volume.
Revisions are best controlled by version number. For example:
- Version 1: initial sample
- Version 2: wider passport pocket and revised card exposure
- Version 3: approved structure with final logo and packing
The approved version should be clearly identified so an older sample is not used as the reference for volume production.
What Happens Before Volume Production?
Approval should cover the physical sample and the written specification. A sample alone may not record every material code, dimension, color, hardware finish, or packing detail.
The pre-production file should include:
- Approved sample version
- Finished dimensions
- Measurement tolerances
- Exterior material code
- Lining code
- Material colors
- Zipper type and color
- Hardware finish
- Card-slot count and position
- Passport-pocket size
- Logo artwork and dimensions
- Edge-finish instructions
- Stitching requirements
- Individual packing
- Barcode or SKU label
- Carton quantity
- Carton marks
- Inspection requirements
A first completed unit from production should be compared with the approved reference before the full order continues. This helps catch material, size, logo, or structural differences early.
The standard MOQ is usually 500 pieces per design. Selected simple styles may be reviewed at 200–300 pieces depending on structure and project conditions. Sample fees can be refunded or deducted when the volume order reaches 2,000 pieces.
Material, logo, packing, color count, and quantity per design should be confirmed together. Dividing 500 pieces into many colors can reduce cutting efficiency and may also conflict with material or packaging minimums.
How Is Bulk Quality Controlled?
Quality control should begin with incoming materials and continue through cutting, assembly, finishing, and packing. Waiting until all pieces are complete makes corrections more difficult and expensive.
A travel-wallet inspection plan may include five stages:
| Stage | Main Checks |
|---|---|
| Incoming materials | Color, texture, thickness, lining, zipper, hardware, and logo parts |
| First completed piece | Dimensions, pocket layout, closure, logo, and overall structure |
| In-process checks | Cutting accuracy, card-slot alignment, stitching, zipper installation, reinforcement |
| Finished-product checks | Appearance, function, capacity, dimensions, and hardware |
| Packing checks | Product count, labels, barcodes, box, polybag, assortment, and carton marks |
Wallet-specific checks should include:
- Card-slot opening width
- Card exposure
- Passport-pocket clearance
- Zipper path
- Zipper-end reinforcement
- Snap or magnet position
- Wrist-strap anchoring
- Stitch distance from edges
- Edge-paint consistency
- Surface marks
- Adhesive residue
- Lining wrinkles
- Hardware plating
- Logo placement
- Loaded closure performance
The first-piece check is especially important. If one card-slot row is too narrow, the same problem may repeat across the order unless it is corrected immediately.
Random finished pieces should be tested with real passports and cards. Function cannot be confirmed through visual inspection alone.
Packing must also follow the approved method. A well-made PU or leather wallet can be damaged by a box insert that is too tight, a metal puller rubbing the exterior, or uncontrolled pressure during carton packing.
Jundong’s control process covers incoming materials, logo work, sewing, function, finished appearance, and packaging rather than relying only on the last inspection.
How Can Cost and Schedule Changes Be Reduced?
Most unexpected changes come from incomplete specifications, late artwork, unavailable materials, repeated structural revisions, or packaging decisions made after the wallet is approved.
The following actions reduce unnecessary delay:
- Confirm intended contents before setting the outer dimensions.
- Approve material direction before calculating the final cost.
- Send logo artwork before sample construction.
- Test the wallet at full capacity.
- Settle the packing format before final approval.
- Combine all revision comments into one clear document.
- Avoid changing several major details at different times.
- Record the approved sample version.
- Confirm quantity by design and color.
- Allow separate time for sample delivery and production delivery.
A lower-cost option should be created by simplifying the structure intelligently rather than weakening essential functions.
Possible adjustments include:
| Cost Adjustment | Possible Effect |
|---|---|
| Reduce card-slot count | Less labor and lower thickness |
| Use standard zipper puller | Removes custom hardware setup |
| Change rigid box to folding carton | Reduces packing cost and volume |
| Use debossing instead of metal plate | Reduces hardware and attachment work |
| Use one lining color | Simplifies material control |
| Remove unused pen or coin section | Reduces components and bulk |
| Increase quantity per color | Improves cutting and material efficiency |
The custom process works well when each stage resolves a specific risk: the brief controls misunderstanding, the pattern controls dimensions, the sample controls function, the revision record controls changes, and multi-stage inspection controls consistency. The result should not merely resemble the approved concept when empty; it should perform correctly after the passports, cards, cash, and papers have been placed inside.
What Affects Price and MOQ?

The price and MOQ of a custom travel wallet depend on much more than its outer size. Material grade, internal layer count, passport capacity, card-slot construction, zipper length, edge finishing, logo method, packaging, color quantity, and inspection requirements all affect the final calculation. A compact wallet with twelve layered card slots may require more work than a larger pouch with two simple compartments.
MOQ is also connected to production efficiency. Materials must be ordered, logo tools prepared, patterns confirmed, parts cut, sewing positions set, packaging arranged, and finished pieces inspected. These steps still exist when the order is small, so lower quantities usually carry a higher unit cost.
Jundong’s standard MOQ is usually 500 pieces per design. Selected simple styles may be reviewed at 200–300 pieces according to structure, material availability, logo, packing, and production scheduling. Sample fees are separate from MOQ and may be refunded or deducted when the volume order reaches 2,000 pieces.
A useful quotation should therefore explain what is included rather than presenting one isolated figure.
| Cost Area | Lower-Complexity Direction | Higher-Complexity Direction |
|---|---|---|
| Exterior | Standard PU or nylon | Genuine leather, microfiber, mixed materials |
| Interior | 3–4 card slots | 8–14 layered card slots |
| Passport storage | One simple sleeve | Several stepped or divided sleeves |
| Closure | Open bifold | Full zip-around or custom hardware |
| Logo | Small debossed mark | Metal fitting, foil, or multi-color process |
| Edge treatment | Turned fabric edge | Repeated painted-edge finishing |
| Packing | Individual protective bag | Printed box, insert, sleeve, labels |
| Color plan | One color | Several low-quantity colors |
| Inspection | Standard functional checks | Extra testing or third-party inspection |
What Determines the Unit Price?
Unit price is built from material, labor, setup, finishing, packing, and inspection. Two travel wallets can have the same exterior dimensions but very different costs because their internal structures require different numbers of components and operations.
The main cost drivers include:
- Finished width, height, and depth
- Exterior material and usable thickness
- Lining and reinforcement
- Passport-pocket quantity
- Number of card slots
- Number of internal dividers
- Zipper length and grade
- Hardware type and finish
- Logo process
- Edge treatment
- Individual packing
- Quantity per color
- Number of designs
- Required completion period
- Testing and inspection needs
A front view rarely reveals the full workload. A simple bifold may contain six or eight pattern pieces. A family zip-around organizer may contain twenty or more individual parts once card pockets, passport sleeves, currency sections, lining, zipper panels, gussets, reinforcement, and small accessory pockets are counted.
Each additional part may require:
- Pattern preparation
- Cutting
- Edge treatment
- Positioning
- Sewing or bonding
- Alignment inspection
This is why pocket count can influence price more than a small increase in outer dimensions.
The following example uses a planning index rather than a quotation. A simple PU bifold is set at 100 to show how complexity may change the total workload.
| Design Change | Illustrative Cost Index |
|---|---|
| Simple PU bifold, 4 card slots | 100 |
| Add 4 more layered card slots | 108–118 |
| Add a full zipper | 115–130 |
| Add 2 extra passport sections | 120–140 |
| Change to microfiber exterior | 112–135 |
| Change to genuine leather | 135–220+ |
| Add repeated painted edges | 120–160 |
| Add custom metal fitting | 110–145 |
| Add rigid gift packaging | 115–150 |
The exact effect depends on size, material grade, order quantity, tooling, and packing. The index is useful because it shows why apparently small additions can change the final total.
How Do Materials Change Cost?
Material cost is influenced by grade, thickness, backing, surface treatment, usable width, cutting yield, color availability, and minimum purchasing quantity.
Genuine leather usually carries the highest material cost, but the term alone is not enough for comparison. Leather type, grade, grain consistency, thickness, surface finish, color variation, and usable cutting area all matter.
A clean outer panel requires a larger defect-free area than a small card pocket. Natural marks, shade differences, and irregular hide shapes can reduce cutting yield, which raises the material used per finished piece.
PU provides more consistent color and texture, but quality varies greatly. Relevant details include:
- Surface film
- Backing fabric
- Total thickness
- Softness
- Fold resistance
- Abrasion behavior
- Adhesion between layers
- Odor
- Response to heat and pressure
- Color consistency
A low-priced PU may require extra backing to hold shape or may show whitening when folded. A slightly higher-grade material can sometimes reduce rework and improve the finished appearance.
Microfiber leather often sits between standard PU and genuine leather in feel and cost. Nylon is lighter and works well for zip-around formats, while canvas creates a casual appearance but may need binding or anti-fraying control.
| Material | Cost Direction | Main Advantage | Cost Risk |
|---|---|---|---|
| Standard PU | Low to medium | Broad color and texture choice | Surface durability varies |
| Higher-grade PU | Medium | Better feel and fold behavior | Material MOQ may be higher |
| Microfiber leather | Medium to high | Refined and consistent | Thicker grades increase bulk |
| Genuine leather | High | Natural feel and premium character | Grade variation and cutting loss |
| Nylon | Low to medium | Lightweight and practical | Lining and binding still add cost |
| Canvas | Low to medium | Natural lifestyle appearance | Fraying and seam bulk |
| Mixed materials | Medium to high | Strong visual distinction | More sourcing and assembly control |
Material thickness also changes labor.
A thick leather exterior may need thinning around folds, card openings, and hardware. A soft fabric may need reinforcement to hold shape. A stiff PU may need larger fold allowances. These adjustments add steps even when the visible product remains similar.
Special colors can affect MOQ. A standard black or brown material may be available from stock, while a custom tone may require a separate material order. The same applies to lining, zipper tape, thread, edge paint, and packaging paper.
How Does Structure Affect Labor?
Structure determines how many times the product must be cut, positioned, sewn, turned, painted, pressed, and checked.
A simple passport sleeve may use:
- Two outer panels
- One or two internal pockets
- Limited stitching
- One logo process
A family zip-around wallet may include:
- Outer shell
- Foam or reinforcement
- Full lining
- Zipper panel
- Gusset
- Four to six passport sleeves
- Eight to fourteen card slots
- Currency sections
- Ticket pockets
- Coin compartment
- Pen loop
- Tracker pocket
- Wrist strap
- Several hardware parts
The difference is not only the amount of material. Card-slot alignment must remain straight across repeated layers. Passport pockets must allow usable clearance after sewing. Zipper corners must move smoothly at full load. The more components involved, the more opportunities there are for visible variation.
| Structural Detail | Cost Effect | Reason |
|---|---|---|
| Additional card slots | Medium | More cutting, folding, alignment, and stitching |
| Stepped passport sleeves | Medium to high | Several layers must remain evenly spaced |
| Full zipper | Medium | Zipper panel, corners, slider, and alignment |
| Gusset | Medium | Extra components and controlled assembly |
| Coin pocket | Medium | Additional zipper and internal construction |
| Tracker pocket | Low to medium | Shaped storage and retention detail |
| Removable insert | Medium | Separate component and additional finishing |
| Wrist strap | Low to medium | Strap, hardware, and reinforced anchor |
| Hidden pockets | Medium | More lining work and positioning |
Layer buildup is another cost issue. When several card pockets overlap, selected edges may need thinning or reduced backing. Without this work, the wallet may become stiff or remain partly open.
A simpler internal arrangement can reduce both unit cost and thickness. Four well-spaced card slots may perform better than eight crowded slots, especially when the product already carries two passports.
Which Logo Method Affects Cost?
Logo cost depends on artwork size, number of colors, process, tooling, placement, and the material receiving the mark.
Common options include:
| Logo Method | Setup Level | Ongoing Cost | Suitable Surface |
|---|---|---|---|
| Debossing | Low to medium | Low | Leather, PU, microfiber |
| Embossing | Low to medium | Low | Leather and selected PU |
| Foil stamping | Medium | Low to medium | Leather, PU, paper packing |
| Screen printing | Medium | Low to medium | Nylon, canvas, selected synthetics |
| Woven label | Medium | Low | Fabric, lining, edge |
| Metal plate | Medium to high | Medium | Leather, PU, fabric |
| Rubber patch | Medium to high | Medium | Nylon and casual fabric |
| Custom zipper puller | High | Medium | Zippered formats |
A small debossed logo is often one of the most efficient options for leather-like surfaces. It requires a plate but adds little weight and no separate attachment part.
A metal fitting creates stronger visual presence but needs:
- Mold or tooling
- Material selection
- Plating
- Protective film
- Backing
- Reinforcement
- Installation
- Surface inspection
Logo placement also changes labor. A front-panel mark can often be applied before assembly. A metal piece near a card section may require hidden backing and careful alignment. A logo crossing a seam or curved area is harder to control.
Several logo colors can increase setup. Screen printing may require separate screens for separate colors. Foil stamping may need another operation when two foil colors are used. Small quantity per color makes these setup costs more noticeable.
Artwork should be finalized before the quote is locked. Changing from debossing to a custom metal plate after sampling can change the unit price, sample fee, schedule, and packaging depth.
How Do Edge Finishes Affect Price?
Edge finishing has a strong effect on both appearance and labor.
Travel wallets commonly use:
- Turned edges
- Raw-cut edges
- Painted edges
- Binding
- Heat-sealed textile edges
- Folded fabric construction
Turned edges are common for PU and fabric constructions. The material is folded around the edge and secured during assembly. This can be efficient, although thick corners need careful control.
Painted edges are often used on leather and refined PU products. A clean result may require:
- Edge trimming
- Sanding
- Base coating
- Drying
- Additional coating
- Further sanding
- Final coating
- Inspection
The number of coats depends on the material and desired finish. Deep colors, bright edge colors, and thick rounded effects may require more work.
Painted edges become especially labor-intensive when the wallet contains many card openings. Each visible slot edge must remain smooth and consistent. A twelve-slot wallet can therefore require substantially more finishing work than a four-slot model.
| Edge Method | Cost Direction | Suitable Use | Main Concern |
|---|---|---|---|
| Turned edge | Low to medium | PU and fabric wallets | Corner thickness |
| Simple raw cut | Low | Selected synthetics | Edge durability |
| Painted edge | Medium to high | Leather and refined PU | Multiple coating stages |
| Fabric binding | Medium | Nylon and canvas | Consistent width and corner work |
| Heat sealing | Low to medium | Selected synthetic fabric | Material compatibility |
Edge treatment should match the intended price level. Repeated edge painting adds little value if the rest of the product uses weak hardware or poor lining. All visible elements should support the same product position.
How Does Packaging Affect Price and MOQ?
Packaging can have its own tooling, printing, material, and quantity requirements. A standard protective bag has limited cost impact. A printed rigid gift box with a fitted insert may influence the total much more strongly.
Common packing options include:
- Individual protective bag
- Tissue wrapping
- Nonwoven pouch
- Printed paper sleeve
- Folding carton
- Drawer box
- Rigid gift box
- Paper or molded insert
- Hangtag
- Barcode label
- SKU label
- Shipping-carton mark
| Packing Type | Cost Level | Volume Effect | Suitable Use |
|---|---|---|---|
| Individual bag | Low | Low | Basic protection |
| Paper sleeve | Low to medium | Low | Lightweight branding |
| Folding carton | Medium | Moderate | Retail presentation |
| Soft pouch | Medium | Moderate | Leather and premium accessories |
| Drawer box | Medium to high | High | Gift presentation |
| Rigid box | High | High | Executive or premium sets |
| Fitted insert | Medium | Moderate | Multi-piece gift sets |
A rigid box increases shipment volume even when the product is small. Freight is often affected by carton volume as well as weight, so packaging should be evaluated together with delivery planning.
Printed packaging may also have a separate minimum quantity. Ordering 500 wallets in five colors does not always mean that 100 printed boxes per color will be efficient. Generic outer packing with color-specific labels can sometimes offer more flexibility.
Jundong can support individual bags, hangtags, barcodes, SKU labels, FBA labels, printed cartons, gift boxes, and carton marks according to the project. Packaging, labels, destination, and delivery requirements form part of the cost review.
Why Does MOQ Change?
MOQ exists because a complete production flow must be arranged even for a relatively small item.
The process can include:
- Material purchasing
- Pattern preparation
- Sample confirmation
- Logo setup
- Cutting
- Pocket preparation
- Sewing
- Edge finishing
- Hardware installation
- Functional checking
- Individual packing
- Carton packing
- Quality inspection
These steps create fixed preparation work. At a lower quantity, that work is divided among fewer pieces, which raises the unit cost.
The standard MOQ is usually 500 pieces per design. A simple style may be reviewed at 200–300 pieces when materials are available, the logo is straightforward, the packing is simple, and the schedule allows it. This lower quantity is an individual review rather than a general rule.
For travel wallets, MOQ can also be influenced by:
| MOQ Factor | Possible Effect |
|---|---|
| Custom exterior color | Material minimum may increase quantity |
| Special lining | Separate lining order may apply |
| Custom zipper tape | Color or component minimum may apply |
| Metal fitting | Mold and plating minimum may apply |
| Printed gift box | Packing minimum may apply |
| Several designs | Quantity is divided across more setups |
| Several colors | Lower efficiency per color |
| Genuine leather | Hide purchasing and shade grouping need review |
| Standard stock materials | May support a lower trial quantity |
| Simple debossed logo | Usually easier than custom hardware |
A more expensive wallet does not always require a higher MOQ. In some cases, a premium leather bifold with a simple layout may be practical at a smaller quantity because the unit value can absorb more setup cost. A very low-priced product may require a larger quantity because there is less room to distribute fixed work.
How Do Colors and SKUs Affect MOQ?
MOQ is normally reviewed per design, but the number of colors and packaging versions matters.
An order of 500 pieces in one color is not operationally equal to:
- Five colors × 100 pieces
- Two materials × 250 pieces
- Ten logo versions × 50 pieces
- Several box designs in small quantities
Each variation can require separate material preparation, cutting records, thread matching, logo work, labels, packing control, and carton identification.
| Order Plan | Operational Complexity |
|---|---|
| 500 pieces, one color, one logo | Low |
| 500 pieces, two colors | Low to moderate |
| 500 pieces, five colors | Moderate to high |
| 500 pieces, five logos | High |
| 500 pieces, mixed materials and boxes | Very high |
Color quantity should be discussed early. A practical first release may use one or two core colors and expand after demand is clearer.
For multi-SKU programs, shared components can improve efficiency:
- One lining color across all exterior colors
- One zipper grade
- One hardware finish
- One box size
- One card-slot structure
- Color-specific barcode labels rather than separate printed boxes
This keeps the visual collection varied while reducing avoidable setup.
What Is the Difference Between MOQ and Sample Fee?
MOQ and sample fee cover different stages.
MOQ is the minimum quantity reviewed for volume production.
The sample fee covers development work such as:
- Material preparation
- Pattern creation
- Logo setup
- Cutting
- Sewing
- Edge finishing
- Sample inspection
- Revision work
Producing one sample still requires skilled labor and setup. It should not be treated as a free mini order.
At Jundong, the sample fee can be refunded or deducted when the volume order reaches 2,000 pieces. Sampling usually helps confirm material, dimensions, card layout, passport capacity, logo, closure, and packing before the main production run.
Sample cost may rise when the project includes:
- Custom hardware
- New molds
- Special material sourcing
- Several logo processes
- Complex painted edges
- Multiple sample versions
- Rigid gift-box development
A sample should be reviewed at full load. That step often prevents much larger costs later by identifying tight pockets, poor zipper movement, excessive thickness, or unsuitable material before the full quantity begins.
How Can Cost Be Reduced Without Weakening the Wallet?
Cost control works best when unnecessary complexity is removed while the main use remains intact.
Useful adjustments include:
| Adjustment | Possible Saving | Functional Effect |
|---|---|---|
| Reduce 12 card slots to 6–8 | Material and labor | Often improves thickness |
| Use one passport section instead of stepped layers | Sewing time | Reduces visibility for multiple passports |
| Replace custom zipper puller with standard metal pull | Tooling and hardware | Little effect on basic function |
| Change metal plate to debossing | Hardware and attachment | Creates a quieter logo |
| Change rigid box to folding carton | Packing and freight | Lower gift impact |
| Use one lining color | Material control | No major use change |
| Remove unused coin or pen section | Components and bulk | Better if feature is rarely used |
| Use shared packing across colors | Printing setup | Color identified through labels |
| Increase quantity per color | Better efficiency | Requires stronger demand planning |
The safest areas to protect are:
- Passport fit
- Card-slot usability
- Closure reliability
- Zipper quality
- Strap anchoring
- Stitching at stress areas
- Clean lining
- Accurate dimensions
Reducing these features may lower the quotation but can increase complaints and replacements.
The best cost adjustment often comes from structure. A cleaner wallet with fewer useful pockets can feel more refined than a crowded design filled with low-value details.
What Is Needed for an Accurate Quote?
An accurate review normally requires:
- Reference images or drawings
- Closed and open dimensions
- Passport capacity
- Card-slot quantity
- Exterior material
- Lining preference
- Closure type
- Logo artwork and process
- Hardware finish
- Edge treatment
- Quantity per design
- Quantity per color
- Packing method
- Label requirements
- Destination
- Required completion period
Without these details, any figure is provisional.
A clear quote should also state:
- Product specification
- Included logo process
- Included packing
- MOQ
- Sample terms
- Production period
- Trade terms
- Validity period
- Items not included
Price should be compared only after the specifications are aligned. A lower figure may exclude lining quality, gift packing, custom hardware, or required inspection. A higher figure may include details that another quotation leaves open.
For travel wallets, the most reliable cost plan is built around actual use. Confirm what the wallet must carry, remove features that add little value, select materials that suit the structure, and keep color and packing plans practical. This creates a product that meets its intended position without allowing hidden complexity to consume the budget.