Skip to content
 Transparent Cost Structure Bag Manufacturer
A transparent cost structure helps you source custom bags with more confidence and fewer surprises. At Jundong, we clearly break down the key cost drivers—materials, trims, labor, logo methods, packaging, testing, and freight-related packing options—so you can compare OEM bag quotes more fairly and understand what is really affecting the price. This makes it easier to plan sampling, bulk production, and repeat orders without hidden add-ons appearing later. If your team wants clear specifications, stable pricing logic, and better visibility into quotes for private-label bags, promotional bags, retail bags, or multi-SKU bag programs, this is the right place to start.
Auditable Transparent Cost Quotes
A transparent cost structure is not “cheap pricing.” It is clear pricing logic that stays consistent from RFQ → sample → bulk. In practice, we split a custom bag quote into parts that you can verify:
- Materials: shell fabric (e.g., 600D/900D polyester, PU/PVC, neoprene), lining, webbing, foam, board, EVA or insert options
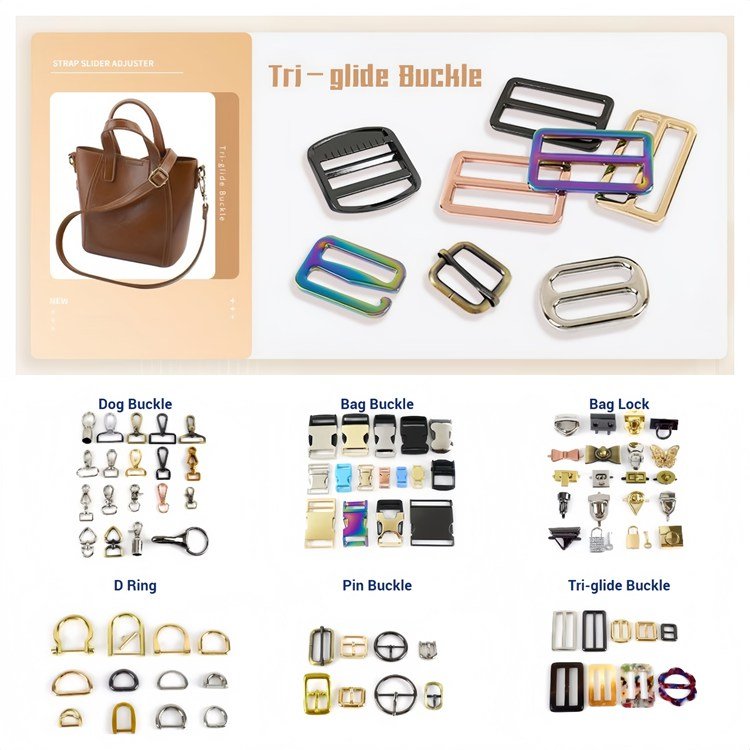
- Trims & hardware: zipper brand or spec, sliders, buckles, D-rings, snaps, hooks, pullers
- Construction: stitch density, seam type, binding, edge finishing, reinforcement in stress zones
- Branding: woven label, heat transfer, embroidery, patch types, mold cost if needed
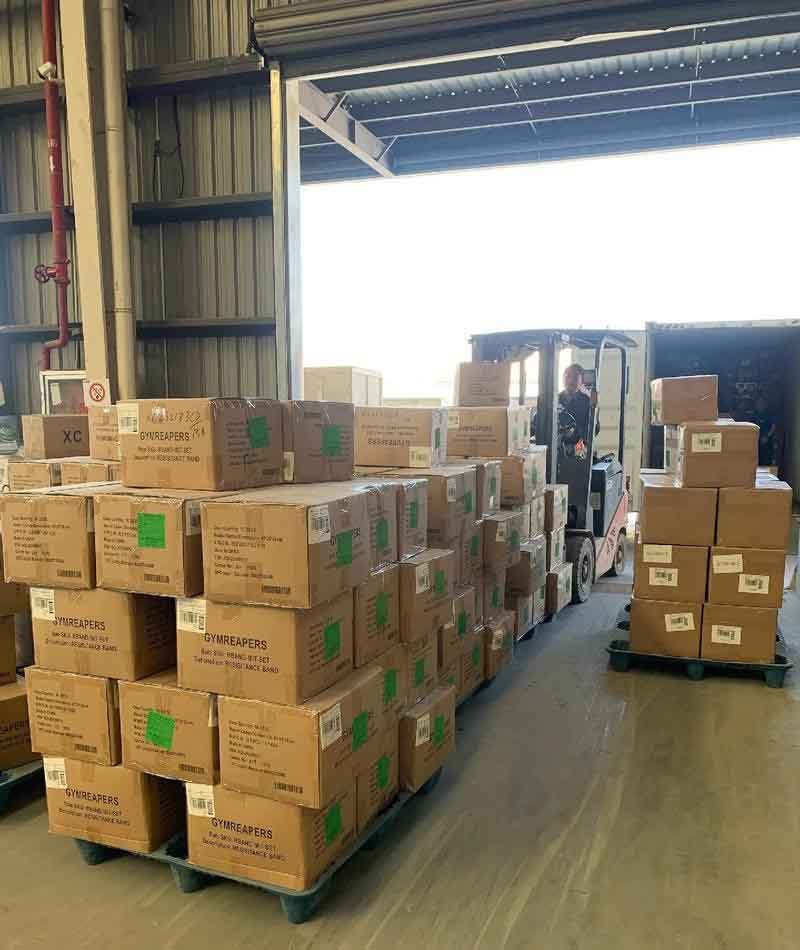
- Packaging: polybag spec, hangtag, insert card, barcode labels, master carton, drop test needs
- Testing or compliance: target markets often require REACH, CPSIA, Prop 65, or brand protocols (cost depends on scope)
- Production & QC: in-line checks, final inspection level, photo or video evidence plan if requested
- Logistics options: EXW, FOB, CIF, DDP assumptions change total landed cost
What you get from us is a quote that answers “why” instead of only “how much.” We align costs to your purchase decision: durability level, finish standard, and risk control. This is especially useful when you compare multiple factories or when your internal team needs an approval trail.
Mini table: The quote format customSameers can audit
| Cost Block | What You Can Verify | Common “Hidden” Risk We Prevent |
|---|---|---|
| Material Spec | fabric code/weight/coating, lining weight, foam thickness | fabric downgrade or coating mismatch |
| Hardware Spec | zipper size/teeth, slider type, buckle material | “Same look, different strength.” |
| Workmanship | seam type, SPI (stitches per inch), reinforcement points | weak stress zones, early failure |
| Packaging | polybag thickness, hangtag, carton strength | export damage, added re-pack cost |
| Testing or QC | testing scope, inspection level, evidence plan | last-minute compliance surprises |


12 Cost Drivers, Keep Your Product Story
A transparent manufacturer should be able to explain price movement with a clear driver map. Below is the cost-driver framework we use to keep pricing stable during RFQ → sampling → bulk. For each lever, we show what it impacts and how you can control it early.
Here is an expanded version at about 180 words:
To help procurement teams move faster without creating hidden quality risk, it is useful to separate cost levers into safe-to-optimize items and do-not-touch items. This makes quote comparison more practical and helps avoid cost cuts that later turn into complaints, rework, or delayed launches.
Safer ways to reduce cost usually keep the product’s function and durability stable. These often include simplifying panel count while keeping the same silhouette, standardizing hardware across SKUs such as one zipper spec or one buckle type, combining colorways to improve material utilization, optimizing packaging with the right carton strength and less empty space, and switching branding from labor-heavy methods like full embroidery to cleaner woven labels or patches when brand standards allow. These changes often improve efficiency without changing how the bag performs in real use.
High-risk cost cuts are different. These are the changes most likely to create quality disputes later. Common examples include downgrading outer fabric coating or fabric weight, removing reinforcements at handle anchors or other stress zones, lowering stitch density too much and weakening seams, switching to unverified zipper or hardware specs, or skipping agreed compliance and performance testing. These cuts may reduce price on paper, but they often raise the true project cost later through claims, returns, and instability in repeat orders.
Cost Drivers Table
| # | Cost Driver | What It Impacts | Control Tip |
|---|---|---|---|
| 1 | Outer Material Grade | look, abrasion, water resistance, yield | Lock fabric code/weight/coating in RFQ |
| 2 | Lining + Interlining | structure, feel, wrinkle, collapse | specify lining weight + foam thickness |
| 3 | Reinforcement Zones | stress failure rate (handles/zip ends/base) | mark “must-reinforce” points on tech pack |
| 4 | Hardware Spec | longevity, break risk, corrosion | define zipper size + buckle material (POM/metal) |
| 5 | Logo Method | unit cost + set-up (mold) | Choose embroidery vs woven label vs patch by MOQ |
| 6 | Pattern Complexity | sewing time, defect risk | Reduce panel count where it doesn’t change function |
| 7 | Stitch Density (SPI) | seam strength, time | lock SPI range (avoid “fast sew” shortcuts) |
| 8 | Edge Finish/Binding | wear, premium feel | standardize binding tape width & fold type |
| 9 | Add-ons (pockets, organizers) | minutes per unit | List “core” vs “optional” features for pricing tiers |
| 10 | Packaging Standard | export damage risk | set carton strength & labeling once for all SKUs |
| 11 | Testing/Compliance Scope | lead time + cost | confirm target market + brand protocol early |
| 12 | Order Mix & Colorways | efficiency, fabric utilization | group colors; avoid tiny runs per color if possible |

Auditable Line-Item Quote Template
This RFQ template helps you compare on the same basis. It separates unit-cost drivers like materials, trims, and labor from one-time costs like molds, artwork setup, and lab testing. It also locks key trade terms such as FOB, CIF, DDP, carton rules, payment terms, and lead time. When everyone fills in the same format, it becomes much easier to spot hidden assumptions, missing details, and unrealistic pricing.
Part A — RFQ Input
Asked to confirm these basics before quoting:
Product Type: bag category and end use
Example: tactical backpack, EVA case, cooler bagTarget Market: country and sales channel
Example: US retail, EU e-commerceMOQ & Quantity: per color and total order volume
Example: 300 pcs or color, 1,200 pcs totalSize: L × W × H in cm or inches
Example: 30 × 15 × 45 cmTarget Price: ex-factory range if available
- Timeline: sample lead time and bulk lead time
Part B — Cost Breakdown
Require you to list clear specs, unit cost, and assumptions for:
Outer material: code, weight, coating
Lining: material and weight
Foam, board, insert: thickness, density, EVA or PE board.
Webbing: width and thickness
Zipper: size, teeth type, brand, quantity
Hardware: buckle, D-ring, plastic or metal
- Logo: print, embroidery, patch, transfer, position
Packaging: polybag, carton spec, barcode, hangtag
Labor & overhead: sewing complexity, panel count
QC or inspection: AQL level or brand protocol
Part C — One-Time Costs
Separate these from the unit price:
mold or tooling
artwork setup
lab testing
sample fee
Part D — Locked Terms
Confirm:
Incoterm: EXW, FOB, CIF, DDP
Packing: units per carton, carton grade
Payment: TT, deposit/balance
Quote validity
Production lead time after sample approval
This format works well for custom bags, OEM bags, private label bag manufacturing, EVA cases, backpacks, cooler bags, and wholesale bag sourcing.
Three Tiers, One Design, Controlled Cost
Good, Better, Best Pricing for Custom Bag Manufacturing
A quote should do more than show a price. It should help understand what drives cost, where savings are possible, and which upgrades improve performance. That is why we use a Good, Better, Best pricing structure for custom bags, OEM bags, private label bags, backpacks, EVA cases, cooler bags, and promotional bags.
This system keeps the bag design and overall appearance consistent while showing how different material and process choices affect price.
How the Tier System Works
We divide specifications into three groups:
Non-Negotiables: core standards that protect durability, structure, and production consistency
Selectable Upgrades: optional improvements for hand-feel, function, or retail appearance
Safe Optimizations: lower-risk adjustments that help control cost for volume orders
Tier Logic by Specification
Outer Material:
Good uses reliable stock fabric. Better upgrades in weight or coating. Best adds premium materials or special finishes.
Lining and Structure:
Good includes standard lining and basic foam. Better improves shape retention. Best adds reinforced structure and a more premium feel.
Zipper and Hardware:
Good uses dependable standard components. Better improves smoothness and strength. Best adds premium zipper and hardware options for long-term use.
Branding and Packaging:
Good supports woven labels or simple patches with export-safe packing. Better improves branding presence and carton protection. Best supports retail-ready packaging, stronger branding impact, and better shelf presentation.
QC and Compliance:
Good includes standard in-line and final inspection. Better adds photo evidence. Best supports stricter QC, documentation, and expanded compliance requirements.
What Never Changes
Across all tiers, we lock critical specs such as:
outer fabric code, weight, and coating
zipper size and specification
reinforcement at stress points
stitch density on load-bearing seams
export carton grade
How to Use It
For most projects, Better is the best starting point because it balances cost, durability, and bulk production stability. Good fits tighter budgets. Best is ideal for retail-ready, premium, or compliance-sensitive bag programs.
This approach gives you clearer cost control, sourcing transparency, and sample-to-bulk consistency.
Change Control: Stable Cost, Stable Price
Cost Change Control for Custom Bag Projects
To keep RFQ, sample development, and bulk production aligned, we use a simple but strict Cost Change Control system. The goal is to prevent quote drift, reduce hidden costs, and protect sample-to-bulk consistency for custom bags, OEM bags, private label bags, backpacks, EVA cases, cooler bags, and promotional bags.
The method is based on two rules:
Lock the baseline spec before sampling
Treat every later adjustment as a documented change request
1. Spec Baseline: What We Lock Early
Before sample work begins, we confirm these items in writing:
Outer fabric: material code, weight, coating, approved color
Lining and structure: lining weight, foam thickness, support points
Zipper and hardware: zipper size, teeth type, slider, buckle material
Stress-zone reinforcement: handle anchors, zip ends, base corners
Logo method: print, embroidery, patch, size, placement, tooling if needed
Packaging: polybag spec, carton grade, barcode, labeling rules
Commercial terms: Incoterm, MOQ per color, target lead time
This locked baseline becomes the reference for both quotation and sampling.
2. What Usually Causes Cost Changes?
Typical cost-change triggers include:
material substitution
construction changes such as extra pockets or new panels
hardware upgrades
branding changes
packaging upgrades
expanded compliance or lab testing
order mix changes, such as too many colors with low quantity per color
When a change happens, we recheck unit cost, setup cost, lead time, and production risk before moving forward.
3. Clear Change Request Workflow
Our process is simple:
Sends the change request.
We issue an impact sheet with cost, lead time, and risk notes.
Approves in writing.
Only then do we revise the sample or update bulk production
4. Practical Lock-Price Tips
To keep pricing more stable:
Finalize key specs before sample approval.
Avoid? late changes to fabric and zipper systems
standardize packaging across SKUs
keep colorways and small-batch splits realistic


QC Evidence Ensures Cost Transparency
When asked for transparent pricing, they usually want two things:
- A quote that can be checked
- A production process that can be verified
That’s why we use an Evidence Pack model—simple documentation that connects the quote to real production inputs. Depending on your program (MOQ, complexity, brand requirements), the evidence can be “light” or “full.”
A. Evidence Pack Levels
| Level | Best For | What You Receive (Examples) |
|---|---|---|
| Level 1: Light Proof | fast programs, simple SKUs | key material photos, hardware photos, sample approval photos |
| Level 2: Standard Proof | most orders | material spec snapshots, incoming checks, in-line QC photos, packaging verification |
| Level 3: Full Proof | brand programs / high-risk items | full inspection report, stress-zone photos, measurement records, carton tests, optional video |
B. Evidence Checklist
Materials
- outer fabric roll label info (as available)
- fabric weight or coating confirmation (photo and notes)
- lining or foam thickness confirmation
Trims & Hardware
- zipper size, teeth type confirmation
- buckle, D-ring material confirmation (POM, metal)
- logo label, patch photos vs approved artwork
Workmanship
- stitch density reference photos on load seams
- stress-zone reinforcement photos (handle anchors, zipper ends, base corners)
- binding or edge finish photos
Packaging
- polybag thickness, labeling check
- carton grade, shipping marks verification
- units-per-carton confirmation
C. QC Checkpoints Table
| Stage | What We Check | What You Avoid |
|---|---|---|
| Incoming Material | fabric/lining/foam match spec | wrong fabric grade, wrong coating |
| Pre-Production | pattern + BOM alignment | sample-bulk mismatch |
| In-Line QC | stitching, reinforcements, logo placement | drifting placement, weak seams |
| Final QC | measurements, function, appearance | high defect rate/rework |
| Packing Check | packaging & carton rules | export damage/relabeling |
D. Acceptance Tips
- ask for two reference sets: approved sample photos and bulk evidence photos
- define “must-have” photos: zipper close-up, reinforcement points, packaging carton label
- If you have multiple SKUs, request evidence for one SKU per material group (Not every color needs full documentation)
This approach protects your landed cost: fewer disputes, fewer returns, fewer emergency reworks.

Control Total Landed Cost Transparently
A transparent cost structure includes what happens after the bag is made: packing, cartonization, labeling, and shipping terms. The goal is to prevent “hidden” costs like emergency re-cartoning, relabeling, damaged goods claims, or warehouse rework.
A. Packaging Cost Drivers (what changes price)
| Packaging Item | What Changes Cost | What you Should Specify Early |
|---|---|---|
| Polybag | thickness, warning text, suffocation hole | target market requirements + bag thickness |
| Hangtag or Insert | paper type, print color, string, QR or barcode | brand artwork + barcode format |
| Inner Protection | tissue, foam sheet, separators | needed only for high-scratch surfaces |
| Master Carton | carton grade, size, moisture protection | carton grade + max weight per carton |
| Retail-Ready | display box, color box, set packing | Define if you ship to retail DCs |
B. Carton Rules That Prevent Damage (simple standards)
Damage is often not the bag’s fault—it’s the carton’s strength and packing rules. Common rules we align on:
- max carton weight (e.g., 12–18 kg depending on program)
- correct carton grade for export
- units per carton (avoid over-compression)
- clear shipping marks and label placement
- moisture control if sea shipping (desiccant or liner when needed)
C. Incoterms Comparison (why quotes look different)
| Term | Who Pays Freight | Who Controls Shipping | Risk Point |
|---|---|---|---|
| EXW | buyer | buyer | buyer must manage pickup/export |
| FOB | buyer | shared | clear port & timeline needed |
| CIF | supplier arranges | supplier | insurance scope must be clear |
| DDP | supplier arranges | supplier | taxes/duty assumptions must be written |
D. The Checklist: Landed Cost Control
Decide your shipping term (FOB and optional DDP comparison)
- Lock packaging standard: polybag, labeling, and carton grade
- Confirm carton rules: units/carton and max weight
- Clarify delivery destination (port, warehouse, DC)
- Add special requirements only if needed (retail packing, testing, drop tests)

Material & Hardware Spec Control
To keep quotes auditable, you need specs that are measurable and repeatable. Below are practical spec-writing rules procurement teams use, plus a template you can copy into your tech pack.
A. Material Spec Template
Use this structure instead of generic names:
- Outer Fabric: material, denier, weave, and weight (gsm), coating type and coating weight (if applicable), and finish
- Lining: material and weight (gsm) and color reference
- Webbing: material, width, thickness, and breaking strength target (if needed)
- Foam or Interlining: type, thickness, and density (when important)
- Board or Insert: material, thickness, and edge finish
Example (good spec):
Outer: 600D polyester, plain weave, ≥260gsm, PU coating, water resistance target, color ref Pantone XXXX.
Not good: “600D polyester, black.”
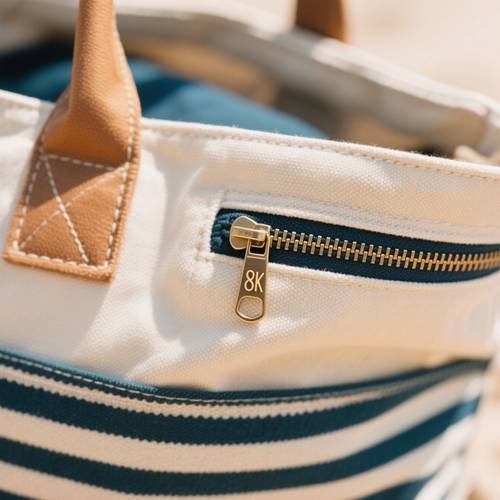
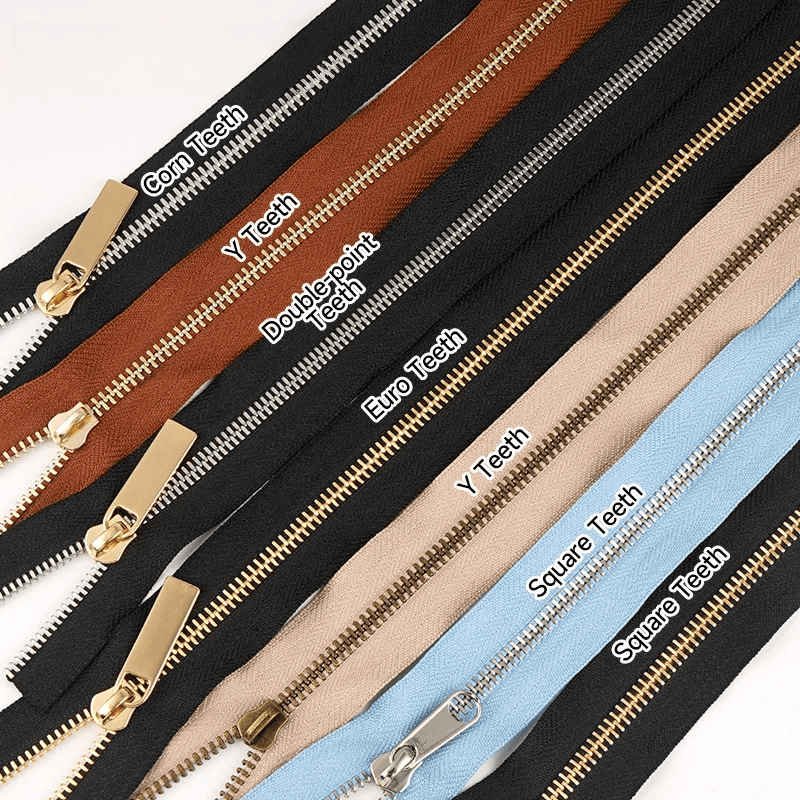
B. Hardware Spec Template
Hardware should be defined by size, material, and function:
- Zipper: size (#5/#8/#10), teeth type (nylon or metal), slider type, puller style, color
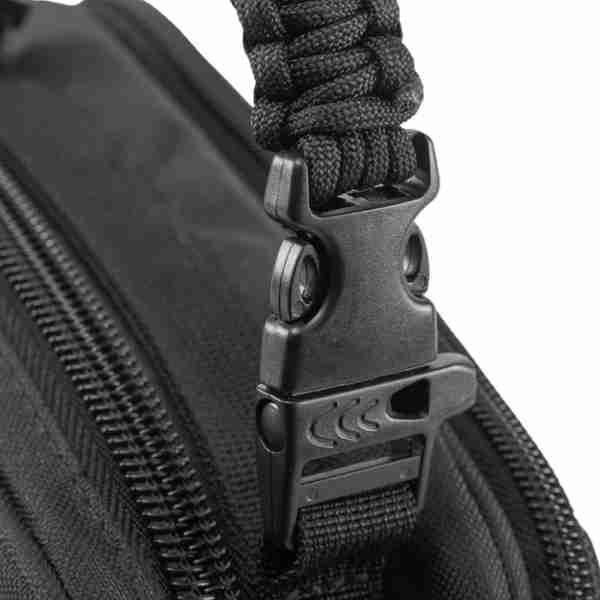
- Buckles: type (side-release or ladder lock), material (POM or metal), size (mm), color
- D-rings or hooks: inner diameter, thickness, material, coating (anti-rust), load target when relevant
Example (good spec):
Zipper: #8 nylon coil, auto-lock slider, matte black puller, corrosion-resistant finish.
C. “Same Name” Risk Table
| Item Same | Same Name, Different Quality | What to Lock |
|---|---|---|
| 600D fabric | GSM varies, coating differs | GSM + coating type |
| PU coating | thickness varies widely | coating weight/water target |
| Zipper #5 | slider quality differs | slider type + puller spec |
| Metal buckle | Alloy quality differs | material + plating spec |
| Webbing | thickness varies | width + thickness |
D. Fast Audit Checklist
- Ask for material confirmation photos (roll label, close-up texture)
- Confirm zipper size and slider function in the sample
- Define “no substitution” items in writing
- For mixed SKUs, lock specs by material group (not by color only)
This approach improves price stability and reduces disputes because everyone is pricing the same thing.
Process Steps, Minutes, Cost Control
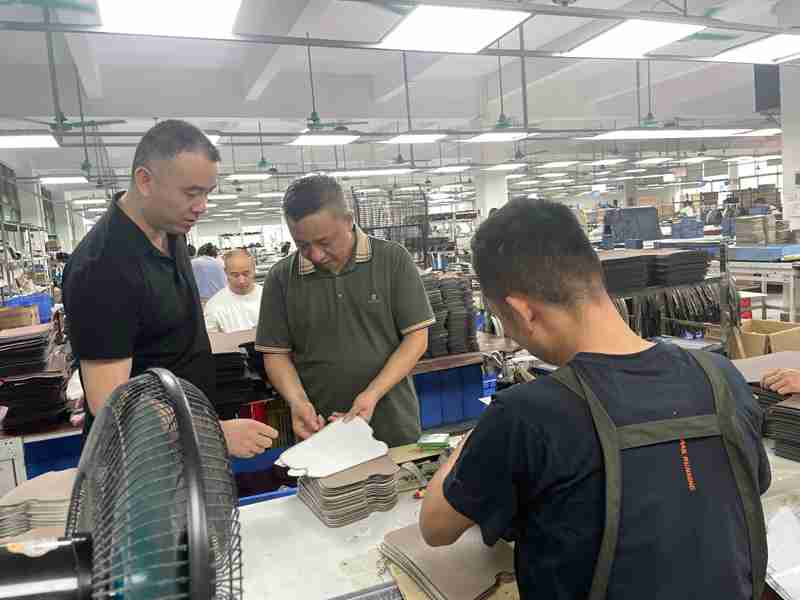
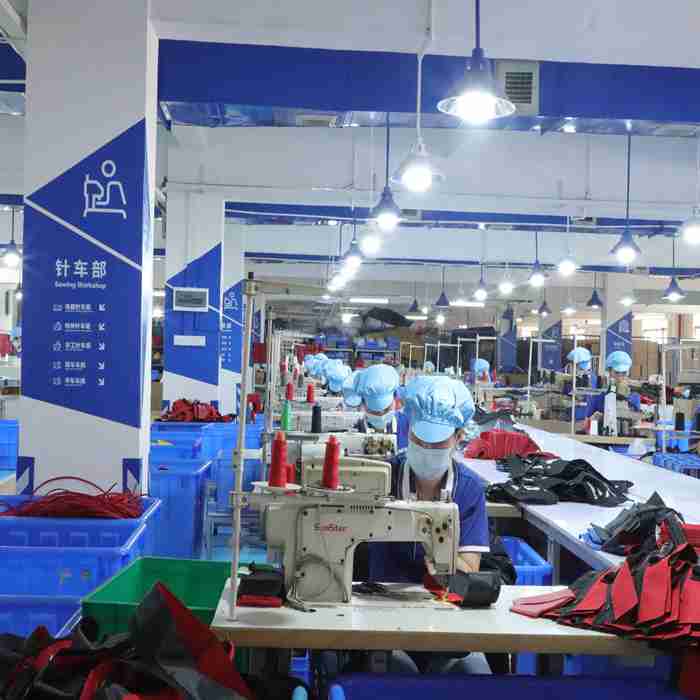
How a Transparent Bag Manufacturer Explains Labor Cost
A professional bag manufacturer should be able to explain labor cost using real production logic, not just a single number. In custom bag manufacturing, labor cost usually comes from the number of operations, the sewing time required, and the quality risk attached to each step. This is especially relevant for OEM bags, private label bags, backpacks, EVA cases, cooler bags, tool bags, and promotional bags.
Typical Manufacturing Steps
Most bag projects include:
material cutting
logo application, such as embroidery, heat transfer, or patch sewing
sub-assembly for pockets, straps, and zipper panels
main assembly for body panels, base, and gussets
reinforcement at stress points
edge finishing, such as binding or piping
cleaning and shaping
in-line QC
final QC
packing and cartonization
What Usually Adds Labor Cost
The biggest labor drivers are:
Higher panel count because more pieces mean more seams
binding or piping because edge finishing takes time
extra pockets and organizers because they increase sewing operations
reinforcement because bar-tacks and extra layers add time, but reduce returns
logo operations because embroidery minutes affect cost
thick or rigid materials because they are slower to handle
tight alignment tolerances because precision increases sewing difficulty
Safe Ways to Reduce Labor Cost
You can often lower costs without hurting quality by:
Reducing non-functional seam lines
standardizing zipper modules across SKUs
limiting micro-pockets with low user value
keeping reinforcement only in high-stress zones
choosing a more efficient logo method, such as woven labels or patches instead of heavy embroidery
What Should be Locked Early
To keep RFQ, sample, and bulk production aligned, you should confirm:
stitching and construction spec
reinforcement points
zipper panel structure
binding finish
sample approval standard
Transparent labor discussion is not a factory secret. It is a key part of cost control, quote accuracy, sourcing transparency, and sample-to-bulk consistency.


Make A Sample First?
See your idea come to life before mass production.
At Jundong Factory, we offer free design mockups and custom samples to ensure every detail is perfect — from material and color to logo placement and stitching.
Start your project with confidence today: info@jundongfactory.com.
Transparent Cost Structure FAQs
How do I know a “transparent cost structure” quote is real, not just a pretty table?
A real, transparent cost structure quote is “audit-ready”: it states measurable specs, separates unit costs vs one-time costs, and lists assumptions (Incoterm, packaging rules, MOQ per color) so you can reproduce the price and catch hidden downgrades before sampling.
Here’s how you can verify transparency in 5 minutes. Asked to show spec-level clarity, not just categories like “materials” or “hardware.”
(1) Spec clarity (must be measurable)
A credible quote includes at least these fields:
Outer fabric: denier/weave and gsm and coating type (PU/PVC)
Lining: material and GSM
Zipper: size (#5/#8/#10) and teeth type and slider function
Hardware: buckle/D-ring material (POM/metal) and size
If any of these are missing, the quote can’t be fairly compared.
(2) Separation of costs (unit vs one-time)
A real structure splits:
Unit cost drivers: fabric, trims, labor minutes, packaging, QC
One-time costs: mold or tooling, artwork setup, lab testing, sample fee
This prevents “hidden add-ons” from appearing later.
(3) Assumptions written in plain language
Transparent state what’s assumed:
- Incoterm (FOB port / DDP destination)
- Packaging standard (polybag thickness, carton grade, units/carton)
- Colorway rules (MOQ per color, mixed order policy)
What are the most common reasons a bag price increases after sampling, and how can I stop it?
Post-sample price increases usually come from spec drift (material, zipper, reinforcement, logo, packaging, compliance) or order structure changes (too many colorways, low qty per color). You stop it by locking a spec baseline before sampling and requiring a written change impact sheet before any revision work.
Most disputes happen because “the sample looks fine,” but the quote didn’t clearly define what “fine” included. Here are the top triggers and how you can control them.
Top price-increase triggers (with prevention actions)
| Trigger | What changes | You prevention move |
|---|---|---|
| Fabric grade/coating | performance + yield | Lock GSM + coating in RFQ |
| Zipper/hardware upgrade | durability | lock zipper size + buckle material |
| Added pockets/organizers | labor minutes | Split “core vs optional” features |
| Reinforcement expanded | time + materials | mark stress zones upfront |
| Logo method change | setup + minutes | Pick one method early (label/patch/embroidery) |
| Packaging upgrade | materials + packing time | decide carton grade + units/carton early |
| Compliance scope | lab fees + timeline | Confirm the target market/test plan early |
| Order mix | efficiency | avoid tiny runs per color |
Which cost cuts are “safe,” and which ones usually cause returns or quality claims?
Safe cost optimizations reduce waste and complexity (panel count, standardized hardware, rational colorways, right packaging) while protecting durability-critical items like fabric grade, zipper system, and stress-zone reinforcement. Risky cuts target the exact areas that fail first and create claims.
You often ask, “Where can I save money without hurting quality?” The key is to separate cosmetic complexity from structural durability.
Safe-to-optimize (usually low risk when managed):
- Reduce panel count in non-structural zones (fewer seams, fewer minutes)
- Standardize zipper lengths/specs across SKUs (efficiency gain)
- Limit tiny, low-value pockets that add labor but little user value
- Improve material utilization by reducing “micro runs” per color
- Right-size packaging (proper carton grade, correct units/carton) to avoid damage and rework
High-risk cost cuts (commonly cause claims):
- lowering outer fabric GSM or changing coating
- switching zipper/hardware to “equivalent” without spec
- removing reinforcement at handle anchors, zipper ends, base corners
- reducing stitch density too much on load seams
- using weak cartons to save cents but increasing shipping damage
What is the minimum “evidence pack” I should request to prove bulk matches the quote?
The minimum evidence pack should verify four areas—materials, hardware, stress-zone workmanship, and packaging—using a small set of photos or records that directly connect your quote assumptions to real production inputs. You don’t need “everything,” but you do need the right proof.
You often ask for proof too late (after production) or ask for too much (which slows the project). The smart approach is to request targeted evidence that prevents the most expensive disputes: fabric downgrade, zipper swap, missing reinforcement, and weak cartons.
The Minimum Evidence Pack
(1) Materials proof (outer + lining + structure)
Request:
- outer fabric close-up and fabric roll or label photo (as available)
- lining close-up and noted weight (gsm if provided)
- foam or interlining thickness photo (if used)
(2) Hardware proof (zipper and key parts)
Request:
- zipper close-up showing size/teeth type + slider function (auto-lock vs non-lock)
- buckle or D-ring close-up showing material type (POM/metal) + size
(3) Workmanship proof (stress zones only)
Request photos of:
handle anchors
zipper ends
base corners
These points fail first. Proof here is more valuable than 50 random photos.
(4) Packaging proof (export stability)
Request:
- polybag spec photo (thickness or printing if relevant)
- carton grade label photo and units-per-carton confirmation
- shipping marks or labels placement photo (if required)
How should I compare FOB vs DDP quotes without getting misled?
To compare FOB vs DDP fairly, you must standardize the product specs first, then isolate logistics variables: destination, delivery scope, customs/tax assumptions, carton rules, and timeline. Otherwise, DDP can look “expensive” or “cheap” for reasons unrelated to manufacturing quality.
FOB and DDP are not just pricing formats—they shift responsibility and risk. Many accept a DDP number without clarifying what is included, then get surprised by exclusions (remote area fees, oversized cartons, duties assumptions).
A fair comparison method (step-by-step)
Step 1 — Lock factory-side assumptions
Before comparing terms, ensure both quotes match:
material GSM/coating, zipper spec, reinforcement, packaging rules
(Use the 10-item checklist from Module 12.)
Step 2 — Define the DDP scope clearly
Ask the supplier to specify:
- delivery address type (port/warehouse/DC)
- included charges: freight, customs clearance, duties/taxes, local delivery
- exclusions: remote area fees, storage/demurrage, re-labeling, appointment fees (if any)
Step 3 — Compare “landed cost per unit”
Use one simple table:
| Item | FOB Quote | DDP Quote |
|---|---|---|
| Ex-factory unit cost | ||
| Export packing/carton | ||
| Freight estimate | buyer arranges | included? |
| Duties/taxes | buyer | included? assumptions? |
| Local delivery | buyer | included? |
| Risk note |
We have low MOQ and many SKUs. How can transparent pricing still work without constant re-quotes?
Transparent pricing works for low MOQ or multi-SKU programs when you price by material groups and common components, set clear MOQ-per-color rules, and use a tiered feature list (“core vs optional”) to control labor minutes. This reduces re-quotes because most SKUs share the same cost logic. Run into chaos when each SKU is treated like a brand-new project. The key is to create a pricing architecture that scales.
A scalable pricing architecture (what to standardize)
(1) Group SKUs by material families
Example groups:
- Group A: same outer fabric + lining family
- Group B: waterproof coating fabric family
- Group C: special materials (neoprene/PVC/PU)
(2) Standardize common components
- one zipper spec across multiple SKUs
- one hardware set (buckle sizes/material)
- one packaging standard (carton grade + labels)
(3) Define “core vs optional” features
Create a menu:
- Core: base structure, standard pocket set, standard logo method
- Optional: extra organizers, special patches, retail inserts, upgraded hardware
(4) Lock MOQ and colorway rules
Write it clearly:
- MOQ per color, mixed order allowed or not
- surcharge logic for micro runs (if any)
Mini table: how this prevents constant re-quotes
| Problem | Old way | Transparent scalable way |
|---|---|---|
| too many SKUs | Re-quote each SKU | quote by material group |
| many colorways | Each color is treated separately | lock MOQ rules + group colors |
| feature creep | random add-ons | “core vs optional” menu |
| inconsistent packaging | each SKU different carton | one packaging standard |
Tip: Ask the factory to return a quote with two layers:
Base price (material group and core build)
Option prices (add-on costs per feature)
That format is much easier for your team to approve and scale.
How do I lock the Good/Better/Best tier into the PO so bulk matches the approved sample?
To lock a Good/Better/Best tier, you must convert the tier into a “must-not-change baseline” attached to the PO and the sample approval sheet, including fabric GSM/coating, zipper system, stress-zone reinforcement points, and packaging rules. Without written tier locks, factories often remember the tier differently.
Many like tiered quotes (Module 4), but they fail to make tiers enforceable. The key is to treat the tier as a spec package, not a marketing label.
Step-by-step: Make the tier enforceable
Step 1 — Pick one tier as the official baseline
For most programs, choose BETTER as the default (balanced durability and cost). Write:
- “Baseline tier for production: BETTER.”
Step 2 — Convert the tier into a Must-Not-Change list
Minimum tier lock fields:
- Outer fabric: code or denier + gsm + coating type
- Lining: material + gsm
- Zipper: size + teeth type + slider function
- Hardware: buckle/D-ring material + size
- Stress zones: handle anchors, zipper ends, base corners (reinforcement method)
- Logo: method + size + placement
- Packaging: polybag + carton grade + units or carton
- Incoterm & destination/port (to avoid logistics assumption drift)
Step 3 — Attach baseline to sample approval and PO
Use a simple PO attachment:
- “Approved sample reference: photos and measurements.”
- “Tier baseline: must-not-change list.”
- “Change rule: any changes require a written impact sheet and approval.”
Mini table: What to attach
| Attachment | Why it matters, | What it prevents |
|---|---|---|
| Approved sample photos | visual baseline | “looks different” disputes |
| Must-not-change list | spec baseline | silent downgrades |
| Packaging rules | shipping stability | carton damage/rework |
| Change workflow | cost clarity | surprise add-ons |
Tip (fast internal control)
If your team has multiple stakeholders, add a short header on the baseline sheet:
“Any change to fabric, zipper, reinforcement, or packaging requires written approval.”
This protects finance and QA from last-minute re-quotes.
How should compliance testing costs be handled in a transparent quote (REACH/CPSIA/Prop 65, etc.)?
In a transparent quote, compliance is handled as a defined scope: what market, what material set, what test items, who pays, and when it’s triggered. Testing should be listed as a separate line (often one-time or per-material-group), not hidden inside the unit price without explanation.
You often get surprised because “testing” is mentioned casually, but the scope is not agreed upon. A transparent manufacturer will clarify testing through a simple decision structure.
A clear way to quote compliance
(1) Define the target market and channel
Example: US retail vs EU e-commerce can trigger different requirements.
(2) Define the material set
Testing usually applies to the materials used (fabric, coating, prints, PVC/PU, accessories), not the stitching. For multi-SKU programs, test by material family, not by each SKU color.
(3) Decide who owns the report and the frequency
- Is it one-time per project, per shipment, or per production lot?
- Will the report be in the name, factory name, or lab record?
Mini table: Transparent testing quote format
| Item | Scope Example | Cost Type | When Triggered |
|---|---|---|---|
| REACH (EU) | coating/material set A | one-time / per set | before bulk shipping |
| CPSIA (US kids) | If the product is for children | one-time + periodic | per brand protocol |
| Prop 65 (CA) | material risk screening | one-time | if required by the channel |
controls (to avoid cost surprises)
- state market/channel in RFQ
- list any “must-have” compliance requirements early
- ask the factory to quote testing as a separate line with assumptions
- avoid adding new materials late (each new material may expand the test scope)
Red flag: If the supplier says “testing included” but cannot define scope, it’s not transparent. “Included” should mean “included under these conditions.”
How do payment terms (deposit/balance) affect pricing transparency and sourcing risk?
Payment terms don’t just affect cash flow—they define risk sharing. Transparent link payment milestones to measurable deliverables (sample approval, material confirmation, inspection) so you pay with confidence and avoid disputes like “we already paid, but specs changed.”
Many accept a simple “30% deposit, 70% before shipment” without attaching deliverables. That’s where risk increases—especially for new suppliers or complex specs.
A. Transparent payment milestones (what good looks like)
A safer structure ties payment to checkpoints:
Deposit (project start)
Purpose: reserve production planning and start sample or material prep.
Protection: Deposit only after you receive a written spec baseline and quote assumptions.
Pre-production confirmation milestone
Purpose: Confirm that materials or hardware match the locked spec.
Protection: require material and hardware confirmation (photos or spec notes) before major cutting.
Balance (before shipment or after inspection)
Purpose: finalize after quality confirmation.
Protection: link balance to the final inspection summary.
B. Mini table: Payment terms mapped to deliverables
| Milestone | Pays For | Deliverable You Should Require |
|---|---|---|
| Deposit | start work | Spec baseline and tier baseline confirmed |
| Pre-production | start bulk | material or hardware confirmation and BOM alignment |
| Balance | shipment release | Final QC summary and packaging verification |
C. Tips (reduce risk without slowing the order)
- Put the baseline spec and change rules as PO attachments
- Define what counts as “approved”: sample photos and measurements, and must-not-change list
- If you need a third-party inspection, state it upfront so lead time is realistic
Red flag: A supplier pushes for full payment early but won’t provide a spec baseline or proof. That’s the opposite of transparent sourcing.
How should “quote validity” and raw material price fluctuations be handled fairly?
A fair, transparent quote defines the validity period, what can trigger a re-quote, and how changes are calculated. Instead of vague “material price may change,” it should specify which materials are volatile, what time window is protected, and whether alternatives exist (tier options).
You dislike uncertainty. But you also face real material price movements, dye lot differences, and availability issues. Transparency means making these factors predictable, not pretending they don’t exist.
A. What “quote validity” should include
A clear quote validity statement should specify:
- validity days (e.g., 15/30 days)
- which items are protected (labor, standard trims)
- which items are variable (special fabrics, custom hardware)
- what happens after validity ends (re-confirm material availability)
B. Trigger list (when a re-quote is legitimate)
| Trigger | Why It’s Legit | How to Keep It Fair |
|---|---|---|
| new material family | different cost base | quote delta for that item only |
| major qty change | efficiency changes | Reprice by qty break |
| new colorway structure | yield changes | group colors or adjust MOQ |
| new compliance scope | lab fees and time | quote testing as a separate line |
C. Strategies to protect the budget
- ask for tier options (Good/Better/Best) as built-in alternates
- lock “must-not-change” items and only allow substitutions in non-critical areas
- if lead time is long, request a material reservation plan (where applicable)
Red flag: “Price can change anytime” with no triggers is not transparent. A transparent supplier defines the rules and the scope.
When are sample fees and tooling/mold costs refundable, and how do I write safer rules?
Sample fees and tooling costs can be handled transparently by separating what is reusable (molds, plates) from what is labor (sampling), and by defining refund or credit rules tied to bulk order quantity. Clear rules prevent arguments and help you budget correctly.
You often feel sample fees are “random.” Manufacturers often feel that sample work is underpaid. A good agreement respects both sides with clear conditions.
A. Typical fee types (what they really are)
- Sample fee: engineering time—pattern making, prototype sewing, revisions
- Tooling or mold: physical asset—rubber patch mold, metal logo mold, cutting die
- Artwork or setup: print plate, heat transfer setup, embroidery digitizing
B. Transparent refund or credit models (common and fair)
| Fee Type | Common Handling | The Rule |
|---|---|---|
| Sample fee | credited in bulk | credit after PO reaches the agreed qty |
| Tooling/mold | usually non-refundable | The client owns the mold after payment; reuse on repeat orders |
| Artwork/setup | project-based | credit partially if repeated SKUs use the same artwork |
C. Checklist: how to write it safely
- List fees as separate lines in the quote
- define credit conditions: “credited when bulk reaches ___ units”
- Define ownership: who keeps the mold, who can reuse it
- Define revision limits: how many sample rounds are included
- Define what counts as “new project” (new size, or material family may require new setup)
Procurement tip: If you plan multiple SKUs, ask for tooling designed for reuse across the line. That reduces future cost and supports long-term transparent pricing.
How do you handle color consistency (Pantone matching, dye lots) without causing rework, delays, or price disputes?
Color consistency is controlled by locking the color reference standard (Pantone or physical swatch), approving a pre-production color sample, and managing dye lots by material group. Transparent also clarifies what ” acceptable tolerance ” is, so you don’t pay hidden costs from late-stage color rework.
Color is a common source of friction because you expect a “perfect match,” while factories work with real material variation. A transparent approach prevents surprises by defining the color target, approval steps, and acceptance rules upfront.
A. What should be locked early (color control basics)
Color reference type
Pantone code alone is not enough for some fabrics. Best is:
Pantone and physical swatch (or previously approved sample)
Material group alignment
Color must be matched separately for:
outer fabric vs lining vs webbing vs binding tape
If you only approve “outer fabric,” other components may drift.
Pre-production color approval
Before bulk cutting, approve:
a small color lab dip or strike-off (depending on material)
This step prevents expensive rework later.
B. Tolerance and “what counts as acceptable.”
Color control works when both sides agree on tolerance. Ask the factory to propose:
acceptable tolerance under standard lighting (e.g., D65 daylight)
HowThe color will be checked: physical swatch comparison, photos (limited), or internal standard
Mini table: Common causes of color disputes
| Cause | What Happens | Prevention |
|---|---|---|
| different dye lots | shade shifts | approve pre-production dip |
| mixed material families | webbing differs | approved by the material group |
| lighting differences | photos look different | Use the physical swatch standard |
| late changes | re-dye or re-order | Lock color early |
C. Budget protection (transparent cost handling)
If you change color after approval, treat it as a change request (Module 5) with cost/time impact.
For many SKUs, group colors to reduce micro runs; micro runs increase both cost and consistency risk.
Tip: If color is brand-critical, ask for a simple “color control pack”: approved swatch reference and pre-production sample photo, and final batch confirmation. This gives your internal team confidence and reduces disagreement.
Everything You Need to Know Before Customizing Your Bags