 Skip to content
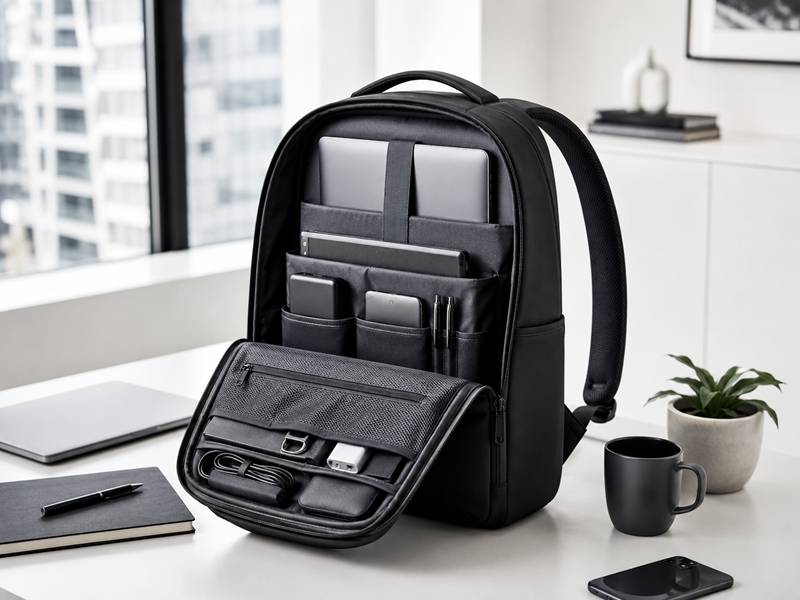
A laptop backpack for a tech brand is judged in small moments: when someone places a laptop inside before a meeting, pulls out a charger at the airport, opens the front pocket during a conference, or walks into an office with the logo visible on the front panel. A weak backpack does not fail all at once. It starts with little frustrations: the laptop sleeve is too loose, the zipper catches at the corner, the front pocket bulges, the shoulder straps feel thin after ten minutes, or the outside looks too casual for a professional setting.
A good laptop backpack for tech brands should protect 13–16 inch laptops, keep cables and accessories organized, carry comfortably during commute or travel, and maintain a clean business look. A practical starting design is usually 20–30L, with padded device storage, a stable back panel, organized front pockets, smooth zippers, reinforced stress areas, and restrained logo placement.
The strongest backpack is often quiet on the outside and highly functional inside. It does not need to shout. It needs to work. A developer should find a cable quickly. A sales team member should walk into a client meeting without the bag looking like outdoor gear. A new employee should feel the backpack belongs in their daily routine, not just in a welcome kit. That is where padding, compartments, and business appearance begin to matter.
What Makes It Tech-Ready?
A tech-ready laptop backpack is built around daily electronics carry. It should protect laptops and tablets, organize small devices, keep cables easy to find, carry comfortably during commutes, and look suitable in offices, airports, conferences, coworking spaces, and meetings. The strongest designs usually combine a 20–30L body, a padded 13–16 inch laptop sleeve, stable compartments, durable zippers, clean panels, and subtle logo placement.
A tech backpack is not created by adding one laptop sleeve and calling it complete. The whole structure must support how modern work items are carried. A normal daily load may include a laptop, tablet, charger, power bank, mouse, adapter, earbuds, notebook, bottle, ID card, travel document, and light jacket. If these items share one open compartment, the bag quickly becomes messy, heavy in the wrong areas, and less protective.
A tech-ready structure should control three things at the same time: protection, access, and appearance. The laptop should sit close to the back panel so the heaviest item stays stable. Hard accessories should be kept away from the screen surface. Frequently used items should be reachable without opening the whole bag. The outside should stay clean after packing, because tech backpacks often appear in professional settings, not only during casual travel.
A good design also avoids feature overload. USB ports, hidden pockets, luggage straps, RFID pockets, and side-access laptop zippers may be useful, but they cannot replace a stable laptop sleeve, smooth zipper, strong seams, and comfortable straps. A backpack with too many visible zippers and bulky pockets may look complicated instead of premium. The best tech-ready backpack feels easy to understand after the first use.
Key features to check before final approval:
The laptop sleeve fits the intended device size without side-to-side movement.
The sleeve has padding on the back, front, and bottom contact area.
A tablet pocket has soft lining and does not press against hard accessories.
Charger and cable storage sits away from the laptop screen.
The main zipper opens smoothly when the bag is packed.
The front panel stays flat enough for a clean logo.
Shoulder straps remain comfortable after 10–15 minutes of carrying.
The back panel keeps hard device corners from pressing into the body.
The bottle pocket holds a 500–750 ml bottle securely.
The backpack keeps a professional shape when placed on a table or floor.
| Tech-Ready Area | What It Should Do | Practical Check |
|---|---|---|
| Laptop sleeve | Hold and cushion the main device | Test 13, 14, 15.6, or 16 inch device fit |
| Tablet pocket | Protect a second screen | Check soft lining and easy access |
| Cable storage | Keep small electronics separate | Test charger, cable, adapter, earbuds |
| Main compartment | Carry documents and daily items | Avoid too much depth without structure |
| Back panel | Improve comfort and shape | Check with loaded laptop and books |
| Shoulder straps | Carry workday weight | Review width, foam recovery, and seam strength |
| Zippers | Support frequent opening | Test loaded opening 30–50 times |
| Front panel | Maintain a polished look | Check logo area after packing |
| Side pocket | Hold bottle or umbrella | Review depth, elastic recovery, and panel pull |
| Hidden pocket | Store valuables discreetly | Ensure access is natural, not awkward |
A tech-ready backpack should be reviewed under real conditions. Pack it with the intended device set, walk with it, open each compartment, remove the laptop, place the bag down, and lift it by the handle. These simple checks reveal whether the design is ready for daily use.
What Is A Tech Brand Backpack?
A tech brand backpack is a laptop-focused backpack designed for people who carry electronics often and need a clean professional appearance. It is commonly used for employee welcome kits, developer conferences, SaaS events, hardware launches, sales teams, product bundles, premium gifts, and private label backpack lines.
This backpack type sits between a business work bag and a daily commuter backpack. It should protect devices better than a simple casual bag, organize accessories better than a basic school backpack, and look more refined than a sporty outdoor pack. It does not need to look formal like a briefcase, but it should feel appropriate beside a laptop, badge, notebook, blazer, suitcase, or office desk.
A strong tech backpack usually includes:
A padded laptop sleeve for 13–16 inch devices.
A tablet pocket or flat document divider.
A front organizer for charger, mouse, cables, pens, and cards.
A top quick pocket for earbuds, key card, or phone.
A side bottle pocket that does not distort the body.
A padded back panel with enough support.
Comfortable shoulder straps with stable adjusters.
Smooth zippers and clean zipper pullers.
A restrained logo position.
A structured front panel that does not collapse when packed.
The outer look should match the type of tech identity. A cloud software company may prefer matte black fabric and a small woven label. A gaming hardware brand may use stronger lines, contrast zipper pulls, and tougher fabric. A sustainable tech event may choose RPET fabric with a calm color palette. A premium accessories line may use nylon, metal pullers, and a subtle badge.
The best tech backpack feels useful beyond the event or onboarding day. If the recipient keeps using it for work, travel, meetings, and commuting, the product has real staying power.
What To Look For In A Laptop Backpack?
When reviewing a laptop backpack, start with the device area, then check organization, carrying comfort, material behavior, zipper strength, and exterior shape. A backpack can look sleek while empty, then become awkward once a laptop, charger, mouse, bottle, and jacket are added.
A practical review should use actual work items, not imagined space. Place the intended laptop inside first. Add charger, mouse, cables, tablet, notebook, bottle, and daily accessories. Then check how the backpack closes, how it sits on the shoulders, how the front panel looks, and how easy it is to remove the laptop.
Important review details:
Laptop fit: The sleeve should hold the device securely but allow smooth insertion.
Bottom support: The lower laptop edge should not rest directly on a thin bottom seam.
Screen-side protection: Chargers and hard accessories should not press against the screen area.
Organizer clarity: Cables, pens, adapters, and earbuds should have logical storage.
Zipper movement: The main zipper should not catch when the backpack is packed.
Strap comfort: Padding should feel firm enough to support real load.
Back panel comfort: Laptop edges should not be felt through the back.
Shape control: The front panel should not bulge heavily.
Logo stability: Branding should stay flat and readable after loading.
Bottle stability: The bottle pocket should hold shape during walking.
| Review Item | Good Result | Warning Sign |
|---|---|---|
| Laptop sleeve | Snug fit with smooth access | Loose, shallow, or too tight |
| Sleeve bottom | Device edge has buffer | Laptop hits base directly |
| Charger pocket | Separated from laptop surface | Hard charger presses into device |
| Front organizer | Easy to read and use | Too many tiny pockets |
| Main zipper | Smooth under load | Slider catches at corners |
| Shoulder straps | Stable after several minutes | Thin foam or slipping adjuster |
| Back panel | No hard edges felt | Laptop corners press into back |
| Front shape | Clean after packing | Bulging or wrinkled logo area |
| Side pocket | Holds bottle securely | Pocket pulls side panel outward |
| Top handle | Strong when loaded | Seam stretches or puckers |
A laptop backpack should reduce daily friction. It should make packing faster, device carry safer, and movement easier. Features should not be added only because they sound impressive. Every pocket, seam, zipper, and pad should support a real action.
Which Tech Backpack Brands Are Popular?
Popular tech backpack names are often recognized because they solve the same daily needs well: device protection, organized storage, comfort, durable materials, and clean appearance. Names often seen in work, commute, and tech backpack discussions include Samsonite, Swissgear, Targus, Lenovo, Thule, Bellroy, Aer, Nomatic, Peak Design, Tomtoc, Incase, Osprey, The North Face, and Patagonia.
The useful part is not the logo on those products. It is the design logic behind them. Many trusted laptop backpacks place the laptop near the back panel, use reliable zippers, keep the exterior controlled, and give each work item a sensible storage location. Some focus on travel. Some focus on urban commuting. Some focus on outdoor strength. Some focus on minimalist work style.
Instead of copying a known model, a tech backpack project should define its own position:
Minimalist tech style: clean front panel, matte fabric, hidden organizer, subtle label.
Business travel style: luggage sleeve, hidden passport pocket, separate laptop access, structured body.
Rugged commute style: stronger fabric, larger zippers, reinforced bottom, side pockets.
Premium casual style: refined nylon, soft lining, metal pullers, restrained logo.
Sustainable tech style: RPET fabric, muted colors, clean construction, responsible material story.
| Style Direction | Common Design Signals | Suitable Use |
|---|---|---|
| Minimalist tech | Smooth front, matte fabric, hidden pockets | SaaS, software, developer events |
| Business travel | Luggage strap, hidden pocket, separate laptop opening | Sales teams, conferences, short trips |
| Rugged commute | Strong fabric, larger zipper, reinforced base | Hardware, daily transit, field teams |
| Premium casual | Soft texture, refined trims, subtle branding | Staff gifts, private label lines |
| Sustainable tech | RPET, muted colors, simple trims | Sustainability programs, eco-focused events |
Popularity usually follows repeat use. People continue carrying backpacks that make work easier: laptop access is smooth, charger storage is clear, straps feel stable, and the outside works in public settings. A custom tech backpack should aim for that same daily usefulness, not just a similar appearance.
Why Does Device Protection Matter?
Device protection matters because the laptop is often the most valuable item inside the backpack and the item people worry about most. Even before damage happens, a weak laptop sleeve can make the whole backpack feel unreliable. If the device shifts, hits the bottom, or presses against chargers, the design feels unfinished.
Protection begins with sleeve fit. A laptop sleeve that is too wide allows movement during walking. A sleeve that is too tight makes users force the laptop in and out. A sleeve that is too shallow leaves the top edge exposed. A sleeve that is too deep makes removal slower. The best sleeve gives stable hold with easy access.
Bottom protection is one of the most overlooked details. Many backpacks have padding on the back and front of the laptop area, but the lower edge may sit directly on a thin seam. When the backpack is placed on the floor, that lower edge receives the impact. A padded bottom, EPE layer, or suspended sleeve can help reduce this problem.
Device protection should also control what touches the laptop. A charger, power bank, mouse, or adapter can create pressure against the screen area if placed in the wrong compartment. A good organizer keeps hard accessories away from the laptop surface.
| Protection Detail | Why It Matters | Better Direction |
|---|---|---|
| Sleeve width | Reduces side movement | Fit target device with slight ease |
| Sleeve height | Protects top edge | Device sits below zipper line |
| Bottom buffer | Reduces floor impact | Add foam, EPE, or suspended base |
| Back padding | Separates device from body | Use stable foam or support panel |
| Smooth lining | Reduces scratches | Avoid rough seams near device |
| Access opening | Prevents forced insertion | Wider zipper opening or separate access |
| Accessory separation | Prevents hard pressure | Place charger and mouse away from screen |
| Sleeve seam | Holds device weight | Reinforced stitching and stable lining |
A good protection setup should be tested with actual devices. Use the target laptop size, place it into the sleeve, walk with the backpack, set it down, and remove the device several times. If the sleeve shifts, sags, or becomes hard to use, it should be adjusted before bulk production.
Laptop Backpack Vs Work Bag
A laptop backpack and a work bag may carry similar items, but they serve different movement patterns. A work bag can be a briefcase, tote, messenger bag, or slim office carry. A laptop backpack is designed for two-shoulder comfort, hands-free movement, device protection, and better organization under heavier daily load.
A work bag may look more formal, especially when made from leather or structured PU. It can work well for light meetings, documents, and short office commutes. But once a laptop, charger, bottle, notebook, and travel items are added, one-shoulder carry can become uncomfortable.
A laptop backpack performs better when people move between home, office, train, airport, conference, hotel, and coworking spaces. It spreads weight across both shoulders and can include more storage without forcing one side of the body to carry everything.
The challenge is appearance. A laptop backpack must avoid looking too much like a school bag, hiking pack, or gym bag. For tech brands, the strongest design combines backpack comfort with work-bag restraint: clean front panel, muted colors, subtle logo, structured body, smooth zippers, and organized interior.
| Comparison Area | Laptop Backpack | Work Bag |
|---|---|---|
| Carry comfort | Stronger for heavier daily load | Better for light carry |
| Device protection | Easier to build padded sleeve | Depends on structure |
| Organization | More compartments possible | Usually slimmer |
| Professional look | Needs controlled design | Often more formal by default |
| Travel use | Better for hands-free movement | Better for short meetings |
| Capacity | More flexible | More limited |
| Logo treatment | Works best when subtle | Usually small and refined |
A laptop backpack is often the better choice for tech teams because electronics, cables, and daily movement are part of the routine. A work bag may still fit more formal settings, but for regular device carry, the backpack format gives more comfort and function. The key is keeping the exterior polished enough for work.
How Should Padding Work?

Padding in a laptop backpack should protect the device from pressure, light impact, bottom contact, and daily movement without making the backpack bulky or stiff. A strong design uses different padding zones for the laptop sleeve, sleeve base, back panel, shoulder straps, tablet pocket, and structure panels. The best protection comes from placement, fit, and material density, not from thickness alone.
A laptop backpack is often judged the first time someone slides a device into the sleeve. If the sleeve feels loose, thin, rough, or unstable, the whole backpack feels less reliable. If the padding is thick but badly placed, it may add weight without protecting the laptop’s most vulnerable areas. If the back panel is soft but has no structure, the laptop edge may still press into the body during walking.
Good padding should solve several problems at the same time:
It keeps the laptop from moving inside the backpack.
It reduces contact between the laptop and books, chargers, or hard accessories.
It helps protect the lower laptop edge when the backpack is placed on the floor.
It makes the back panel feel smooth when the backpack is loaded.
It spreads shoulder pressure through padded straps.
It supports a clean outer shape, so the backpack still looks professional when packed.
Padding should be planned as a layered system. The laptop sleeve may need foam or EPE for cushioning. The bottom may need extra buffer or a suspended structure. The back panel may need foam plus a support layer. The shoulder straps may need medium-firm foam that recovers after pressure. The tablet pocket may need soft lining rather than thick padding. Each area has a different job.
| Padding Zone | Main Job | Common Material | What To Check |
|---|---|---|---|
| Laptop sleeve back side | Separates laptop from the wearer’s back | Foam, EPE, PE support, lining | No hard laptop edge felt through back panel |
| Laptop sleeve front side | Protects laptop from other items | Foam, polyester lining | Charger or notebook does not press into screen area |
| Sleeve bottom | Reduces contact with floor impact | EPE, foam, suspended base | Laptop does not sit directly on bottom seam |
| Tablet pocket | Protects second device surface | Soft lining, light foam | Smooth touch, no rough seam contact |
| Back panel | Improves comfort and shape | Foam, air mesh, PE board | Stable shape, no collapse under load |
| Shoulder straps | Spreads carrying pressure | Foam, mesh, webbing | Foam recovery and no sharp strap edge |
| Front panel | Controls shape and bulging | Light foam, backing, lining | Logo area stays smooth after packing |
| Bottom panel | Supports loaded backpack | Foam, backing, reinforced fabric | No heavy sagging after laptop and charger are packed |
The main mistake is treating padding as a single material decision. In a real laptop backpack, padding is more like architecture. The laptop area, back panel, bottom, and straps must work together. A heavily padded sleeve cannot fully protect the device if the charger pocket presses into it. A thick back panel cannot make the bag comfortable if the laptop sits too low. A soft strap cannot carry well if the backpack pulls backward.
A good padding review should be done with real items inside:
One target laptop, such as 13 inch, 14 inch, 15.6 inch, or 16 inch.
One tablet if the design includes a tablet pocket.
One laptop charger.
One mouse.
Two or three cables.
One notebook or document folder.
One bottle.
One light jacket or hoodie.
After packing, the backpack should be worn, opened, lifted, set down, and checked from the side. The laptop should stay stable. The bottom should not collapse. The back should feel smooth. The straps should not dig into the shoulders. The outside should still look clean enough for office or travel use.
What Padding Is Used In Laptop Bags?
Laptop bags commonly use foam, EPE, PE board, sponge padding, air mesh, soft polyester lining, velvet-like lining, EVA inserts, and reinforced fabric backing. Each material has a different purpose. Foam adds softness. EPE gives lightweight impact cushioning. PE board supports shape. Air mesh improves back and strap comfort. Soft lining protects the device surface.
Foam is one of the most common padding materials because it is flexible and easy to use in sleeves, back panels, and straps. The key is density. Foam that is too soft may feel pleasant at first touch but flatten quickly under laptop weight. Foam that is too hard may create a stiff feel and reduce comfort. Medium-firm foam often works better for daily laptop backpacks because it supports the device and recovers after pressure.
EPE is useful in laptop sleeves and bottom areas because it gives lightweight buffering. It can help reduce impact without making the backpack too heavy. For laptop bases, EPE can be placed where the lower edge of the device needs extra protection.
PE board is not soft like foam, but it can help the backpack keep shape. It is often used in back panels or structure zones. A PE support layer can stop the laptop from pressing directly into the back and can make the backpack look more structured. The risk is stiffness. If the board is too hard or poorly shaped, the backpack may feel rigid.
Air mesh is often used on shoulder straps and back panels. It adds comfort and breathability, especially for commute, travel, or full-day carry. It should be checked for abrasion resistance and surface feel. Some mesh looks comfortable but wears quickly if the quality is weak.
Soft lining is important inside laptop and tablet pockets. A rough lining may scratch device cases or feel cheap. A velvet-like lining can feel more premium in tablet, glasses, or phone pockets, but it should be checked for lint, color transfer, and seam finish.
| Material | Best Use | Benefit | Watch Carefully |
|---|---|---|---|
| Foam | Sleeve, straps, back panel | Soft cushion, flexible structure | Density and recovery |
| EPE | Sleeve base, laptop area, impact zones | Lightweight buffer | Thickness and placement |
| PE board | Back panel, base support | Shape stability | Stiffness and edge feel |
| Air mesh | Back panel, straps | Breathability and comfort | Surface wear |
| Polyester lining | Main inner areas | Clean inside finish | Tear strength |
| Velvet-like lining | Tablet, glasses, phone pocket | Softer touch | Lint and seam quality |
| EVA insert | Firmer protection area | Stronger formed support | Bulk and cost |
| Fabric backing | Outer panel support | Shape and stability | Cracking or wrinkles |
The material choice should follow the product level. A simple event backpack may only need moderate foam in the sleeve. A daily work backpack should add better sleeve padding, back support, and strap comfort. A premium business laptop backpack may need layered padding, a suspended sleeve, soft device lining, and a more structured body.
Which Laptop Size Fits Best?
Laptop sleeve size should match the device group the backpack is designed for. Common device targets include 13 inch, 14 inch, 15.6 inch, and 16 inch laptops. A 15.6 inch sleeve is often practical for general work use, while 16 inch support is useful for creative teams, designers, engineers, and premium device users. A 17 inch sleeve needs a larger backpack body and stronger structure.
Screen size alone is not enough. Two laptops with the same screen size can have different outside dimensions because of bezel width, body thickness, protective case, or rugged shell. A sleeve marked for 15.6 inch devices may not fit every 15.6 inch laptop well. The real device dimensions should be checked before the sleeve size is locked.
A good laptop sleeve should feel secure but not tight. The laptop should slide in smoothly without forcing the zipper area. There should be enough width for easy use, but not so much space that the device shifts side to side. The top edge should sit below the zipper or opening line, so the device is not exposed. The bottom edge should have cushioning or suspension.
| Device Target | Backpack Direction | Sleeve Detail To Review |
|---|---|---|
| 13 inch laptop | Slim office backpack | Keep bag compact and light |
| 14 inch laptop | Daily work backpack | Good balance of device fit and shape |
| 15.6 inch laptop | Broad work and event use | Most practical middle option |
| 16 inch laptop | Creative or premium work use | Needs more height and careful zipper opening |
| 17 inch laptop | Large tech or gaming use | Requires bigger body and stronger support |
The sleeve opening should also be tested. If the opening is too narrow, users may scrape the laptop corner during insertion. If the sleeve is too deep, removal becomes slow. If the zipper is placed too close to the device edge, the laptop may rub against zipper teeth. These small details strongly affect daily use.
A practical sleeve review should include:
Fit the real target laptop.
Insert and remove it at least 10 times.
Check whether the zipper or binding touches the device edge.
Shake the backpack gently to see if the laptop shifts.
Place the backpack on the floor and check bottom contact.
Wear the loaded backpack and feel whether the device presses into the back.
A good sleeve should feel natural after the first use. If people need to think carefully every time they put the laptop inside, the sleeve is not designed well enough.
Is A Suspended Sleeve Better?
A suspended laptop sleeve is often better for daily commute, business travel, premium gifts, and tech backpacks carrying higher-value devices. It keeps the laptop bottom slightly above the backpack base, reducing direct contact when the backpack is placed on the floor. This small gap can improve protection without changing the outside appearance much.
A standard padded sleeve protects the laptop from front and back pressure, but the lower edge may still rest near the bottom seam. When someone places the backpack on the floor, the impact often travels through the base. A suspended sleeve creates extra distance between the laptop and the impact zone.
The suspended structure should be carefully proportioned. If the sleeve is too short, taller devices may not fit. If the bottom gap is too large, the sleeve may reduce usable space in the main compartment. If the suspension seam is weak, the laptop pocket may sag after repeated use. The sleeve should hold the device securely while still allowing easy removal.
| Sleeve Structure | Protection Level | Best Use | Watch Carefully |
|---|---|---|---|
| Basic divider sleeve | Light separation | Simple event backpack | Limited protection |
| Foam padded sleeve | Better daily cushioning | Office backpack | Bottom edge may still need support |
| Suspended padded sleeve | Better base protection | Commute and travel backpack | Sleeve height and seam strength |
| Separate laptop compartment | Better access and organization | Business travel backpack | Added zipper length and thickness |
| Side-access sleeve | Faster laptop removal | Travel or meeting use | Zipper position and security |
A suspended sleeve is not always necessary. For a short-term event backpack or a low-load design, a well-padded standard sleeve may be enough. For daily device carry, the suspended sleeve often adds value because the bottom edge is one of the most common contact areas.
A good suspended sleeve should pass these checks:
The laptop fits fully without top exposure.
The bottom edge does not touch the backpack base directly.
The sleeve does not sag when the device is inside.
The laptop can be removed easily.
The structure does not make the main compartment too small.
The seam holds firm after repeated insertion and removal.
This feature is especially useful when the backpack is meant to feel more thoughtful and protective. Users may not always see the suspended base, but they feel the difference when they set the bag down.
Do Tablets Need Extra Space?
Tablets need separate space when the backpack is designed for work travel, sales teams, tech events, creative teams, educators, designers, or users carrying a second screen. A tablet pocket prevents the tablet from sliding around in the main compartment and keeps it away from chargers, pens, adapters, and other hard objects.
A tablet pocket does not need the same thickness as a laptop sleeve, but it should have a soft surface and stable shape. The screen side should not touch rough seams or hard accessories. A light foam layer or soft lining is often enough. The pocket should hold the device snugly without making removal difficult.
Placement is important. A tablet pocket near the laptop sleeve is usually more stable because it sits close to the back. A tablet pocket in the front compartment may be easier to reach, but it can receive more external pressure if the backpack is set down face-first or packed tightly. For business travel, a tablet pocket in a dedicated tech compartment can work well.
| Tablet Pocket Detail | Good Design | Problem Sign |
|---|---|---|
| Pocket size | Fits common tablet sizes with slight ease | Too loose or too tight |
| Lining | Smooth and soft | Rough seam or scratch risk |
| Padding | Light but stable | No support or too much bulk |
| Placement | Near laptop zone or protected divider | Pressed by charger or front pocket |
| Access | Easy to insert and remove | Hidden too deep inside |
| Shape | Does not bend when bag is full | Pocket folds or collapses |
A tablet pocket should be checked with a tablet case if users are likely to use one. Cases add thickness and can change fit. If the pocket only fits a bare tablet, it may feel too tight in real use.
For premium tech backpacks, a tablet pocket makes the design feel more complete. It shows that the backpack is not only a laptop holder, but a full work carry system.
Best Padding Checklist
A strong padding checklist should review laptop fit, bottom support, sleeve thickness, back panel comfort, tablet lining, strap foam, structure stability, and loaded shape. The goal is to protect devices and improve comfort while keeping the backpack slim enough for business use.
Before approving a laptop backpack design, check the following:
The intended laptop size fits smoothly.
The sleeve holds the device without strong side movement.
The laptop top edge sits below the zipper or opening line.
The sleeve has front, back, and bottom protection.
The lower laptop edge does not sit directly on a thin seam.
The tablet pocket has soft lining and stable shape.
Chargers and hard accessories do not press against the laptop screen side.
The back panel prevents laptop edges from pressing into the body.
Shoulder strap foam recovers after being pressed.
The backpack does not look bulky before it is packed.
The front panel remains clean after a laptop and accessories are added.
The bottom keeps shape after the backpack is placed on a table or floor.
The padding does not block zipper access.
| Padding Check | Good Result | Problem Sign |
|---|---|---|
| Laptop fit | Secure but easy to use | Device shifts or gets stuck |
| Bottom buffer | Edge is protected from base contact | Laptop rests on bottom seam |
| Sleeve padding | Front and back feel supported | Thin divider only |
| Back comfort | No hard device edge felt | Laptop presses into body |
| Tablet pocket | Smooth and stable | Rough lining or loose fabric |
| Strap foam | Recovers after pressure | Foam flattens quickly |
| Shape | Clean outside after loading | Bulging or sagging |
| Weight | Protective but manageable | Heavy before packing |
| Zipper access | Smooth laptop removal | Device scrapes zipper area |
A loaded test is more useful than a visual check. Pack the backpack with the actual laptop, tablet, charger, mouse, cables, bottle, notebook, and jacket. Wear it for 10 minutes. Open and close the laptop compartment. Place it on the floor. Lift it by the handle. Remove the laptop. These actions reveal whether the padding works in real life.
Padding should always be checked together with compartment layout. A well-padded laptop sleeve can still fail if the charger pocket pushes into the laptop surface. A structured back panel can still feel uncomfortable if the device sits too low. A tablet pocket can still be risky if the lining is rough or the pocket folds when full.
The best padding setup feels protective without calling attention to itself. The user should not think about it. The laptop goes in smoothly, the backpack carries well, the device stays stable, and the outside still looks clean.
Which Compartments Work Best?

The best laptop backpack compartments separate devices, chargers, documents, small electronics, bottles, and quick-use items without making the backpack look bulky. A strong layout usually includes a laptop sleeve, tablet pocket, main storage zone, front organizer, quick-access pocket, bottle pocket, and optional hidden pocket. Every compartment should have a clear job and still work when the backpack is fully packed.
A laptop backpack can use excellent fabric and padding but still feel frustrating if the compartment layout is poorly planned. The most common problem is mixing hard electronics, soft items, paper documents, and water bottles in the same space. A charger can press against the laptop screen. A mouse can scratch a tablet case. Cables can tangle with keys. A document folder can bend at the bottom. A bottle can pull the side panel out of shape.
A practical compartment layout should follow real work habits. The laptop is usually the heaviest and most valuable item, so it should sit close to the back. The tablet should have a smoother, softer area. Chargers and cables need a controlled pocket, but they should not sit directly against the laptop surface. Small items such as earbuds, access cards, pens, USB drives, and keys should be easy to reach. Documents and notebooks need a flatter space where they will not curl.
A good layout should also protect the outside shape. Tech backpacks often need a clean business appearance, so the front panel should not become thick, swollen, or uneven after packing. Too many visible zippers and raised pocket lines can make the backpack look busy. A cleaner exterior with better internal organization usually works better for office, commute, and event use.
| Compartment | Main Job | Better Placement | What To Check |
|---|---|---|---|
| Laptop sleeve | Holds the main device securely | Close to the back panel | Fit, padding, bottom support |
| Tablet pocket | Protects a second device | Near laptop sleeve or inner divider | Soft lining and stable shape |
| Main compartment | Holds notebook, jacket, documents | Center body | Enough space without heavy sagging |
| Front organizer | Stores charger, mouse, cables, pens | Inside front pocket | No strong outward bulge |
| Quick pocket | Holds earbuds, card, keys, phone | Upper front or top area | Easy one-hand access |
| Bottle pocket | Holds water bottle or umbrella | Side panel | Depth, elastic recovery, side pull |
| Hidden pocket | Stores wallet, passport, access card | Back panel or side seam | Secure but easy to reach |
| Luggage sleeve | Supports travel use | Back panel | Stitching strength and suitcase handle fit |
A compartment plan should be tested with the actual carry set: laptop, tablet, charger, mouse, cables, power bank, notebook, bottle, glasses, badge, phone, wallet, and light jacket. After loading, the backpack should close smoothly, keep a neat front shape, allow easy laptop removal, and avoid hard accessories pressing into the device area.
What Pockets Do Tech Users Need?
Tech users usually need seven pocket types: a padded laptop sleeve, a tablet pocket, a charger pocket, a cable zone, a small electronics pocket, a bottle pocket, and a quick-access pocket. Not every backpack needs all seven in a complex form, but each daily item should have a logical place.
The laptop sleeve should be the most stable area. It should fit the intended device size, commonly 13 inch, 14 inch, 15.6 inch, or 16 inch. The tablet pocket should be slightly softer and thinner. It should not be placed where a charger or bottle can press against it. The charger pocket should hold a bulky object without distorting the outside panel too much.
A useful front organizer often includes a few simple storage areas:
Two or three slim cable pockets.
One medium pocket for a charger or mouse.
Two pen slots.
One small zipper mesh pocket for adapters or USB drives.
One flat card pocket.
One key leash if needed.
This is usually enough for daily tech use. When the organizer has too many small pockets, users forget where items are placed. Extra pockets also increase sewing time, weight, and thickness. A simple, readable organizer is often better than a crowded one.
Bottle storage needs careful planning because it sits near electronics. The pocket should hold a 500–750 ml bottle securely during walking. A fabric side pocket looks cleaner than mesh, while mesh offers stretch and visibility. Elastic should recover after repeated use. If the pocket is too shallow, the bottle may fall out. If it is too tight, the side panel may twist.
| Item | Better Pocket | Why It Matters |
|---|---|---|
| Laptop | Padded rear sleeve | Keeps the heaviest item stable |
| Tablet | Soft inner pocket | Reduces screen pressure |
| Charger | Medium organizer pocket | Keeps hard object away from device |
| Mouse | Padded or shaped front pocket | Prevents random movement |
| Cables | Elastic loop or mesh pocket | Reduces tangling |
| Power bank | Lower organizer pocket | Keeps weight controlled |
| Earbuds | Top quick pocket | Fast access |
| Water bottle | Side pocket | Keeps liquid away from electronics |
| Documents | Flat divider | Prevents bending |
| Access card | Small flat pocket | Easy daily reach |
The pocket layout should feel natural after one use. If the user has to search through too many small sections, the design is not clear enough.
How To Store Cables?
Cables should be stored in a controlled organizer area rather than loose in the main compartment. A proper cable area keeps charging cords, adapters, USB drives, earbuds, and small electronics separated from the laptop, documents, and bottle. The goal is clean access without creating a bulky front panel.
Cable storage should be compact and flat. Elastic loops are useful for short cables. Mesh zipper pockets help users see small accessories. Flat stitched pockets are good for USB drives, cards, and adapters. A slightly deeper pocket can hold a charger, but the pocket should not push hard against the laptop area.
Cable and charger placement should consider weight. Laptop chargers can be heavy and angular. If the charger sits too far forward, the backpack may bulge. If it drops to the bottom, it may create pressure and noise. A middle-height organizer pocket often works better because it keeps the charger accessible while limiting bottom weight.
For frequent travel or conference use, cable access should be quick. People often need chargers in airports, meeting rooms, coworking spaces, or event halls. If the cable pocket is too hidden, it becomes inconvenient. If it is too exposed, the backpack may look messy. The best design keeps cables easy to reach while keeping the outside clean.
| Cable Item | Recommended Storage | Design Detail |
|---|---|---|
| USB-C cable | Elastic loop or slim mesh pocket | Avoids tangles |
| Laptop charger | Medium pocket with controlled depth | Prevents front bulge |
| Adapter | Small mesh zipper pocket | Easy to see and remove |
| Power bank | Lower front organizer pocket | Keeps weight stable |
| Earbuds | Top pocket or small inner zipper pocket | Fast daily access |
| Mouse | Medium pocket with enough height | Prevents pressure on laptop |
| Stylus | Narrow slot | Avoids bending or loss |
| USB drive | Small zipper pocket | Prevents dropping out |
Cable storage should be tested after the laptop is loaded. Place the laptop in the sleeve, pack the charger and cable area, then press the front panel lightly. If the charger creates a hard lump against the laptop or makes the outside look swollen, the pocket depth or position needs adjustment.
Which Type Of Organizer Works?
The best organizer is simple, flat, and easy to read. It should separate daily work accessories without turning the front of the backpack into a thick storage block. For most business laptop backpacks, an internal organizer panel works better than many visible outer pockets.
There are several organizer styles, and each suits a different use.
A flat organizer is best for clean office and commute backpacks. It uses slim pockets for cables, pens, cards, and small accessories. It keeps the front panel neat and controls thickness.
A deeper organizer works better for travel, conference, or full-day commute backpacks. It can hold a larger charger, mouse, power bank, glasses case, passport, or notebook. It offers more storage but needs stronger structure so the front panel does not bulge.
A mesh organizer makes small items visible. It works well for cables, adapters, and tech accessories. However, visible mesh can look less formal if placed too openly, so it is better inside the backpack.
A modular organizer, such as a removable pouch, can be useful for premium tech kits. It gives flexibility but increases cost, parts, and packing complexity. It should be used only when the project truly needs it.
| Organizer Type | Strength | Suitable Use | Risk |
|---|---|---|---|
| Flat organizer | Clean and light | Office, staff gift, minimalist tech style | Limited bulky storage |
| Deep organizer | Holds more accessories | Travel, conference, commuter use | Front bulge if poorly supported |
| Mesh organizer | Easy item visibility | Cables, adapters, USB drives | Less formal if exposed |
| Hidden organizer | Clean exterior | Business-style backpacks | May be harder to find items |
| Modular pouch | Flexible storage | Premium kits or tech bundles | Higher cost and more parts |
| Fold-open organizer | Strong visibility and access | Travel and event backpacks | More zipper length and sewing work |
Organizer pockets should match hand movement. If a pocket is too deep, small items disappear. If it is too tight, cables become annoying to remove. If it is too loose, items move around and create noise. A pocket should be easy to use without looking inside for too long.
The best internal organizer has a clear visual order. Large pocket for charger. Slim pockets for cables. Small zipper pocket for valuable accessories. Pen slots placed where they do not scratch a tablet. A small top area for earbuds or access card. These details make the backpack feel considered without making it complicated.
Are Anti-Theft Pockets Useful?
Anti-theft pockets are useful for commuting, business travel, conferences, airport movement, and city use. They are best for passports, wallets, phones, access cards, earbuds, keys, and small valuable items. The pocket should be hidden from others but still easy for the wearer to use.
Common hidden pocket placements include the back panel, rear side seam, inner zipper pocket, or a concealed pocket under a flap. A back panel pocket is one of the most popular choices because it sits against the wearer’s body. A side hidden pocket can be useful for a transit card or phone, but it should not be too easy for others to open. An inner zipper pocket is simple and safe for smaller items.
The pocket size should match the item. A passport pocket should be flat. A phone pocket should not press into the back uncomfortably. A wallet pocket should not create a hard lump. A key pocket should have enough space to prevent scratching devices. If the hidden pocket is too small, users ignore it. If it is too large, it can become heavy and uncomfortable.
Anti-theft pockets should not make the backpack look tactical unless the style requires it. For a business laptop backpack, hidden function is better than visible security styling. A clean outer panel with a discreet back pocket often feels more professional.
| Hidden Pocket Type | Best For | Placement Check |
|---|---|---|
| Back panel zipper pocket | Passport, wallet, phone | Does not press hard into back |
| Rear side pocket | Transit card, access card | Reachable while worn |
| Inner zipper pocket | Keys, USB drive, small wallet | Easy to find after opening |
| Luggage sleeve pocket | Travel document | Secure during suitcase use |
| Top hidden pocket | Earbuds, card, phone | Fast access, no heavy bulge |
| Flap-covered pocket | Small valuables | Zipper not easily exposed |
Anti-theft pockets should be tested with actual items. Place a passport or phone inside, wear the backpack, walk, sit, and try to remove the item naturally. A good hidden pocket should feel secure without becoming frustrating.
Compartments Vs Clean Shape
Compartments and clean shape must be balanced carefully. More compartments can improve storage, but too many outer pockets can make the backpack look bulky, casual, or messy. A business laptop backpack should organize the inside while keeping the outside simple.
The best approach is to move function inside. A smooth front panel, hidden organizer, stable laptop compartment, side bottle pocket, and top quick-access pocket can give strong function without making the exterior crowded. The backpack should look calm when worn, then reveal useful storage when opened.
Clean shape depends on several design choices:
Laptop sleeve placed close to the back.
Organizer pockets kept flat and not too deep.
Heavy charger pocket placed where it will not pull the front outward.
Zipper lines kept straight and controlled.
Front panel material given enough structure.
Bottle pocket depth planned to avoid side distortion.
Logo placed away from high-bulge areas.
Main compartment depth matched to real daily load.
If the backpack is too slim, it may look elegant but fail when charger, mouse, bottle, and jacket are added. If it is too deep, it may look bulky and casual. A moderate depth with good internal support often looks cleaner than a very slim bag that bulges in several places.
| Design Choice | Benefit | Risk |
|---|---|---|
| More internal pockets | Better organization | More sewing work and weight |
| More outer pockets | Faster access | Less business-like appearance |
| Slim body | Cleaner silhouette | Limited charger and jacket space |
| Moderate depth | Better daily use | Needs shape control |
| Deep front pocket | More storage | Can distort logo area |
| Hidden organizer | Cleaner exterior | Requires clear internal layout |
| Structured front panel | More polished look | Adds material and process complexity |
A clean laptop backpack should stay neat after loading. This is the real test. Pack the laptop, charger, notebook, bottle, and jacket. Check the front panel from the side. If the pocket lines bulge, the logo wrinkles, or the base sags, the compartment layout needs refinement.
A strong compartment design should feel almost invisible from the outside. The user gets practical storage, but the backpack still looks professional in an office, meeting, airport lounge, or conference hall.
How To Keep Business Looking Good?
A business laptop backpack should look clean, structured, and suitable for offices, commuting, travel, meetings, and tech events. The safest direction is a calm outer shape, matte or textured fabric, limited visible pocket lines, refined zipper details, stable front panels, and a logo that feels intentional rather than loud. The backpack should still look polished after a laptop, charger, bottle, notebook, and jacket are packed inside.
Business appearance is not created by color alone. A black backpack can still look cheap if the fabric shines too much, the front pocket bulges, the seams wave, or the logo wrinkles after loading. A gray or navy backpack can look premium if the material has good texture, the body holds its shape, and the hardware feels smooth. The real test is how the backpack looks in daily use, not how it looks when empty.
For tech brands, the business look usually sits between formal and practical. It should not be as stiff as a briefcase, but it should not look like a school bag, outdoor pack, or gym bag. The design should feel appropriate beside a laptop, phone, notebook, conference badge, suitcase, blazer, hoodie, or office desk. This flexibility is why business laptop backpacks often use simple silhouettes, muted colors, subtle trims, and organized interiors.
A clean business appearance depends on five areas:
Shape: the body should stand or rest neatly without heavy sagging.
Material: the surface should look refined and stable, not flimsy or overly shiny.
Pocket layout: function should stay mostly inside, with fewer outer bulges.
Logo: the position and size should match daily work use.
Details: zippers, pullers, webbing, stitching, handle, and bottom shape should look controlled.
| Business Look Area | Better Direction | What To Avoid |
|---|---|---|
| Outer shape | Structured, clean, moderate depth | Soft sagging body or oversized travel shape |
| Fabric surface | Matte, textured, stable hand feel | Shiny thin fabric or uneven coating |
| Front panel | Smooth with limited pocket lines | Bulging pockets and crowded seams |
| Logo | Small to medium, balanced, flat | Huge front print or curved logo area |
| Color | Black, charcoal, navy, gray, dark green | Too many bright contrast panels |
| Zippers | Smooth teeth, clean pullers | Noisy pullers or rough zipper curves |
| Straps | Padded but simple | Excessive webbing and outdoor styling |
| Bottom | Stable and slightly reinforced | Collapsed base after loading |
A business laptop backpack should be reviewed while packed. Add a laptop, tablet, charger, mouse, cable pouch, notebook, bottle, and light jacket. Then check the side profile, front panel, logo area, zipper lines, and bottom shape. If the backpack looks neat under load, the design is closer to real business use.
What Is The Best Business Laptop Backpack?
The best business laptop backpack protects devices, organizes work items, carries comfortably, and keeps a polished appearance in office, commute, travel, and event settings. It should not look overdesigned. It should look easy to use, stable in shape, and refined enough for daily professional carry.
A strong business laptop backpack usually includes:
A padded 13–16 inch laptop sleeve.
A tablet pocket or flat document divider.
A front organizer for charger, mouse, cables, pens, and cards.
A top quick pocket for earbuds, access card, or phone.
A clean front panel with limited outer pocket lines.
A structured body that resists heavy bulging.
A padded back panel.
Comfortable shoulder straps with stable adjusters.
Smooth zipper movement.
A logo method that suits the fabric and body shape.
Optional business travel details such as a luggage sleeve, hidden wallet pocket, or separate laptop access.
A 20–30L capacity often works well for tech work, staff kits, conferences, and commuting. Slim styles below 18L may look elegant but often struggle with chargers, bottles, jackets, and documents. Larger styles above 32L may be useful for travel, but they can look bulky in office settings.
| Use Scene | Better Backpack Direction | Recommended Capacity |
|---|---|---|
| Daily office commute | Slim-medium body, clean front, padded sleeve | 18–24L |
| Tech conference | Organized pockets, notebook space, badge-friendly access | 20–26L |
| Staff program | Durable daily structure, subtle logo, practical compartments | 20–28L |
| Business travel | Luggage sleeve, hidden pocket, separate laptop access | 24–32L |
| Sales team | Strong fabric, refined finish, comfortable straps | 22–30L |
| Premium gift | Better lining, refined trim, clean logo | 20–28L |
The best business laptop backpack is not always the one with the most features. It is the one that still feels useful after several months: the laptop is easy to remove, the charger has a proper pocket, the straps do not feel thin, the front panel stays clean, and the logo still looks right in public.
What Makes A Backpack Professional?
A backpack looks professional when its shape, material, color, pocket layout, stitching, hardware, and logo feel controlled. Professional appearance comes from restraint. Fewer visual interruptions, cleaner seams, better fabric, and balanced proportions usually look more refined than heavy decoration.
The body shape is the first signal. A business backpack should not collapse when empty or become round and swollen when packed. A slightly structured front panel helps the backpack look cleaner. A stable bottom keeps the bag from looking tired after a laptop and charger are added.
Fabric texture is the second signal. Matte polyester, textured polyester, nylon, RPET, coated fabric, and selected PU trim can all work if the surface looks clean and the structure supports the shape. Thin shiny fabric may lower perceived value. Heavy rugged fabric may look too outdoor if the project needs a boardroom-friendly style.
Pocket lines also affect appearance. Too many front zippers can make the backpack look busy. Large outer pockets may be useful, but they can distort the body. For a business look, it is often better to keep the outside calm and place more storage inside.
Professional style details to review:
Front panel stays smooth after loading.
Zipper lines are straight and not forced around tight curves.
Stitching is even on visible seams.
The handle is centered and firm.
Shoulder straps look integrated with the body.
Webbing ends are clean.
Pullers feel smooth and quiet.
Logo sits on a flat area.
The bottom does not sag.
The side pocket does not pull the body out of shape.
| Detail | Professional Look | Less Polished Look |
|---|---|---|
| Shape | Clean, stable, moderate depth | Soft, sagging, over-rounded |
| Front panel | Smooth and balanced | Puffy pocket bulges |
| Stitching | Even and straight | Wavy seams or loose threads |
| Zipper path | Clean and smooth | Tension at corners |
| Webbing | Matched color, neat finish | Loose ends or rough trimming |
| Pullers | Simple and refined | Oversized or noisy |
| Logo | Balanced and flat | Oversized or wrinkled |
| Side pocket | Controlled and stable | Pulls body outward |
A professional backpack should look good from three views: front, side, and back. The front carries the visual identity. The side shows thickness and structure. The back shows comfort level and finishing quality. All three views should feel consistent.
Which Materials Look Premium?
Premium-looking laptop backpack materials usually have a stable body, clean texture, even color, and a surface that works well with the logo method. Nylon, high-density polyester, textured polyester, coated fabric, RPET, PU trim, and leather accents can all create a more refined look when used correctly.
600D polyester is practical and widely used. It can look clean when the surface is even and the backing gives enough support. For a more elevated business look, textured polyester, nylon, 900D/1000D polyester, 1680D polyester, or coated fabric may improve structure and perceived value. RPET works well when sustainability is part of the program.
Nylon often gives a smoother, lighter, more urban feel. 1680D polyester can look stronger and more structured, but it may also feel heavier. Coated materials can look modern and water-resistant, but creasing should be checked. PU trim can add a refined accent around the handle, patch, zipper pull, or logo area, but too much PU may increase weight and change the style.
| Material | Visual Feel | Better Use | Check Before Approval |
|---|---|---|---|
| 600D polyester | Practical, clean, cost-stable | Events, staff programs, daily use | Surface shine, backing, color match |
| 900D/1000D polyester | Stronger, more rugged | Hardware teams, commuter use | Weight and stiffness |
| 1680D polyester | Structured and durable | Business travel, premium daily use | Thickness, sewing bulk |
| Nylon | Smooth and refined | Office commute, premium tech style | Wrinkle, color depth |
| Textured polyester | Mature and business-friendly | Corporate gifts, private label lines | Logo clarity on texture |
| RPET polyester | Clean with sustainability value | Eco-focused programs | Certification needs and fabric hand feel |
| Coated fabric | Modern, water-resistant look | Sleek tech backpacks | Creasing and coating durability |
| PU trim | Polished accent | Logo patch, puller, handle wrap | Peeling risk and color consistency |
| Leather patch | Warm premium detail | Higher-value gift programs | Thickness, edge finish |
Color depth matters. Black should not look washed out. Navy should not turn purple under indoor light. Charcoal should not look dusty. Dark green should stay professional rather than outdoorsy. Material should be checked under natural light, office light, and camera light when possible.
Fabric should also be tested after loading. Some materials look flat and premium when the backpack is empty but wrinkle after packing. Some coated fabrics show pressure marks. Some textured fabrics make small printed logos less sharp. The material and logo method should be decided together.
How Should Logos Be Placed?
Logo placement should support daily use and business appearance. For business laptop backpacks, subtle placement often works better than large front branding. The logo should identify the brand clearly without making the backpack feel like a temporary giveaway.
The safest logo positions are usually flat, stable, and away from heavy pocket expansion. Common areas include the upper front panel, lower front panel, woven label position, leather patch area, rubber patch area, side panel, zipper pull, or metal plate position. The placement should be checked after the backpack is packed because fabric movement can distort the logo.
A logo should not sit across a curved seam, soft bulge, heavy zipper bend, or pocket area that expands. If the front pocket fills with charger and mouse, a logo placed on that pocket may wrinkle or curve. If the logo is placed too low, it may be hidden when the bag is carried. If it is too high, it may compete with zipper lines or handle stitching.
Logo size should fit the backpack scale. For many business laptop backpacks, a front logo width of around 40–80 mm works better than oversized branding. A small woven label, rubber patch, embroidery, metal badge, or leather patch can look more refined than a large print. Larger branding may work for event photos, but it can reduce daily wearability.
| Logo Method | Business Look | Better Position | Watch Carefully |
|---|---|---|---|
| Embroidery | Refined, durable | Flat front panel or patch zone | Puckering on thin fabric |
| Woven label | Subtle and clean | Lower front, side seam, front tab | Edge finish and size |
| Rubber patch | Modern and dimensional | Front panel, side panel | Weight and attachment |
| Metal plate | Premium and sharp | Flat reinforced area | Scratches and secure fixing |
| Leather patch | Warm and polished | Front lower panel or handle area | Edge finish and color match |
| Heat transfer | Clean fine detail | Smooth fabric panel | Cracking and adhesion |
| Silk screen | Simple and clear | Flat fabric area | Rubbing and fabric texture |
Logo review should include:
Check logo size on the real backpack body.
Pack the backpack and review whether the logo stays flat.
Review logo visibility from 1 meter and 3 meters.
Check color contrast under indoor and outdoor light.
Rub the logo surface lightly to check finish.
Review whether the logo method matches the material texture.
Confirm that the logo does not sit on a high-stress seam.
A good logo feels like part of the backpack, not a sticker added at the end.
Business Style Vs Sport Style
Business style and sport style can both work for laptop backpacks, but they create different feelings. Business style is calmer, cleaner, and more suitable for office and travel settings. Sport style feels more active, rugged, and casual. The right choice depends on the brand identity and where the backpack will be used.
Business style usually uses structured panels, muted colors, subtle logos, hidden organizers, smooth zipper lines, and refined materials. It works well for SaaS brands, corporate teams, finance tech, business travel, executive gifts, sales teams, and professional events.
Sport style uses stronger contrast, more visible pockets, thicker mesh, bolder zipper pulls, larger webbing, and sometimes more angular shapes. It can work well for gaming hardware, outdoor tech, field service teams, sports-tech events, and active commuting.
Many tech backpacks perform best between the two styles: business on the outside, functional on the back and inside. For example, the front panel can stay clean and professional, while the back panel uses breathable mesh. The straps can be comfortable without looking like hiking gear. The interior can have strong organizer pockets while the outside remains simple.
| Design Area | Business Style | Sport Style | Balanced Tech Direction |
|---|---|---|---|
| Shape | Structured and clean | Dynamic and rugged | Clean front, stronger back support |
| Color | Black, navy, gray, charcoal | Contrast trims, brighter accents | Muted body with small accent |
| Logo | Small label, patch, embroidery | Larger patch or print | Medium subtle logo |
| Straps | Simple padded straps | Wider mesh, more webbing | Comfortable but visually clean |
| Pockets | Hidden or minimal outside | More visible access pockets | Internal organizer, one quick pocket |
| Fabric | Matte, textured, refined | Stronger, coated, rugged | Textured or coated fabric with clean cut |
| Use scene | Office, travel, meetings | Active commute, field, outdoor | Commute, work, event, travel |
The safest choice for most tech brands is a business-led design with practical performance details. Keep the front clean. Put the function inside. Use comfortable straps and a stable back panel. Add a subtle logo. Choose colors that people will actually carry after the event or launch.
A backpack that looks too sporty may be left at home before meetings. A backpack that looks too formal may lack comfort and storage. The best business tech backpack sits in the middle: polished enough for work, practical enough for daily movement.
How To Custom With A Manufacturer?

A custom laptop backpack should begin with the real carrying scene: device size, daily items, comfort level, visual style, logo position, packing needs, quantity, and required arrival date. A strong project does not start from “make it look similar.” It starts from “what should this backpack protect, carry, and represent after months of daily use?”
For tech brands, a laptop backpack usually has more pressure than a normal promotional bag. It may be used by employees, event guests, sales teams, software users, hardware partners, conference attendees, or retail shoppers. That means the backpack needs to look clean in business settings and still work under real load: laptop, tablet, charger, mouse, cables, bottle, notebook, documents, and a light jacket.
The custom process should connect five areas from the beginning:
Product use: office commute, tech event, onboarding kit, business travel, or private label line.
Device protection: laptop size, sleeve fit, padding level, tablet pocket, bottom support.
Storage structure: organizer, charger pocket, cable pocket, bottle pocket, hidden pocket, document divider.
Business appearance: body shape, fabric texture, color, zipper style, logo method, front panel control.
Bulk execution: sample review, quantity, packing, QC focus, carton mark, delivery route, arrival date.
When these details are decided early, the sample becomes more accurate. When they are left vague, problems often appear later: laptop sleeve too small, front pocket too bulky, logo placed on a curved area, straps too thin, zipper path too tight, or packing not suitable for warehouse or event handling.
| Custom Detail | What To Confirm Early | Why It Matters |
|---|---|---|
| Laptop size | 13, 14, 15.6, 16, or 17 inch | Controls sleeve height, width, padding, and backpack body |
| Capacity | Slim office, daily commute, travel-ready | Controls body depth, pocket count, and comfort |
| Padding level | Basic sleeve, padded sleeve, suspended sleeve | Affects device protection, thickness, and cost |
| Material | Polyester, nylon, RPET, coated fabric, PU trim | Affects look, durability, logo method, and hand feel |
| Organizer | Cable, charger, mouse, pen, card, hidden pocket | Affects daily usability |
| Logo | Position, size, color, method | Affects business appearance and bulk consistency |
| Zipper | Standard, smooth, branded puller, hidden zipper | Affects access, style, and durability |
| Packing | Polybag, hangtag, barcode, inner label, carton mark | Affects event, retail, and warehouse handling |
| Timeline | Sample, revision, bulk, shipping | Protects launch, event, or internal schedule |
A custom laptop backpack should not be overfilled with features only because they sound attractive. A hidden pocket is useful only when it is easy to reach. A luggage strap is useful only when travel is part of the use scene. A USB pass-through is useful only when the design supports clean cable routing. A premium logo method is useful only when the fabric and placement support it well.
The most reliable direction is simple: protect the laptop, organize daily electronics, carry comfortably, keep the outside clean, and make the logo feel natural.
How To Plan A Custom Design?
A custom laptop backpack should be planned around use first, style second. The design should start with who will carry it, what they carry, where they use it, and how polished it needs to look. A backpack for a developer conference is different from a backpack for an executive gift, a sales team, or a private label product line.
Start with the daily load. A realistic tech load often includes:
One 13–16 inch laptop.
One tablet or document folder.
One laptop charger.
One mouse.
Two or three cables.
One power bank.
One notebook.
One 500–750 ml bottle.
One phone, earbuds, ID card, and keys.
One light jacket or hoodie.
The backpack body should be built around this load. If the charger has no proper pocket, it may press into the laptop. If the bottle pocket is too shallow, it may fall out. If the backpack is too slim, the front panel may bulge. If the body is too deep, the style may feel too casual for business use.
A practical planning order works well:
Confirm use scene and daily load.
Choose target laptop size.
Set capacity and body size.
Select material direction.
Plan laptop, tablet, charger, cable, bottle, and quick-use storage.
Decide padding level and back comfort.
Choose logo method and position.
Confirm packing and delivery needs.
Review sample with real items before approval.
| Use Scene | Better Design Direction | Details Worth Keeping |
|---|---|---|
| Staff onboarding | Clean daily backpack with subtle logo | 20–26L, padded sleeve, organizer, soft back panel |
| Developer event | Light, organized, easy to distribute | Badge/card pocket, notebook space, cable storage |
| Business travel | Structured and travel-ready | Luggage strap, hidden pocket, separate laptop access |
| Sales team | Durable and professional | Strong zipper, refined logo, comfortable straps |
| Hardware launch | Better protection and stronger structure | Suspended sleeve, reinforced base, tougher fabric |
| Premium gift | Polished appearance and better materials | Refined lining, metal/patch logo, stable body |
| Private label line | Retail-ready finish | Hangtag, barcode, consistent color, clean stitching |
Design planning should also control proportion. A 15.6 inch laptop backpack often works well around 20–30L for daily tech use. Slimmer styles can look elegant, but they may not hold chargers, bottles, and jackets comfortably. Larger travel styles can hold more, but they may look too bulky for office use.
Logo planning should happen before the sample is made. The logo should be placed on a flat area that does not bend or bulge after loading. For business styles, embroidery, woven labels, rubber patches, metal plates, leather patches, and clean heat transfer can all work, depending on fabric and visual tone.
What Should A Sample Confirm?
A sample should confirm how the backpack performs when it is packed, worn, opened, closed, lifted, placed down, and inspected under normal light. It should not be approved only from front-view appearance. A laptop backpack sample must prove that device protection, compartments, straps, zippers, logo, material, and packing all work together.
A sample review should use real items. Place the target laptop, tablet, charger, mouse, cables, notebook, bottle, and jacket inside. Then check how the backpack feels on the shoulder, whether the laptop is easy to remove, whether the front panel stays clean, and whether the logo remains flat.
The sample should confirm:
Laptop sleeve fit and smooth access.
Bottom padding or suspended sleeve position.
Tablet pocket softness and stability.
Charger and cable pocket placement.
Main zipper smoothness when packed.
Front organizer clarity.
Bottle pocket depth and elastic recovery.
Shoulder strap width, foam, angle, and stitching.
Back panel comfort with laptop inside.
Top handle strength when loaded.
Logo size, position, process, and color.
Fabric texture, stiffness, wrinkles, and color.
Lining quality and inner seam finish.
Packing method, label position, hangtag, barcode, and carton requirement.
| Sample Area | What To Check | Possible Adjustment |
|---|---|---|
| Laptop sleeve | Fit, padding, bottom support | Adjust sleeve size, add EPE, change opening |
| Tablet pocket | Softness, depth, lining | Add soft lining or revise pocket size |
| Organizer | Charger, cable, mouse placement | Change pocket depth or panel layout |
| Zipper | Smooth movement under load | Adjust zipper size, curve, or puller |
| Straps | Comfort and strength | Change foam, width, angle, reinforcement |
| Back panel | No hard laptop edge felt | Add foam, mesh, or support layer |
| Logo | Flat, clear, balanced | Move, resize, or change method |
| Material | Look, stiffness, wrinkle, color | Change fabric, backing, or color |
| Shape | Clean when loaded | Adjust gusset, front panel, or pocket depth |
| Packing | Tag, label, polybag, carton | Revise retail or event packing details |
A sample should be reviewed from front, side, back, and inside. The side view is especially important for laptop backpacks because it shows thickness, pocket bulge, and body balance. A backpack can look clean from the front but too thick from the side once a charger and bottle are packed.
Lighting also matters. Black, charcoal, navy, and coated fabrics can shift under office light, natural light, and camera light. Logo contrast may look different on textured fabric. Embroidery can pucker on thin panels. Heat transfer may look sharp but should be checked for flexibility and adhesion.
Once approved, the sample should become the physical reference. Size, material, logo, zipper, lining, stitching, pocket layout, padding, and packing should all follow it as closely as possible.
How Long Does Sampling Take?
Sampling time depends on structure, material availability, logo method, accessories, and revision depth. A simple laptop backpack with available fabric and a basic logo can move faster. A backpack with suspended sleeve, multiple compartments, custom zipper pullers, rubber patch, metal badge, special lining, or retail packing needs more preparation.
For many custom laptop backpack projects, a regular sample usually takes about 5–7 days after key details are confirmed. A simple structure may take around 2–3 days. A more complex design may take 7–14 days or longer, especially when special materials or custom accessories are involved.
| Sample Type | Approximate Time | Suitable Situation |
|---|---|---|
| Simple structure sample | 2–3 days | Standard fabric, simple sleeve, basic logo |
| Regular custom sample | 5–7 days | Custom size, pockets, logo, padding |
| Complex laptop backpack sample | 7–14 days | Suspended sleeve, many compartments, special trims |
| Revised sample | 3–7 days | Adjust logo, sleeve, pocket, straps, or fabric |
| Special accessory sample | Case by case | Rubber patch, metal plate, custom puller, special label |
Sampling moves faster when the project brief is complete. Before sample work begins, prepare:
Reference photo or sketch.
Target laptop size.
Preferred backpack size or capacity.
Logo artwork.
Logo size and position idea.
Material preference or visual style.
Color plan.
Quantity per color or design.
Packing requirement.
Target arrival date.
Destination.
Any inspection or testing requirement.
For event, launch, or onboarding schedules, time should be counted backward from the required arrival date. A practical schedule should include sample making, sample review, revision, production, inspection, packing, and transport. Late sample approval often creates pressure on material choice, logo method, and shipping cost.
| Stage | Practical Time Need |
|---|---|
| Project detail review | 1–3 days |
| Material and logo confirmation | 1–5 days |
| First sample | 2–14 days depending on complexity |
| Sample review | 1–5 days |
| Revision if needed | 3–7 days |
| Bulk production | Usually 20–30 days after approval |
| Delivery | Depends on route and destination |
A fast sample is useful only when it can be checked properly. Rushing the first sample while leaving device size, padding, or logo placement unclear often leads to more revision later.
How Does Price Change?
Laptop backpack price changes with size, fabric, padding, compartment count, zipper level, logo method, accessories, packing, quantity, inspection detail, and delivery route. Two backpacks may look similar from the outside but have very different costs because the inside structure is different.
Major cost drivers include:
Backpack dimensions and fabric consumption.
Outer fabric type and backing.
Lining material.
Foam, EPE, PE board, EVA, or mesh padding.
Suspended laptop sleeve or separate laptop compartment.
Number of pockets, dividers, and zippers.
Zipper chain size, slider quality, and puller design.
Logo method, size, and color count.
Custom label, hangtag, barcode, and packing.
Shoulder strap structure.
Back panel support.
Bottom reinforcement.
Quantity per color.
Inspection and packing requirements.
Delivery method.
A cost-conscious design may use standard polyester, a padded laptop sleeve, simple organizer, basic zipper, and one clean logo. A higher-value design may use nylon or textured polyester, suspended sleeve, tablet pocket, hidden pocket, luggage strap, stronger zipper, refined logo, and retail-ready packing.
| Cost Factor | Cost-Control Direction | Higher-Value Direction | Risk If Reduced Too Much |
|---|---|---|---|
| Fabric | Standard polyester | Nylon, RPET, coated fabric, textured fabric | Weak hand feel or poor appearance |
| Padding | Basic foam sleeve | Suspended sleeve, EPE, PE support | Weak device protection |
| Compartments | Main pocket plus simple organizer | Laptop, tablet, cable, hidden, travel pockets | Messy daily use |
| Zipper | Standard zipper | Smoother zipper, stronger chain, custom puller | Jamming or early wear |
| Logo | One simple process | Embroidery, patch, woven label, metal plate | Lower perceived value |
| Straps | Basic padded straps | Better foam, air mesh, reinforcement | Shoulder pressure |
| Back panel | Light padding | Structured mesh or PE support | Device edge pressure |
| Packing | Basic polybag/carton | Hangtag, barcode, inner label, carton mark | Harder distribution or retail handling |
A three-level structure often helps decision-making:
Basic tech backpack: standard fabric, padded sleeve, simple organizer, clean logo, basic packing.
Daily work backpack: better fabric, tablet pocket, charger storage, reinforced stress areas, smoother zipper, stronger straps.
Premium business tech backpack: refined material, suspended sleeve, structured body, hidden pocket, luggage strap, subtle logo, upgraded lining, retail-ready packing.
For Jundong projects, regular MOQ is usually 500 pcs per design. Simple styles may be reviewed at 200–300 pcs depending on structure and materials. When the order reaches 2000 pcs, sample fees can often be refunded or deducted. The final price should always be based on the approved sample, confirmed material, logo method, packing plan, and delivery details.
Factory Process Checklist
A reliable custom laptop backpack process should move from project review to material selection, sample making, sample testing, revision, approval, production, QC, packing, and delivery. Each step should reduce uncertainty before bulk work begins.
| Step | What Happens | What To Confirm |
|---|---|---|
| 1. Project review | Use scene, laptop size, reference, quantity, deadline | Product direction |
| 2. Structure planning | Sleeve, pockets, padding, straps, back panel | Real daily function |
| 3. Material selection | Fabric, lining, zipper, webbing, foam | Appearance and durability |
| 4. Logo review | Method, size, color, placement | Business look and clarity |
| 5. Sample making | Physical sample is produced | Real size, structure, logo, feel |
| 6. Sample testing | Load, wear, open, lift, inspect | Comfort, protection, usability |
| 7. Revision | Adjust details if needed | Improved sample direction |
| 8. Approval | Final sample confirmed | Production reference |
| 9. Bulk production | Cutting, sewing, logo, assembly | Consistency and schedule |
| 10. QC | Size, stitch, zipper, logo, function, packing | Quality before shipment |
| 11. Packing | Polybag, tag, barcode, carton mark | Distribution and handling |
| 12. Delivery | Shipment arranged by route and deadline | Arrival timing |
Before production begins, these details should be locked:
Final dimensions.
Laptop and tablet pocket size.
Outer fabric and lining.
Zipper, slider, puller, webbing, foam, and accessories.
Logo method, artwork, color, and position.
Strap width, padding, and reinforcement.
Back panel structure.
Bottom support.
Pocket layout.
Packing method.
Carton marks.
Approved sample reference.
Quantity per color.
Inspection focus.
Delivery destination and required arrival date.
QC should cover more than outside appearance. For laptop backpacks, inspection should pay special attention to laptop sleeve size, padding position, zipper movement, strap stitching, handle strength, logo placement, lining cleanliness, pocket function, size tolerance, packing accuracy, and carton labels.
A laptop backpack for tech brands should feel practical from the first use and still look professional after daily carry. When design planning, sample review, material choice, logo placement, and process control work together, the final backpack can support real work routines rather than becoming a one-time giveaway.