 Skip to content
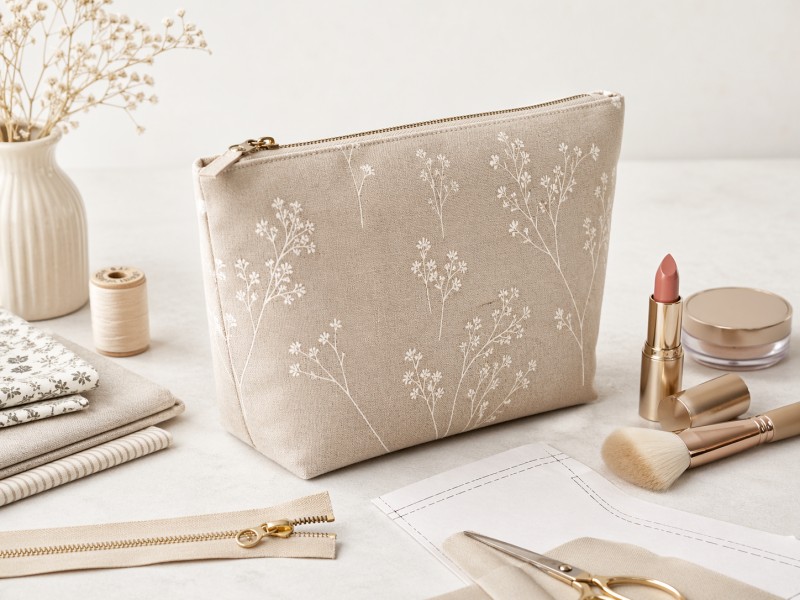
A flat bottom makeup bag looks simple at first glance. A zipper. Two fabric panels. A lining. A few seams. But anyone who has sewn one, sourced one, or approved one for a beauty brand knows the truth: the bottom shape decides whether the bag feels useful or forgettable.
A basic pouch can hold cosmetics. A well-made flat bottom makeup bag can stand on a vanity, stay open while products are being used, protect small bottles during travel, and look polished enough for retail display or gift sets. That is why this structure is so common across cosmetic pouches, toiletry bags, travel organizers, private-label beauty kits, promotional cosmetic bags, and daily makeup storage bags.
Here is the simple version.
A flat bottom makeup bag is made by sewing an outer fabric, lining, zipper, and shaped bottom structure together, then forming boxed corners or gussets so the base can stand upright. The best results come from choosing the right fabric, adding suitable interfacing, sewing a clean zipper, matching both boxed corners evenly, and checking the sample for capacity, opening width, seam strength, logo placement, and lining fit before bulk production.
That short process sounds easy.
But small decisions change the result quickly.
A soft cotton pouch may collapse beautifully for a casual gift, while a PU leather makeup bag may need stronger stitching and controlled seam thickness. A clear PVC travel bag may look simple, but zipper edge finishing and heat sensitivity can affect appearance. A quilted nylon pouch may feel premium, yet the filling thickness can change the finished size. For brand teams, these details are not minor. They affect cost, packing, shelf appearance, repeat orders, and complaints after delivery.
This guide explains how a flat bottom makeup bag is made from both views: hands-on sewing and commercial custom production. It covers pattern planning, fabric selection, boxed corners, zipper construction, lining, size, cost, sample review, and when to work with a professional bag factory.
What Is a Flat Bottom Makeup Bag and Why Is It Different from a Regular Pouch?
A flat bottom makeup bag is a cosmetic pouch with a shaped base that allows the bag to stand upright. Unlike a flat zipper pouch, it has extra depth created through boxed corners, side gussets, darts, or a separate bottom panel. This structure gives more usable space, better visibility, and a more stable shape for cosmetics, brushes, skincare tubes, and travel items.
A regular flat pouch is usually made from two main panels. It is easy to sew, easy to pack, and cost-friendly. But once filled, it often bulges unevenly. It may lie flat, slide around, or make small items harder to find. That is acceptable for receipts, cables, pencils, or slim beauty tools. It is less ideal when the user wants the bag to sit open on a bathroom counter.
A flat bottom cosmetic bag solves that problem through structure. The base gives the pouch a footprint. The bag can stand. The zipper opening becomes more accessible. The inside capacity becomes easier to use. This is why many beauty brands choose this style for travel sets, seasonal gift sets, skincare trial kits, salon retail, hotel amenities, and online beauty launches.
There are several related styles:
| Style | Structure | Best Use |
|---|---|---|
| Flat Zipper Pouch | Two flat panels | Low-cost gifts, slim storage |
| Flat Bottom Makeup Bag | Boxed corners or gusseted base | Daily cosmetics, travel, retail sets |
| Boxy Makeup Bag | Full rectangular body | Toiletries, bottles, larger capacity |
| Structured Cosmetic Case | Firm shell, padding, dividers | Premium travel kits, tools, fragile items |
| Clear Cosmetic Bag | PVC / TPU surface | Stadium, travel, visibility needs |
The difference is not only appearance. It is also about how the user handles the product. A pouch that stands upright feels easier to use. A pouch with a wider base can hold bottles better. A pouch with a clean lining can be wiped or cleaned more easily. A pouch with stable seams can survive repeated packing and unpacking.
For a brand, this means the structure should match the real use scene. A daily makeup pouch does not need the same body as a travel toiletry bag. A gift-with-purchase pouch does not need the same strength as a professional makeup artist bag. A clear travel pouch does not need the same construction as a quilted velvet beauty pouch.
That is why the first step is not cutting fabric.
The first step is deciding what the bag must do.
Which Materials Are Best for Making a Flat Bottom Makeup Bag?

The best material for a flat bottom makeup bag depends on use, shape, cleaning needs, logo method, and target price. Canvas, polyester, nylon, PU leather, PVC, TPU, velvet, neoprene, and quilted fabrics can all work, but each one changes the bag’s structure, weight, sewing method, surface finish, and production cost.
Material choice decides more than the outside look. It decides how the bag stands, how the seams behave, how the zipper sits, and how the product feels in hand. A beautiful material can fail if it does not match the structure.
For hand sewing or small studio sewing, cotton, canvas, and quilted fabric are easy to handle. They press well, fold cleanly, and work with common sewing machines. For larger brand projects, fabric selection becomes more layered. The team may need water-resistant lining, branded zipper pulls, logo patches, custom colors, special packaging, or washable surfaces.
Here is a practical material comparison:
| Material | Best For | Strength | Watch Carefully |
|---|---|---|---|
| Canvas | Casual makeup bags, natural style | Strong handfeel, easy printing | May stain if untreated |
| Polyester | Everyday cosmetic pouches | Cost-friendly, printable, flexible | Needs right lining for better feel |
| Nylon | Travel makeup bags | Lightweight, smooth, water-resistant options | Thin nylon may need padding |
| PU Leather | Private-label beauty bags | Polished look, easy wipe surface | Seam bulk and peeling risk need control |
| PVC / TPU | Clear travel cosmetic bags | Visibility, waterproof surface | Scratches, odor, and heat sensitivity |
| Velvet / Satin | Gift sets, beauty collections | Soft, premium visual effect | Dirt and crushing marks need review |
| Quilted Fabric | Puffy cosmetic pouches | Soft padding, strong gift feel | Filling thickness affects size |
| Neoprene | Flexible travel pouches | Soft protection, stretch | Edge finishing matters |
For a flat bottom structure, the material should have enough body to keep the base from collapsing. If the fabric is too soft, interfacing or padding may be needed. If the fabric is too thick, the boxed corners can become bulky. If the material is too slippery, cutting and sewing accuracy may suffer.
The lining also deserves attention. A makeup bag lining should not be chosen only by color. It should match cleaning expectations. For lipstick, powder, foundation, and skincare leakage, a wipe-friendly lining is often better than plain cotton. For eco-minded collections, RPET lining may be considered. For a luxury gift set, satin or printed lining may add a strong brand feel, but it must still be checked for durability.
A good material choice balances four things:
- How the bag looks
- How it stands
- How it cleans
- How it repeats in production
If your project needs help comparing canvas, nylon, PU, PVC, quilted fabric, or lining options, you can send your target size, reference style, and logo plan to info@jundongfactory.com for a material review before sampling.
How Do You Make a Flat Bottom Makeup Bag Step by Step?

To make a flat bottom makeup bag, prepare outer fabric, lining, interfacing, zipper, and thread. Cut the panels to the planned size, attach interfacing, sew the zipper between the outer fabric and lining, close the side seams, leave a turning gap, shape the bottom with boxed corners, turn the bag right side out, close the lining, then press and shape the base.
The process can be simple, but accuracy matters. A few millimeters can change the final shape, especially around the zipper ends and bottom corners.
Basic Tools and Materials
| Item | Purpose |
|---|---|
| Outer fabric | Main appearance and structure |
| Lining fabric | Inside finish and cleaning support |
| Interfacing or fleece | Shape, body, and stability |
| Zipper | Main closure |
| Thread | Seam strength and color matching |
| Scissors or rotary cutter | Clean cutting |
| Clips or pins | Hold layers in place |
| Ruler and marker | Accurate measurements |
| Sewing machine | Main stitching |
| Iron or pressing tool | Cleaner seams and shape |
For a simple flat bottom makeup pouch, many home sewing tutorials use outer fabric, lining, interfacing, fleece, and a zipper. Some sewing guides use two outer pieces and two lining pieces cut to the same size, then form the flat base later through boxed corners.
Step 1: Decide the Finished Size
Before cutting fabric, decide what the bag should hold. Lipstick and powder need less height. Brushes and travel bottles need more length and depth. A pouch made for a gift set may need to fit a product bundle exactly.
For a common small makeup pouch, the pattern may start with two rectangles. For a larger travel pouch, the panels may need extra height and a deeper boxed corner.
A useful starting formula:
| Desired Use | Body Direction | Bottom Direction |
|---|---|---|
| Small daily pouch | Shorter height | Narrow base |
| Travel pouch | Taller body | Wider base |
| Gift pouch | Balanced shape | Medium base |
| Brush pouch | Longer length | Moderate depth |
| Skincare pouch | Taller body | Stable base |
Step 2: Cut Outer Fabric, Lining, and Interfacing
Cut two outer fabric panels and two lining panels. If using interfacing, cut it to match the outer panels or slightly smaller depending on seam thickness. For padded pouches, fusible fleece can be added to give softness and body.
Accuracy in cutting prevents one side from pulling tighter than the other. This matters when the zipper is sewn, because uneven fabric layers can create a twisted top edge.
Step 3: Attach Interfacing
Interfacing gives the makeup bag shape. Without it, soft fabric may collapse. With too much stiffness, the bag may become hard to turn and the corners may look bulky.
Choose interfacing based on the main fabric:
| Main Fabric | Suggested Support |
|---|---|
| Cotton | Light to medium fusible interfacing |
| Canvas | Light interfacing or none, depending on weight |
| Nylon | Soft backing or foam, depending on style |
| PU | Often needs careful reinforcement, not too thick |
| Quilted fabric | May not need extra fleece |
| PVC / TPU | Usually not fused; structure comes from material thickness |
Step 4: Prepare the Zipper
The zipper should be slightly longer than the bag opening. This makes sewing easier and helps create cleaner edges. Zipper tabs can be added at both ends to reduce bulk and improve appearance.
For commercial cosmetic bags, zipper choice changes the final feeling. Nylon coil zippers are common for soft pouches. Metal zippers may look premium but can add weight and stiffness. Waterproof zippers may suit travel or toiletry styles, but they cost more and may change the sewing process.
Step 5: Sew the Zipper to Outer Fabric and Lining
Place the zipper face down on the outer fabric, then place the lining on top with right sides together. Sew along the zipper edge. Repeat for the other side. After sewing, press the fabric away from the zipper and add topstitching.
This step controls the first impression. If the zipper waves, the bag may look cheap. If the lining is caught too close to the teeth, the zipper may jam. If the topstitching is uneven, the pouch loses its clean finish.
Step 6: Sew the Side Seams
Open the zipper halfway before closing the body. This is easy to forget, and it can make turning the pouch difficult later.
Match outer fabric to outer fabric and lining to lining. Sew around the edges, leaving a gap in the lining so the bag can be turned right side out. The turning gap should be wide enough to avoid crushing the boxed corners.
Step 7: Box the Corners
This is the step that creates the flat bottom. Pinch one bottom corner so the side seam and bottom seam align. Measure across the corner and mark a straight line. Sew along the marked line. Repeat on every bottom corner that needs shaping.
A deeper corner creates a wider base and shorter body height. A smaller corner creates a slimmer base and taller body. Both sides must match.
Step 8: Turn, Close, and Shape
Turn the bag through the lining gap. Push out corners carefully. Close the lining gap with machine stitching or invisible hand stitching. Place the lining inside the bag. Press gently if the material allows it.
For PU, PVC, TPU, or delicate fabrics, pressing must be handled carefully to avoid heat marks. Use finger pressing, clips, or low heat with protection when needed.
The finished bag should stand evenly, open smoothly, and feel balanced when filled.
How Do Boxed Corners Create the Flat Bottom Shape?
Boxed corners create a flat bottom by folding each lower corner so the side seam aligns with the bottom seam, then stitching across the corner at a set depth. This removes the sharp flat corner and turns it into a three-dimensional base. The deeper the boxed corner, the wider the bottom becomes and the shorter the body appears.
This is the small sewing detail that changes the entire product.
A flat pouch is two-dimensional. It has width and height, but little planned depth. Once cosmetics are placed inside, the bag expands randomly. A boxed corner pouch is three-dimensional. The base is planned. The product has width, height, and depth.
In practical terms:
| Boxed Corner Depth | Result |
|---|---|
| Small corner | Slim base, more height |
| Medium corner | Balanced makeup pouch shape |
| Deep corner | Wider base, more storage, shorter look |
| Uneven corners | Twisted bottom, unstable standing |
| Bulky corner seam | Poor shape, harder turning |
For example, a pouch with a 2-inch boxed corner will have a different base from one with a 3-inch boxed corner, even if the starting fabric panels are the same. This is why brands should not approve only the front look of a makeup bag. The bottom must also be checked.
A boxed corner affects:
- Standing stability
- Usable capacity
- Side shape
- Finished height
- Packing thickness
- Carton quantity
- Shelf display
- User experience
Factories usually control boxed corners by using production patterns, seam allowance guides, marked corner depths, and sample approval records. If workers measure corners casually by eye, the bulk order may have size drift. One bag stands well. Another leans. Another looks too short.
This is why a production sample should record the corner depth clearly. For makeup bags with logo placement, this is even more necessary. A deeper boxed corner can pull the front panel downward and make the logo sit lower than expected.
For a brand team, the boxed corner should be treated as a design decision, not a sewing afterthought.
How Long Does It Take to Make a Flat Bottom Makeup Bag?
A simple flat bottom makeup bag may take 45 minutes to 3 hours for individual sewing, depending on skill, zipper handling, lining, and corner shaping. A commercial sample usually takes longer because the process includes material matching, pattern adjustment, logo testing, zipper review, lining choice, and sample comments before approval.
A sewing guide for a lined flat bottom zip pouch lists preparation and sewing time as several hours for a home project, especially when fabric cutting, interfacing, zipper work, and construction are included.
For brand projects, the timeline should be viewed differently.
| Stage | Typical Time Direction | What Happens |
|---|---|---|
| Design review | 1–2 days | Size, style, material, logo, use scene |
| Material sourcing | 2–7 days | Fabric, lining, zipper, puller, trims |
| Pattern making | 1–3 days | Shape, seam allowance, bottom depth |
| First sample | 5–10 days | Sewing, checking, internal review |
| Sample revision | 3–7 days each round | Adjust size, corners, logo, lining, zipper |
| Pre-production sample | Depends on project | Confirms bulk-ready details |
| Bulk production | Depends on quantity and complexity | Cutting, sewing, inspection, packing |
A simple polyester makeup pouch can move faster than a custom quilted cosmetic bag with branded zipper pullers and printed lining. A clear PVC pouch may need material odor review and scratch control. A PU leather pouch may need logo testing. A travel toiletry bag may need compartment checks.
The fastest sample is not always the best sample.
A rushed sample may miss the exact bottom width, zipper opening, seam thickness, or lining fit. Later, those mistakes become more expensive because the pattern, materials, and packaging have already moved forward.
The better approach is to control the review order:
- Shape
- Size
- Material
- Zipper
- Lining
- Logo
- Packaging
- Packed test
If you are preparing a custom makeup bag program, send your reference images, target size, material direction, logo file, and expected quantity to info@jundongfactory.com. A clear brief helps shorten sample discussion and reduce unnecessary revisions.
Do You Need a Pattern to Make a Flat Bottom Makeup Bag?
Yes, a pattern is strongly recommended for a flat bottom makeup bag. A simple rectangle can work for personal sewing, but a repeatable custom cosmetic bag needs a clear pattern that defines body size, seam allowance, zipper length, corner depth, lining fit, interfacing position, logo placement, and finished dimensions.
A pattern is not just a drawing. It is the control tool behind the finished shape.
For personal sewing, you can cut two fabric rectangles and form the base by boxing the corners. This is flexible and beginner-friendly. But for commercial production, “close enough” is risky. A makeup bag made for 500 pieces, 2,000 pieces, or repeat seasonal orders must be consistent.
A proper pattern should include:
| Pattern Detail | Why It Matters |
|---|---|
| Finished width | Controls front appearance |
| Finished height | Affects capacity and logo position |
| Bottom depth | Controls standing ability |
| Seam allowance | Affects final dimensions |
| Zipper length | Affects opening and ease of use |
| Lining allowance | Prevents bunching or tightness |
| Interfacing area | Controls body and softness |
| Logo placement | Keeps branding visually balanced |
| Label position | Supports retail and care information |
The pattern also helps control material behavior. A canvas pouch and PU pouch may not use exactly the same construction even if the finished size looks similar. PU cannot be pressed like cotton. PVC cannot be treated like polyester. Quilted fabric needs thickness allowance. Neoprene stretches. Velvet has nap direction.
For a factory sample, the pattern becomes the bridge between idea and repeat production. Once approved, it should not be casually changed. If the brand later changes fabric, lining, logo, or zipper, the pattern may need another review.
This is where many projects go wrong. Teams approve a sample visually, then later change the material. The same pattern is used, but the final pouch no longer looks the same. The corners become thicker. The zipper sits differently. The body collapses or becomes too stiff.
A clear pattern avoids this problem.
What Is the Best Size for a Flat Bottom Makeup Bag?
The best size for a flat bottom makeup bag depends on what it needs to hold. A daily makeup pouch can be compact, while a travel cosmetic bag needs more height and bottom depth. For brand projects, the size should match product set, retail price, packing method, and the way the end user will carry or store it.
Size should never be chosen only because it looks cute in a picture. A makeup bag must work with real items. Lipstick, mascara, cushion compact, powder, brush, skincare tube, perfume bottle, and travel-size cleanser all require different space.
Here is a practical size planning table:
| Use Scene | Size Direction | Structure Advice |
|---|---|---|
| Daily makeup pouch | Compact body, slim base | Keep it light and easy to carry |
| Travel cosmetic pouch | Wider base, taller height | Add wipe-friendly lining |
| Skincare trial kit | Medium body, stable base | Match bottle height carefully |
| Gift-with-purchase pouch | Medium size, attractive surface | Focus on color, logo, and packing |
| Retail beauty pouch | Balanced capacity and shelf look | Check barcode, hangtag, display needs |
| Makeup artist tool pouch | Larger body, more compartments | Add stronger fabric and dividers |
| Clear travel pouch | Transparent body, strong zipper | Control edge finishing and scratches |
The bottom depth is the most overlooked dimension. Many teams provide only length and height. But for a flat bottom makeup bag, depth decides how the bag stands and how much it holds. A bag can look wide from the front and still feel too small if the base is narrow.
A useful review method is to place the actual products inside the first sample:
- Can the zipper close without strain?
- Do bottles stand upright?
- Does the bag tip over when half-filled?
- Does the lining pull at the corners?
- Does the logo still sit in the right visual area?
- Does the bag fit the planned carton or gift box?
For beauty sets, the bag should be planned together with the items it will carry. A pouch made before product selection may later become too small, too large, or poorly balanced.
For online brands, packed size also matters. A puffy bag may look attractive, but it can raise shipping volume. A flat-packed pouch may save freight, but it may not look as premium when opened. The right size is a balance between use, visual value, and logistics.
Flat Bottom Makeup Bag vs Boxy Makeup Bag: Which Style Is Better?

A flat bottom makeup bag is better for daily cosmetics, gift sets, and medium-capacity travel use because it stands well without looking too bulky. A boxy makeup bag is better when more storage, bottles, or toiletries are needed. The best style depends on capacity, fabric, price target, and how the product will be displayed or packed.
The two styles are often confused. Both can stand. Both can hold cosmetics. But their structure creates a different feeling.
| Style | Best For | Main Benefit | Possible Limit |
|---|---|---|---|
| Flat Bottom Makeup Bag | Daily use, beauty gifts, travel pouches | Stands well, clean profile | Less volume than full boxy shape |
| Boxy Makeup Bag | Toiletries, skincare bottles, larger storage | High capacity, clear shape | Can feel bulky |
| Flat Zipper Pouch | Low-cost gifts, simple storage | Easy to pack and produce | Does not stand well |
| Structured Cosmetic Case | Premium sets, tools, travel protection | More protection | Higher cost and bulk |
| Clear Cosmetic Bag | Travel, stadium, visibility needs | Easy to see contents | Scratches and edge quality need control |
For a beauty brand, the decision often comes down to perceived value. A flat bottom pouch feels more refined than a flat zipper pouch, but still remains soft and packable. A boxy pouch feels more functional, but may look less elegant if the material is too stiff or the proportions are not balanced.
For travel, boxy styles often work better when the user carries bottles, skincare, or toiletries. For daily handbags, a flat bottom pouch often feels easier to carry. For gifts, a flat bottom style gives a better display shape without making the set too heavy.
From a production view, the boxy style usually requires more precise seam matching. It may also need more fabric, longer zippers, more lining control, and better corner finishing. The flat bottom makeup bag is often a stronger balance for brands that want a practical, attractive, and cost-controlled cosmetic pouch.
The style should match the purpose, not just the trend.
How Much Does It Cost to Make or Customize a Flat Bottom Makeup Bag?
The cost of a flat bottom makeup bag depends on fabric, lining, zipper, size, bottom depth, logo method, compartments, packaging, sample revisions, and order quantity. A simple polyester pouch costs less than a PU leather, quilted nylon, clear PVC, or structured cosmetic case. The final price should be reviewed through structure, not appearance alone.
A flat bottom makeup bag may look small, but the cost can change quickly. Two bags with the same size may have different prices because one uses printed polyester and a standard zipper, while the other uses quilted nylon, custom pullers, branded lining, woven labels, and retail packaging.
Cost factors usually include:
| Cost Factor | Why It Changes Price |
|---|---|
| Main fabric | PU, PVC, nylon, canvas, velvet, and RPET have different costs |
| Lining | Plain lining costs less than printed or wipe-friendly lining |
| Interfacing / padding | Adds body, softness, and labor |
| Zipper | Standard zipper costs less than waterproof, metal, or custom pullers |
| Logo method | Printing, embroidery, patch, embossing, and metal plates vary |
| Size | More material and longer zipper increase cost |
| Inner pockets | More sewing steps and higher labor |
| Bottom structure | Deeper or more complex base changes cutting and sewing |
| Packaging | Polybag, hangtag, insert card, box, or gift pack |
| Quantity | Larger quantities reduce setup pressure per piece |
Logo method deserves special care. A printed logo may work well on canvas or polyester. Embossing may suit PU. A woven label may be better for quilted nylon. A rubber patch can add dimension. A metal plate can feel premium, but it adds cost and weight.
Packaging also affects price. Many teams focus only on the bag and forget the sales channel. A pouch for retail may need a hangtag, barcode, insert card, dust bag, or color box. A pouch for online sales may need shape protection during shipping. A pouch for gift sets may need to fit neatly inside a bigger box.
For a custom price review, prepare these details:
- Target size
- Material preference
- Lining requirement
- Logo artwork
- Expected quantity
- Packaging plan
- Use scene
- Reference image
- Need for compartments or padding
Without these details, a quote may look fast but not accurate. With them, the factory can review the real structure and give more useful feedback.
Who Can Produce Custom Flat Bottom Makeup Bags for Brands?
Brands should work with a professional bag factory when the project needs custom size, private label branding, logo placement, material matching, packaging support, repeat quality, or bulk production. A flat bottom makeup bag may start from a simple sewing idea, but commercial production requires pattern control, sample review, QC, packing, and delivery coordination.
A good factory does more than sew the shape. It helps check whether the design can be produced smoothly and repeated across the order.
For a custom flat bottom makeup bag, the factory should be able to support:
| Need | Factory Role |
|---|---|
| Design idea | Review structure and feasibility |
| Material choice | Suggest canvas, nylon, PU, PVC, quilted fabric, lining |
| Pattern work | Create production-ready shape |
| Sample | Make and revise prototype |
| Logo | Test printing, patch, embroidery, embossing, or label |
| Packaging | Support hangtag, polybag, insert card, carton mark |
| QC | Check seams, zipper, logo, size, base, lining, packing |
| Repeat orders | Keep approved details consistent |
Jundong is based in Guangdong, China, and supports custom bag projects across materials such as fabric, leather, PU, PVC, neoprene, and plush. The company has foreign trade sales, product development, design, and sample room teams, with 600+ employees, an 18,000㎡ factory, and 80 quality inspectors.
For brand teams, this structure matters because makeup bags often involve more than one decision. A pouch may need a soft outer fabric, wipe-clean lining, smooth zipper, accurate logo, color-matched puller, barcode label, insert card, and carton marking. If one step is unclear, the final product can feel different from the approved sample.
Before contacting a factory, prepare a short brief:
| Detail to Send | Example |
|---|---|
| Product type | Flat bottom makeup bag |
| Size | Length × height × bottom depth |
| Material | PU, canvas, nylon, PVC, quilted fabric |
| Lining | Polyester, wipe-clean, printed lining |
| Logo | Artwork file and preferred method |
| Color | Pantone or reference color |
| Quantity | Trial order or repeat order plan |
| Packaging | Polybag, hangtag, box, insert card |
| Use scene | Retail, travel, gift set, beauty kit |
This helps the development team review the project faster and reduce sample back-and-forth.
For simple styles, Jundong may review lower trial quantities such as 200–300 pcs, depending on material and structure. For stronger cost efficiency and smoother production planning, 500 pcs per design is usually a more practical starting direction.
If you need a flat bottom makeup bag sample for a beauty line, travel kit, gift set, or private label launch, send your reference images and project notes to info@jundongfactory.com.
What Should You Check Before Approving a Flat Bottom Makeup Bag Sample?
Before approving a flat bottom makeup bag sample, check the standing shape, bottom depth, zipper smoothness, lining fit, seam strength, logo position, fabric handfeel, cleaning surface, packed size, and whether the bag still works when filled with real products. A sample should be reviewed as a usable product, not only as a nice-looking pouch.
A good sample review prevents expensive changes later.
Many teams look at the front photo and approve too quickly. That is risky. A flat bottom makeup bag has several hidden details that only show up when it is used.
Use this sample review checklist:
| Review Area | What to Check |
|---|---|
| Shape | Does the bag stand evenly? |
| Bottom | Are both boxed corners equal? |
| Zipper | Does it open smoothly without catching lining? |
| Lining | Is it loose, tight, wrinkled, or twisted? |
| Seams | Are stitches clean and strong? |
| Logo | Is the placement balanced after filling? |
| Material | Does it match the intended feel and use? |
| Capacity | Can it hold the target items? |
| Packing | Does it fit the planned carton or gift box? |
| Repeatability | Can this structure be repeated in bulk? |
The real test is filling the bag. Put in the products that users will actually carry. Close the zipper. Open it again. Set the pouch on a table. Pick it up by one side. Put it into a handbag or travel case. Check if the bottom collapses or tips.
For clear PVC or TPU bags, look for scratches, bubbles, edge marks, odor, and zipper edge quality. For PU bags, check crease marks, logo finish, seam tension, and corner bulk. For quilted bags, check filling consistency and whether the bottom stays stable.
Approval should be based on evidence:
- Approved sample
- Confirmed material card
- Confirmed logo method
- Confirmed dimensions
- Confirmed packaging
- Confirmed color
- Confirmed QC criteria
Once these details are locked, production becomes much safer.
FAQs About Making and Customizing a Flat Bottom Makeup Bag
1. What fabric is best for a flat bottom makeup bag?
The best fabric depends on the use. Canvas works well for casual daily pouches. Nylon is strong for travel. Polyester is cost-friendly and easy to print. PU leather gives a polished private-label look. PVC or TPU works for clear travel bags. Quilted fabric gives a soft gift-ready feel. For a stable flat bottom, soft fabric may need interfacing or padding.
2. How do you make a makeup bag stand upright?
A makeup bag stands upright when the bottom has planned depth. The most common method is boxed corners. The lower corners are folded so the side seam and bottom seam align, then stitched across at equal depth. This creates a flat base. Material stiffness, interfacing, lining fit, and corner accuracy also affect standing stability.
3. Which zipper is best for a flat bottom cosmetic bag?
A nylon coil zipper is often the most practical choice for soft cosmetic pouches because it is light, smooth, and flexible. Metal zippers can look premium but add weight. Waterproof zippers may suit travel or toiletry styles. For custom projects, zipper tape color, puller shape, opening length, and end finishing should be reviewed during sampling.
4. Do flat bottom makeup bags need lining?
Most flat bottom makeup bags should have lining. Lining hides inner seams, improves appearance, protects the outer material, and makes the inside cleaner. For cosmetics, wipe-friendly lining is often useful because makeup residue, powder, or skincare leakage may happen during daily use or travel.
5. How do boxed corners affect the final bag size?
Boxed corners change the finished depth and height. A deeper boxed corner creates a wider bottom but reduces visible height. A smaller boxed corner creates a slimmer base and taller body. This is why a flat bottom makeup bag should be checked after the corners are sewn, not only before sewing.
6. Is PU leather better than canvas for makeup bags?
PU leather is better when the project needs a polished, wipe-friendly, private-label look. Canvas is better when the project needs a casual, natural, or printed fabric style. PU may need more careful seam and logo control. Canvas may need lining treatment if stain resistance matters.
7. Are clear PVC makeup bags good for travel?
Clear PVC or TPU makeup bags can work well for travel because users can see the contents easily and the surface is generally easy to wipe. The material should be checked for thickness, flexibility, odor, scratch resistance, zipper quality, and edge finishing. A clear bag that looks clean in photos may still fail if the material feels stiff or marks too easily.
8. How long does a factory sample take?
A simple makeup bag sample often takes about 5–10 days after key details are confirmed, but the exact time depends on material, logo method, structure, zipper, lining, and packaging. More complex projects may need extra revision rounds. Clear instructions and reference images can shorten the process.
9. What details should I send before requesting a custom sample?
Send the bag size, reference image, material preference, lining needs, logo file, color direction, quantity, packaging idea, and use scene. If you already have a physical sample, photos from front, side, inside, bottom, and zipper areas are very helpful. The clearer the brief, the easier it is to make a useful first sample.
10. Can logo, lining, zipper, size, and packaging all be customized?
Yes. A flat bottom makeup bag can usually be customized by size, shape, material, lining, color, logo method, zipper, puller, inner pockets, label, hangtag, insert card, individual packing, and carton marking. The exact options depend on order quantity, material, structure, and budget. For professional review, send your project details to info@jundongfactory.com.