 Skip to content

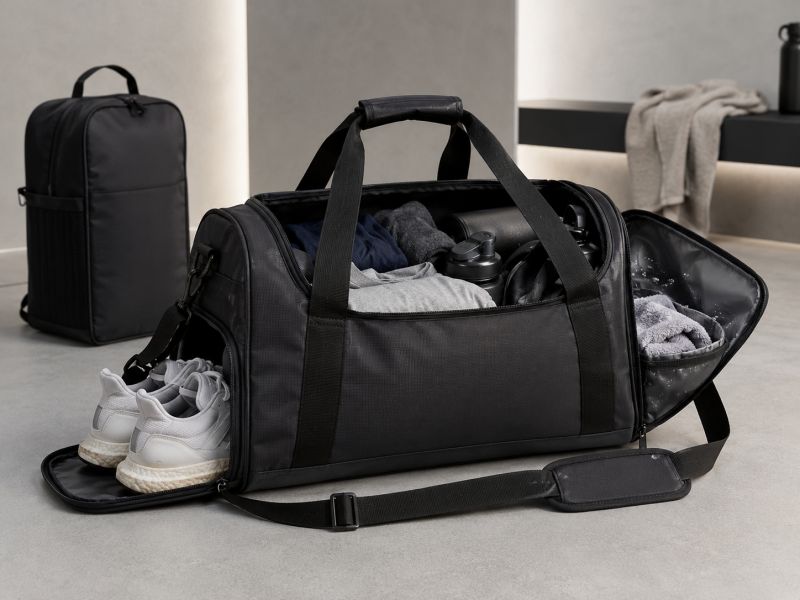
Should Travel Bags Include Shoe Compartments? When Extra Sections Make Sense
A shoe compartment looks like a simple upgrade on a travel bag sketch. In real use, it changes much more than one pocket. The added section affects usable volume, zipper placement, internal geometry, carry balance, lining choice, sewing time, cleaning, and sometimes even the outer silhouette. A travel bag that looks perfectly organized while empty can become awkward once a large pair of sneakers pushes halfway into the clothing area.
The opposite problem is just as real. Remove the shoe section completely and used footwear may sit beside clean shirts, toiletries, electronics, or business clothing. For gym-to-travel products, sports duffels, weekend bags, and certain corporate travel programs, that separation can be one of the most useful features in the entire design.
Travel bags should include a shoe compartment when footwear separation improves real packing without taking too much flexible storage from the main section. The strongest designs match the shoe space to actual footwear, isolate dirt and moisture, remain easy to clean, and keep the bag comfortable when loaded. If footwear is only occasionally carried, a collapsible, removable, or soft-sided section usually makes more sense than a permanently rigid compartment.
Imagine approving a beautiful 40 L weekender from photos alone. The shape looks clean, the shoe zipper sits neatly on the side, and every section appears organized. Then someone inserts a pair of large running shoes. The shoe tunnel expands, two packing cubes no longer fit side by side, the side wall bulges, and the shoulder strap suddenly feels off-center. That single packing test can reveal more about the design than twenty studio photos.
Do Travel Bags Need a Shoe Compartment?
A travel bag needs a shoe compartment only when footwear separation improves the way the bag is actually packed and carried. For gym-to-travel duffels, sports weekenders, short business trips, and mixed-use travel bags, a dedicated shoe area can keep dirty soles away from clothing and make packing more predictable. For compact overnight styles or minimalist carry-ons, the same feature can consume valuable space and make the interior less flexible.
The most important design decision is therefore not whether a shoe compartment can be added. It is whether the section still makes sense after the intended footwear, clothing, electronics, toiletries, and other travel items are packed together.
A good shoe section should achieve several things at the same time:
- separate footwear from clean clothing;
- fit the intended shoe size without forcing the zipper;
- avoid taking excessive space from the main compartment;
- remain easy to clean;
- avoid creating an uncomfortable weight imbalance;
- keep the outer shape controlled when loaded;
- remain useful when shoes are not carried.
When those conditions cannot be achieved, an open main compartment with a separate shoe pouch may produce a better travel bag.
| Travel Use | Shoe Compartment Need | Preferred Direction | Main Risk |
|---|---|---|---|
| Gym + weekend travel | Very high | Side tunnel or ventilated section | Odor and moisture |
| Sports travel | Very high | Larger dedicated section | Oversized footwear |
| Business weekender | Medium | Slim or collapsible section | Lost clothing space |
| Carry-on duffel | Medium–high | Soft tunnel | Capacity reduction |
| Overnight bag | Low–medium | Removable pouch | Too much subdivision |
| Corporate travel gift | Medium–high | Easy-use hidden section | Extra cost without enough use |
| Minimal travel bag | Low | Open compartment | Fixed structure reduces flexibility |
What Does a Shoe Compartment Actually Solve?
The main purpose is separation.
Shoes are different from most other items inside a travel bag because they can carry dirt, moisture, odor, and abrasive soles. They are also relatively rigid compared with clothing. When placed directly inside an open compartment, they can press against folded garments, toiletries, laptop sleeves, or soft lining.
A dedicated shoe section creates a controlled space around that problem.
This is especially useful when the bag is expected to move between several environments during the same trip. Someone may leave home with clean running shoes, use them during the trip, then place them back into the bag beside clean clothing. Without separation, the interior has to rely on disposable bags, independent pouches, or careful packing.
The shoe section can also become a secondary dirty-item area. Depending on the lining and construction, it may be used for slippers, swimwear, gym clothes, laundry, or a compact rain shell when no footwear is inside.
That makes the section more valuable than a single-purpose pocket.
However, the opening must be practical. A compartment may have enough internal volume but still be difficult to use because the zipper is too short or the entry angle is too narrow. Athletic shoes with thick soles are particularly revealing during sample testing because they require more clearance than flat sandals.
A useful evaluation is simple: load the bag completely, then remove and replace the shoes without emptying the main compartment. If that process feels awkward, the access design needs improvement.
Which Type of Travel Bag Benefits Most?
The strongest candidates are bags where carrying a second pair of shoes is part of normal use.
Sports travel bags are an obvious example. Running shoes, court shoes, training shoes, golf shoes, or indoor footwear often travel separately from clothing. A dedicated section keeps the packing routine simple.
Gym-to-travel bags also benefit because the shoe area may hold used footwear after exercise. In this case, airflow and an easy-clean lining become more important than they would be in a fashion-focused weekender.
Weekend bags occupy the middle ground. A two- or three-day trip often includes one spare pair of shoes, but clothing capacity is still important. These products usually benefit from a flexible shoe tunnel rather than an oversized rigid chamber.
Business travel requires more careful judgment. A traveler may need:
| Item | Approximate Space Priority |
|---|---|
| 2–3 shirts or tops | High |
| Trousers or skirt | High |
| Laptop + charger | High |
| Toiletries | Medium |
| Dress shoes or trainers | Medium–high |
| Documents/accessories | Low–medium |
If the shoe area consumes too much volume, clothing may become compressed and difficult to organize. A compact side-access section or collapsible tunnel is often more suitable than a deep lower chamber.
Compact overnight bags deserve even more restraint. If the exterior dimensions are small, every permanent divider reduces packing freedom. In that situation, a removable shoe pouch may be more useful than a built-in compartment.
Are Shoe Compartments Standard in Business Travel Bags?
No. They are common in some business-oriented weekenders, but they are not an essential feature for every business travel design.
The need depends on how the bag is expected to be used.
A bag intended for airport-to-hotel-to-gym use has a strong reason to include shoe separation. A bag intended mainly for one-night business trips may prioritize a laptop sleeve, wrinkle-friendly clothing storage, a trolley sleeve, and fast-access document pockets instead.
Exterior appearance also matters more in this category.
A large bottom shoe chamber can make a bag look taller and heavier. That may be acceptable for a sports-inspired product but less suitable for a clean executive style.
A side tunnel can preserve a simpler silhouette, but if the footwear is large, the tunnel may push outward against the side panel.
For a refined business weekender, a collapsible section often works well because it provides separation when needed without permanently dominating the interior.
The decision should therefore come from the intended packing routine rather than from the assumption that “premium” means “more compartments.”
When Is a Shoe Compartment Unnecessary?
A shoe compartment is unnecessary when spare footwear is not part of the normal travel load or when open storage creates more value.
Minimal travel designs are a good example. Users who rely on packing cubes often prefer one uninterrupted main area because cube placement can change depending on the trip. A fixed shoe section reduces that flexibility.
It may also be unnecessary when the bag is already highly structured.
Consider a compact carry-on design containing:
- padded laptop storage;
- tablet sleeve;
- wet pocket;
- bottle pocket;
- toiletry section;
- document pocket;
- electronics organizer;
- shoe tunnel.
Each feature sounds useful by itself. Together, they may divide the interior into so many sections that the bag struggles to hold larger clothing items or packing cubes.
The risk is feature stacking.
A stronger rule is that every permanent section should solve a repeated need. If footwear is carried only occasionally, a removable shoe pouch or fold-flat separator may offer more flexibility.
There is also a cost consideration. A dedicated shoe compartment normally requires extra lining, zipper length, stitching, and assembly. If the feature is rarely used, that cost may be better invested in stronger handles, smoother zippers, better lining, or improved shoulder comfort.
Who Needs Separate Clean and Dirty Storage?
The strongest use cases are people who regularly mix travel with physical activity.
That includes:
- fitness travel;
- running;
- swimming;
- team sports;
- hiking;
- beach travel;
- gym-to-office routines;
- weekend city travel.
In these situations, separation improves both cleanliness and packing order.
For example, a traveler returning from a run may need to store used footwear before checking out of a hotel. A swimmer may have damp sandals and swimwear. A gym user may carry shoes and used clothing together.
The interior treatment should reflect those conditions.
If the section is mainly for dry footwear, a standard lining with some ventilation may be enough. If damp items are expected, a smoother coated lining becomes more valuable because it is easier to wipe clean.
Ventilation can also matter, but it should be used carefully. Mesh panels and eyelets improve airflow but reduce containment. A more enclosed lining contains dirt and moisture better but can trap odor.
The correct solution depends on what the section is expected to carry most often.
Do Separate Shoe Compartments Reduce Overall Packing Capacity?
Yes, in most designs they reduce the flexible capacity of the main compartment.
The key distinction is between total outer volume and usable packing space.
Imagine an illustrative travel bag with an internal rectangular space close to:
50 cm × 30 cm × 25 cm
The simple geometric volume is:
37.5 liters
Now imagine a loaded shoe tunnel extending approximately:
32 cm × 15 cm × 12 cm
That envelope equals about:
5.8 liters
This does not mean exactly 5.8 liters of usable clothing volume disappears because fabric, footwear, corners, and soft panels do not form perfect boxes. It does show the scale of the trade-off.
In this example, the shoe zone represents roughly 15% of the simple internal geometric volume.
| Illustrative Element | Approximate Volume |
|---|---|
| Main internal envelope | 37.5 L |
| Loaded shoe area | 5.8 L |
| Simple volume share | About 15% |
A rigid shoe compartment reserves that space continuously.
A collapsible tunnel behaves differently. When empty, it can flatten against the side or base, allowing much of the space to return to the main compartment.
That is why flexible construction has become attractive for multi-purpose travel bags.
The same external dimensions can therefore produce very different packing experiences depending on how much interior volume is permanently divided.
For product development, the most useful test is not simply measuring liters. Pack the intended clothing, footwear, laptop, and toiletries into the actual sample and see what remains.
Are Bags With Shoe Compartments Popular for Corporate Gifts?
They can work very well when the gift is connected to travel, fitness, hospitality, conferences, employee programs, or incentive travel.
The reason is practical differentiation.
A basic duffel may look like a promotional item. A well-designed weekender with shoe separation, a trolley sleeve, comfortable handles, and discreet branding can feel like something the recipient would continue using long after the event.
The strongest corporate travel concepts normally keep branding controlled. A large logo may reduce perceived value, while a smaller embroidered mark, woven label, metal plate, or subtle print can make the bag feel more refined.
Shoe storage also gives the gift an immediately understandable feature. It can be demonstrated in a presentation or product launch without requiring complicated explanation.
However, it should not be added only to make the specification look longer.
The value depends on the intended recipient.
For a hotel group, fitness program, sports event, or travel incentive, the feature has obvious relevance. For a financial conference where most recipients use briefcases or laptop bags, the same section may not justify its space or cost.
The decision is stronger when the travel scenario is defined before the bag is developed.
How Should the Final Decision Be Made?
A simple decision test can prevent unnecessary complexity.
Score the proposed shoe section against five factors:
| Factor | Low Need | High Need |
|---|---|---|
| Footwear carried regularly | Rarely | Almost every trip |
| Clean/dirty separation | Minor concern | Essential |
| Available bag volume | Very limited | Generous |
| Packing flexibility | Critical | Less critical |
| Product positioning | Minimalist | Functional travel |
When three or more factors strongly favor separation, a built-in shoe section is usually worth exploring.
When only one or two do, a removable pouch or collapsible design may be better.
A physical sample should then confirm four things before the layout is finalized:
- the intended footwear fits without forcing the zipper;
- clothing capacity remains acceptable;
- the loaded bag stays balanced when carried;
- the exterior still looks intentional when the shoe section is full.
That final step matters because shoe compartments are one of those travel features that can look excellent in drawings and behave very differently in real use.
The best design is not the one with the most storage zones. It is the one where each section earns the space it occupies.
Shoe Compartment vs Open Main Compartment: Which Is Best?
A dedicated shoe compartment is better when footwear separation is used frequently and the bag has enough volume to absorb the space it consumes. An open main compartment is better when packing flexibility, low weight, and maximum usable volume matter more. For many 30–45 L travel bags, a collapsible shoe tunnel or removable divider offers the strongest compromise because unused space can return to the main packing area.
The real difference is not simply “organized versus unorganized.” These two structures change how the entire bag behaves.
A fixed shoe area creates predictable storage. Shoes stay away from clothing, the location is always clear, and coated lining or ventilation can be added specifically for footwear. The trade-off is that the bag gives part of its internal volume to that function even when no shoes are carried.
An open compartment does the opposite. Almost the entire interior remains available for clothing, packing cubes, jackets, gifts, or irregular objects. Shoes can still be carried in a separate pouch, but the bag itself does not permanently reserve space for them.
A practical comparison looks like this:
| Design | Separation | Packing Flexibility | Space Efficiency When Empty | Structural Weight | Best Fit |
|---|---|---|---|---|---|
| Fixed shoe compartment | High | Low | Medium | Medium–high | Sports and frequent shoe carry |
| Side shoe tunnel | High | Medium | High | Medium | Weekenders and duffels |
| Collapsible shoe pocket | Medium–high | High | High | Low–medium | Multi-use travel |
| Removable divider | High | Very high | Very high | Medium | Premium flexible layouts |
| Separate shoe pouch | Medium | Very high | Highest | Lowest in main bag | Minimal travel |
| Fully open compartment | Low | Highest | Highest | Lowest | Packing-cube and one-bag travel |
The best structure is the one that still performs well after shoes, clothing, electronics, and toiletries are loaded together.
Is a Fixed Shoe Compartment Worth the Space?
A fixed shoe compartment is worth the space when footwear is part of almost every trip.
This is common in sports duffels, gym-to-travel bags, golf bags, and larger weekenders. The section gives shoes a permanent home and makes clean/dirty separation easy to understand.
The drawback is permanent volume allocation.
Consider an illustrative 40 L travel bag. If the lower shoe chamber uses an internal envelope of about 33 × 16 × 12 cm, that is approximately 6.3 L of geometric volume. Real usable volume will differ because fabrics and shoes are irregular, but the example shows why the trade-off matters.
In a 40 L bag, 6 L represents roughly 15% of the total geometric volume.
That may be acceptable for a sports weekender where shoes are central to the use. It may feel excessive in a short-trip business bag where shirts, trousers, electronics, and toiletries already compete for space.
A fixed section also changes the exterior shape. A deep bottom chamber can make the bag taller and more structured. When the upper area is lightly packed, the lower section may look visually heavy.
Before approving a fixed structure, test whether the separation is valuable enough to justify the permanent loss of flexible storage.
Do Collapsible Shoe Pockets Save Internal Storage Space?
A collapsible shoe pocket does not create extra capacity, but it can return much of the reserved space to the main compartment when footwear is not carried.
That distinction is important.
A soft tunnel sewn into the side or base may lie nearly flat when empty. Clothing can then occupy most of the interior. When shoes are inserted, the tunnel expands inward and temporarily takes space from the main area.
For travel bags used in several different ways, this is often more practical than a rigid chamber.
A useful comparison:
| Condition | Fixed Compartment | Collapsible Tunnel |
|---|---|---|
| No shoes inside | Space still reserved | Space largely available |
| Shoes loaded | Predictable shape | Expands into main section |
| Clothing flexibility | Lower | Higher |
| Exterior consistency | Higher | Depends on loading |
| Construction complexity | Medium | Medium |
| Multi-use value | Medium | High |
The main weakness of a soft tunnel is shape control.
If the fabric is too loose, the pocket can collapse while shoes are inserted. If it is too narrow, footwear may push hard against clothing. If it extends too deeply, it can block packing cubes or distort the side wall.
A good collapsible section needs enough softness to disappear when unused but enough definition to guide footwear into place.
Which Is Better: Bottom vs Side Shoe Access?
Bottom access gives stronger separation. Side access usually gives easier retrieval.
A bottom shoe chamber places footwear below clothing, which creates a very clear clean/dirty division. It can also help the bag stand more steadily when shoes provide weight at the base.
The downside is height. Large footwear can require a deep lower section, and every extra centimeter added to the shoe chamber reduces the vertical space available above it.
Side access behaves differently. Shoes enter horizontally through a side zipper and extend inward.
Advantages include:
- shoes can be removed without opening the main compartment;
- the top section remains visually clean;
- the lower body does not need to be permanently divided;
- a collapsible tunnel can recover space when empty.
The weakness is lateral intrusion.
A pair of large running shoes can push deeply into the clothing area and may create visible bulging on one side.
Bottom access usually suits structured weekenders and sports travel. Side access works well for duffels and flexible travel bags where quick footwear retrieval is useful.
If the product must maintain a clean executive appearance, both structures should be evaluated with shoes inside—not only when empty.
How Large Should a Shoe Compartment Be?
The section should be built around a defined footwear type and size.
“Fits one pair of shoes” is too vague because sandals, dress shoes, running shoes, and hiking footwear occupy completely different volumes.
Important dimensions include:
- shoe length;
- sole width;
- upper height;
- heel structure;
- sole thickness;
- whether the pair can nest together.
A flat pair of sandals may occupy only a few centimeters of depth. Bulky athletic footwear may need substantially more.
A practical specification is more useful:
“Fit one pair of the intended athletic shoes without excessive compression, zipper strain, or visible side-wall distortion.”
That gives the development team a functional target.
The compartment should not be oversized simply to claim compatibility with larger shoes. Oversizing increases fabric use and reduces clothing space.
The best shoe section is usually the smallest one that accepts the intended footwear comfortably.
During sample testing, footwear should be inserted and removed several times while the main compartment is fully packed. If the zipper requires force or the shoes catch against the lining, the opening or internal depth needs adjustment.
How Does Shoe Size Affect the Bag Layout?
Larger shoes influence much more than the shoe compartment itself.
A longer pair may require the tunnel to extend farther into the main compartment. Wider footwear may require a larger side opening. Taller shoes may increase the required depth of a bottom chamber.
Those changes can affect neighboring features.
For example:
| Larger Shoe Requirement | Possible Effect Elsewhere |
|---|---|
| Longer tunnel | Less room for packing cubes |
| Greater depth | Reduced clothing volume |
| Wider zipper opening | Larger side-panel cut |
| Higher chamber | Taller exterior profile |
| More rigid footwear | Greater side-wall pressure |
| Heavier footwear | Stronger effect on balance |
This becomes particularly important in unisex collections.
If a sample is tested only with small footwear, the final design may appear successful even though larger sizes are difficult to insert.
For a broader audience, it is sensible to test at least three conditions:
- no footwear;
- the intended standard size;
- the largest size the design is expected to handle.
Photographing the bag from the front, side, and base in all three conditions makes structural changes much easier to see.
How Do Shoe Sections Affect Bag Weight Distribution?
Footwear is often denser than clothing, so its position affects how a travel bag feels on the shoulder or in the hand.
A fixed bottom chamber concentrates weight low. This can improve standing stability, but the bag may swing more when carried on a long shoulder strap.
A side tunnel can create left-right imbalance. If heavy sneakers sit on one side while soft clothing fills the other, the bag may rotate slightly or hang unevenly.
The effect becomes more noticeable in convertible backpack styles because the bag changes orientation during use.
An illustrative packed load could look like this:
| Contents | Approx. Load Example |
|---|---|
| Clothing | 2.0–3.0 kg |
| Shoes | 0.8–1.4 kg |
| Laptop + charger | 1.5–2.5 kg |
| Toiletries | 0.5–1.0 kg |
| Miscellaneous items | 0.5–1.0 kg |
A pair of shoes can therefore represent a meaningful share of the loaded weight.
That is why shoulder-strap anchors, handles, D-rings, webbing, base seams, and side connections should be evaluated together with the shoe section.
A useful carry test should include:
- hand carry;
- shoulder carry;
- walking for several minutes;
- lifting from the floor;
- placing the bag on a luggage handle;
- setting it down fully loaded.
If the bag consistently tilts toward the footwear side, the layout or strap geometry may need adjustment.
Do Ventilation and Wipe-Clean Linings Matter?
They matter when used shoes, sports footwear, or damp items are carried regularly.
Ventilation helps reduce trapped humidity. Easy-clean lining makes dirt, sand, mud, and moisture easier to remove.
The two functions sometimes work against each other.
A highly enclosed coated section contains dirt well but can hold moisture and odor. Mesh openings or metal eyelets improve airflow but reduce containment.
The material direction should therefore follow the intended use:
| Use | Main Need | Suitable Direction |
|---|---|---|
| Business shoes | Clean appearance | Smooth easy-clean lining |
| Gym shoes | Airflow | Vents or breathable panel |
| Running shoes | Odor and moisture control | Ventilation + wipe-clean lining |
| Beach sandals | Sand and moisture cleanup | Coated smooth lining |
| Hiking footwear | Dirt isolation | Strong lining + generous opening |
The zipper also matters. A coated inner fabric provides limited benefit if moisture can easily escape through a large unprotected opening.
For travel styles that may carry wet items, it is more accurate to design for moisture resistance and cleanability rather than assuming the section is fully waterproof.
Which Structure Makes More Sense for Different Travel Styles?
The use case should drive the decision.
For a sports duffel, a fixed or structured shoe section often makes sense because footwear is expected on almost every trip.
For a weekend bag, a collapsible side tunnel usually offers better flexibility.
For a business weekender, a low-profile shoe area can work if it does not reduce clothing space or interfere with laptop storage.
For minimalist travel, an open main compartment with a removable shoe pouch often performs better.
A simple decision table helps:
| Travel Style | Recommended Direction |
|---|---|
| Sports duffel | Fixed or ventilated shoe compartment |
| Gym-to-travel | Side tunnel with easy-clean lining |
| Weekend travel | Collapsible shoe pocket |
| Business travel | Slim collapsible section |
| Carry-on backpack | Soft tunnel or removable divider |
| Minimal overnight | Separate shoe pouch |
| Multi-purpose travel | Removable or fold-flat structure |
A travel bag should not include a shoe compartment simply because the feature looks useful on a specification sheet.
It should earn its place through real packing performance.
The best structure is the one that keeps footwear separated without making clothing harder to pack, without creating an awkward silhouette, and without making the fully loaded bag uncomfortable to carry.
Which Extra Sections Make Sense in a Travel Bag?
Extra sections make sense when they protect something, separate something, or make frequently used items easier to reach. The strongest travel-bag layouts usually combine one generous main compartment with a limited number of purpose-built sections rather than filling the interior with pockets. Wet storage, laptop protection, quick-access pockets, toiletry areas, and removable dividers can all add value, but every addition consumes material, sewing time, weight, and usable space.
A practical way to evaluate any extra section is to ask three things: does the item need protection, does it need separation, and does it need fast access?
If the answer is no to all three, the section may not deserve permanent space.
For a 35–45 L weekender, it is usually better to preserve the main packing volume and use secondary sections selectively. Clothing, packing cubes, and jackets need flexible space. Electronics need padding. Damp items need isolation. Passports and phones need quick access. The internal layout should reflect those differences.
| Section | Main Function | Space Cost | Weight Impact | Best Fit |
|---|---|---|---|---|
| Wet/dry section | Moisture separation | Medium | Low–medium | Gym, beach, sports |
| Laptop sleeve | Device protection | Low–medium | Medium | Business and mixed travel |
| Quick-access pocket | Fast retrieval | Low | Low | Airport and daily travel |
| Toiletry section | Liquid separation | Medium | Low–medium | Weekend and business trips |
| Removable divider | Flexible organization | Low–medium | Low | Multi-use travel |
| Bottle pocket | External access | Low | Low | Daily and active travel |
| Hidden pocket | Valuables storage | Very low | Very low | Business and international travel |
The best layout is rarely the one with the highest number of sections. It is the one that still feels simple when the bag is fully packed.
When Does a Wet/Dry Section Make Sense?
A wet/dry section is valuable when the bag regularly carries damp swimwear, gym clothing, towels, rain gear, or used sportswear. Its purpose is to keep moisture and odor away from clean clothes and electronics.
The most useful versions are large enough for realistic contents but not so large that they dominate the interior. For a short-trip duffel, a wet section that consumes roughly 10–15% of the usable internal volume is often enough for swimwear, a small towel, or one set of training clothes. Larger sections may be justified for beach or sports programs, but they begin to compete directly with clothing capacity.
The lining matters. Smooth coated polyester, TPU-based materials, PEVA-type lining, or other easy-clean materials can improve usability. However, a water-resistant material does not automatically make the whole section leakproof. Stitching holes, zipper openings, and seams still matter.
A good wet section should also be easy to turn inside out or wipe clean. If the interior cannot be reached properly, trapped moisture and odor become more difficult to manage.
For gym, beach, swimming, and active-travel products, this section can be highly useful. For a compact business overnight bag, it may be unnecessary unless the travel concept includes fitness or wellness use.
Do Travel Bags Need a Laptop Compartment?
A laptop compartment makes sense when the travel bag is expected to replace a separate work bag. Business weekenders, carry-on backpacks, and gym-to-office styles benefit most.
The sleeve should be sized around a defined device, not just labeled “laptop compartment.” A 13-inch laptop, 14-inch laptop, and 15.6-inch laptop need different internal dimensions, especially once protective foam and zipper clearance are considered.
Padding also needs balance. Too little foam provides weak protection; too much foam adds weight and reduces clothing space.
A practical laptop section normally includes:
- a padded back or side wall;
- a soft lining around the device;
- enough clearance for easy insertion;
- some protection from shoe or wet sections;
- stable positioning so the device does not move freely.
Placement deserves particular attention. A laptop sleeve directly beside a large shoe tunnel can receive pressure from footwear. A sleeve placed against the back or one structured wall is usually easier to protect.
For business-oriented travel, laptop storage often creates more value than several small organizer pockets combined.
Which Quick-Access Pockets Are Worth Adding?
Quick-access pockets should hold items that are reached repeatedly while the main compartment stays closed.
The strongest candidates are:
- passport;
- boarding pass;
- phone;
- wallet;
- keys;
- earbuds;
- charging cable;
- power bank;
- hotel card.
One well-positioned pocket can be more useful than three shallow decorative pockets.
External front pockets are convenient, but they are not ideal for every item. Passports and wallets may be better placed in a rear pocket, hidden zipper section, or area close to the body.
Depth matters too. A pocket that is too shallow can allow a phone or passport to press against the zipper. A very deep pocket can turn into a loose cavity where small items become difficult to find.
A useful front pocket often works best when it is divided lightly rather than heavily. For example, one main cavity plus one small internal slip section can handle a phone, passport, and cable without creating excessive sewing or clutter.
Quick-access storage should reduce travel friction. If users still need to open the main bag to reach important items, the layout has missed its purpose.
Should Toiletries Have a Separate Section?
A separate toiletry area can work well for two- or three-day travel, especially when the bag is designed around one-bag travel.
The main benefit is separating bottles, grooming products, and cosmetics from clothing and electronics. If a bottle leaks, the damage is easier to contain.
The section should not be oversized. Toiletries are often better handled in a compact removable pouch or a lined internal pocket than in a large permanent chamber.
For a 35–40 L weekender, a toiletry zone occupying about 2–4 L can be enough for common short-trip essentials. A larger fixed area may reduce flexibility unless the product is specifically designed around beauty, hospitality, or wellness travel.
Easy-clean lining is useful here. Smooth polyester lining, coated materials, PVC, or TPU-based sections can be considered depending on the intended look and construction.
The toiletry section should also be positioned away from electronics whenever possible. Even when the lining resists moisture, physical separation between liquids and a laptop remains a better design decision.
A removable toiletry pouch can add even more flexibility because it can be carried to the bathroom independently and removed when not needed.
Are Removable Dividers Better Than Fixed Dividers?
Removable dividers are better when the same bag is expected to handle different types of trips.
A fixed divider gives consistent organization, but it permanently determines how the interior works. A removable divider allows the user to create two sections when needed and return to one open compartment for larger items.
Several systems can work:
- hook-and-loop divider;
- zip-out divider;
- snap-in panel;
- fold-flat partition;
- removable padded insert.
Each has a different balance of stability and flexibility.
Hook-and-loop systems are easy to adjust but can collect lint and may sound less refined in premium travel products. Zip-out dividers look cleaner but add zipper length and sewing steps. Fold-flat dividers are light and simple but may not hold shape under pressure.
The divider should be tested under load. If clothing, shoes, or toiletries push it over immediately, it is not providing meaningful organization.
For premium weekender and carry-on styles, a removable divider often provides one of the best compromises between structure and open packing space.
How Many Compartments Are Too Many?
A travel bag has too many compartments when users lose more flexible packing space than they gain in organization.
This usually happens when several permanent sections serve similar purposes.
For example, a 40 L bag may include:
- shoe tunnel;
- wet section;
- laptop sleeve;
- tablet sleeve;
- document pocket;
- toiletry section;
- bottle pocket;
- front organizer;
- hidden pocket;
- two mesh pockets;
- removable divider.
That sounds impressive in a specification list, but the actual main area may become surprisingly small.
A useful internal planning method is to divide sections into three groups:
| Priority | Meaning | Examples |
|---|---|---|
| Essential | Defines the travel concept | Laptop sleeve, shoe section |
| Useful | Improves daily travel | Quick-access pocket, trolley sleeve |
| Optional | Depends on specific use | Toiletry zone, hidden pocket, bottle holder |
If too many “optional” features become permanent, the bag becomes heavier, more expensive, and harder to pack.
Each additional pocket also adds cutting pieces, sewing lines, zipper or elastic components, and inspection steps.
A practical travel bag often works best with:
- one main compartment;
- one or two major functional sections;
- two or three smaller access pockets;
- one flexible or removable organizer.
That is usually enough to create order without turning the bag into a maze.
Which Sections Add Real Value for Business Travel?
Business travel usually needs a different structure from sports or leisure travel.
The highest-value sections are often:
- laptop protection;
- quick-access document storage;
- clean clothing space;
- trolley sleeve;
- compact shoe separation;
- charger or cable pocket.
The main compartment should still have enough uninterrupted room for shirts, trousers, a jacket, and packing cubes.
A laptop sleeve should stay close to a structured wall. Passport storage should be easy to access but not overly exposed. The trolley sleeve should sit at a comfortable height so the bag stays stable on a suitcase handle.
Shoe storage can be useful, but it should remain visually discreet. A large external shoe chamber may make an executive weekender look too sporty. A collapsible side tunnel or low-profile bottom section usually blends better with a clean silhouette.
For a short business trip, a practical capacity allocation might look like this:
| Use Area | Illustrative Share of Usable Space |
|---|---|
| Clothing | 50–60% |
| Footwear | 12–18% |
| Laptop/electronics | 8–12% |
| Toiletries | 5–10% |
| Documents/accessories | 5–8% |
These percentages are not fixed specifications. They illustrate why the main clothing area should remain dominant even when several functional sections are added.
How Should Extra Sections Be Prioritized?
Start with the intended trip.
A gym weekender and a business weekender may have similar outside dimensions but should not share the same internal layout.
For gym and sports travel, the priority may be:
- footwear;
- wet/dry separation;
- bottle access;
- large open clothing area.
For business travel:
- laptop;
- documents;
- clothing;
- discreet shoe storage;
- trolley sleeve.
For leisure weekend travel:
- clothing;
- flexible shoe storage;
- quick-access pocket;
- toiletries;
- removable organization.
For hospitality or corporate travel programs:
- easy-to-understand features;
- broad usefulness;
- clean branding area;
- simple packing;
- reasonable weight.
This approach prevents unnecessary features from being added simply because they appear on competing products.
How Do Extra Sections Affect Weight and Cost?
Every permanent section adds something.
A pocket may need fabric, lining, zipper tape, elastic, mesh, binding, foam, or reinforcement. Even when the material increase is small, sewing time grows because each piece has to be cut, aligned, sewn, finished, and inspected.
A laptop sleeve adds foam and lining. A wet section may require coated material. A shoe compartment adds zipper length and internal panels. A removable divider may need hook-and-loop tape, snaps, or another zipper.
The impact becomes more noticeable when several features are combined.
A practical design review should separate features into three levels:
- necessary for function;
- useful but optional;
- decorative or rarely used.
Removing one unnecessary section can simplify production, reduce weight, improve packing freedom, and sometimes make the product feel more premium rather than less complete.
The goal should not be to offer the longest feature list. It should be to make every feature justify its space, weight, and cost.
How Should the Final Layout Be Tested?
The layout should be tested with the actual items expected to travel inside it.
For a weekender, that may include:
- one pair of target-size shoes;
- two or three days of clothing;
- laptop;
- charger;
- toiletries;
- passport;
- phone;
- water bottle;
- small accessories.
Then check the bag in real use.
Can the shoes be inserted after the clothes are packed?
Can the laptop be removed without opening the main section?
Can the passport be reached quickly?
Does the bag still close easily?
Does the shoulder strap remain balanced?
Can the wet section be cleaned properly?
Does the exterior keep its intended shape?
These tests reveal whether the internal layout actually works.
A strong travel bag feels simple because the organization has already been thought through. The best extra sections disappear into the experience: they are there when needed, stay out of the way when not needed, and never make the main compartment harder to use.
How Does a Custom Travel Bag Manufacturer Engineer the Layout?
A strong travel-bag layout starts with the load, not the pocket count. Before patterns are cut, the design should define what the bag must carry, how often each item is accessed, which contents need protection, which need separation, and how the weight will behave when the bag is carried. From there, the interior is divided into usable zones for clothing, footwear, electronics, toiletries, wet items, and quick-access essentials.
For travel bags, Jundong’s documented customization areas include capacity, compartments, zipper systems, shoulder straps, handles, luggage sleeves, shoe compartments, wet pockets, lining, set combinations, packaging, and transportation considerations.
A practical layout process usually moves through six decisions:
| Design Step | What Must Be Confirmed |
|---|---|
| 1. Load definition | Clothing, footwear, laptop, toiletries, accessories |
| 2. Capacity allocation | How much space each category receives |
| 3. Access planning | Top opening, side entry, clamshell, U-shape |
| 4. Material zoning | Shell, lining, foam, wet area, shoe area |
| 5. Carry structure | Handles, strap anchors, base, reinforcement |
| 6. Physical testing | Fit, balance, access, shape, packing efficiency |
A good layout should still make sense when the bag is fully packed. That is the part most often missed when a design is judged only from drawings.
What Should Be Defined Before the Design Process?
The first step is to define the intended travel scenario in practical terms.
A weekender for business trips should not be developed the same way as a sports duffel. A carry-on bag with a laptop sleeve needs different volume allocation from a gym-to-travel bag with a large shoe section and wet storage.
Before development begins, it helps to confirm:
- external dimensions;
- target capacity;
- trip duration;
- footwear type and size;
- laptop or tablet size;
- clothing volume;
- toiletry volume;
- wet-item requirement;
- carrying method;
- opening style;
- material direction;
- logo method;
- packing method;
- quantity;
- delivery destination and timing.
If only a reference photo, sketch, existing sample, or rough concept is available, that is still enough to begin. Jundong’s project-review guidance allows development to start from a reference image, sample, sketch, design file, logo, approximate size, use scenario, packaging idea, or delivery requirement, with the remaining details confirmed before sampling and costing.
The more clearly the travel load is defined at the beginning, the fewer structural changes are needed later.
How Are Capacity and Compartments Balanced?
Capacity should be treated as usable packing space, not simply an external liter figure.
A bag may be described as 40 L, but padding, curved corners, internal tunnels, divider walls, zipper flanges, lining, foam, and reinforcement all reduce the space that clothing can actually use.
A useful allocation model for a 35–45 L travel bag might look like this:
| Interior Zone | Illustrative Share |
|---|---|
| Main clothing area | 50–60% |
| Footwear | 12–18% |
| Laptop/electronics | 8–12% |
| Toiletries | 5–10% |
| Small accessories | 5–8% |
These percentages are not fixed specifications. They simply show why the main clothing area should remain dominant.
The layout should be checked in two conditions:
- with every special section empty;
- with shoes, electronics, toiletries, and clothing all loaded.
That second test reveals whether the sections compete with each other.
For example, a side shoe tunnel may look compact when empty but extend deeply into the main area once a pair of running shoes is inserted. A laptop sleeve may appear slim but become difficult to access if a loaded shoe section presses against it.
The best layout usually protects one large flexible packing zone instead of dividing the entire bag into many smaller permanent sections.
What Are the Best Waterproof Materials for Shoe Pockets?
For shoe storage, the safer target is usually moisture resistance and easy cleaning rather than assuming the entire compartment is completely waterproof.
The lining material is only one part of the system. Stitching holes, seams, zipper openings, and panel joins still affect moisture control.
Common material directions include:
| Material | Main Strength | Main Trade-Off |
|---|---|---|
| Coated polyester | Light, practical, easy to sew | Moderate moisture control |
| Coated nylon | Light and durable | Higher material cost |
| PVC-coated fabric | Easy to wipe, strong barrier | Heavier and stiffer |
| TPU material | Flexible, cleaner hand feel | Higher cost |
| PEVA-type lining | Light and easy to clean | Lower tear strength |
| Water-resistant polyester lining | Simple construction | Lower containment |
The correct choice depends on what will go inside.
Dry business shoes may only need a smooth lining and modest airflow. Gym shoes may need ventilation. Beach sandals or damp sports footwear may justify a coated interior with stronger moisture separation.
Jundong’s documented material capability includes polyester, nylon, Oxford fabric, canvas, RPET, PVC, TPU, EVA, mesh, water-resistant linings, foam, EPE, PE board, webbing, zippers, buckles, and related structural components.
The shoe area should therefore be planned as a separate material zone rather than simply using the main lining everywhere.
Which Materials Work Best for Main and Secondary Sections?
Different areas of the same travel bag usually benefit from different materials.
The outer shell needs the right balance of appearance, abrasion resistance, weight, structure, and cost. The interior has different priorities: smooth packing, cleaning, visibility, cushioning, and protection.
Common directions include:
- polyester for practical travel bags with broad color options;
- nylon for lightweight and smoother-feeling travel styles;
- Oxford fabric for stronger structure and abrasion resistance;
- canvas for lifestyle-oriented travel bags;
- PU or leather for more refined visual positioning;
- RPET when documented recycled-material requirements are part of the project;
- mesh for visibility or airflow;
- foam for laptop or handle protection;
- PE board or EVA for controlled panel structure.
Jundong’s travel-bag material list includes polyester, nylon, Oxford fabric, canvas, PU, leather, RPET, PVC-coated fabric, mesh, lining fabric, and foam padding.
A stronger material plan assigns each material a job instead of choosing one fabric and forcing it across the whole bag.
How Should Zippers and Openings Be Planned?
Opening design changes how the bag is packed just as much as the internal sections do.
A wide U-shaped or clamshell opening works well for clothing because more of the interior is exposed at once. A traditional top zipper creates a cleaner exterior but makes items at the bottom less accessible.
Shoe storage needs separate consideration.
A short straight zipper may look clean but can make bulky footwear difficult to insert. A longer curved opening improves access, though it introduces more zipper length and more sewing around curves.
Several details should be checked:
- zipper length;
- opening angle;
- slider direction;
- access while the bag is full;
- reinforcement at zipper ends;
- whether the zipper distorts under pressure.
A good zipper should also be tested under load, not only on an empty sample.
Jundong’s functional inspection guidance includes zipper smoothness, secure pullers, correct internal sections, practical openings, correct lining, secure handles, and shoe-compartment function for travel bags.
How Should Shoe Compartments Be Reinforced?
Reinforcement should be concentrated where shoes create pressure and abrasion.
The main stress areas are usually:
- zipper ends;
- side-panel joins;
- bottom seams;
- corners;
- lining contact areas;
- strap and handle connections nearby.
Shoes often push outward against the compartment wall, especially when the space is tightly sized. If the internal panel is too weak, the section may distort or wear quickly. If it is too rigid, the bag becomes heavier and less flexible.
A balanced structure may use stronger lining, binding, reinforced stitching, a thicker bottom layer, or limited foam or board in selected areas.
The carrying structure should also be reviewed at the same time. Jundong’s load-bearing guidance highlights handles, shoulder straps, webbing, D-rings, buckles, zipper surroundings, side joins, bottom seams, reinforcement stitching, corners, and heavy-load areas as important stress locations.
The objective is controlled durability, not simply adding more thickness.
What Should a Custom Sample Test?
A travel-bag sample should be tested as a working product, not just as a visual reference.
For a shoe-compartment style, load the actual footwear category the design is expected to hold. Then add clothing, laptop, toiletries, and accessories.
Check:
- external dimensions;
- internal usable space;
- footwear fit;
- zipper access;
- shoe insertion and removal;
- pressure against clothing;
- laptop clearance;
- balance while carried;
- handle comfort;
- shoulder-strap behavior;
- exterior shape;
- lining;
- logo position;
- packing method.
The bag should also be photographed in at least three states:
- empty;
- loaded without shoes;
- fully loaded with footwear.
This makes side-wall bulging, base distortion, and weight shift easier to identify.
Jundong’s sampling guidance treats the sample as a reference for appearance, material, structure, logo, packaging, function, and production feasibility rather than appearance alone.
How Is the Shoe Compartment Checked During QC?
The shoe area should be checked for dimension, function, construction, and interaction with the rest of the bag.
A practical inspection includes:
- compartment size;
- zipper smoothness;
- opening width;
- correct lining;
- seam alignment;
- reinforcement;
- bottom stability;
- internal tunnel position;
- footwear fit;
- exterior distortion.
The section should also be checked together with neighboring areas. A technically correct shoe pocket can still cause problems if it blocks another compartment, pushes against the laptop sleeve, or deforms the outer wall.
Travel-bag functional checks documented by Jundong include shoulder straps, handles, shoe compartments, zipper systems, compartment usability, openings, lining, and related load-bearing areas.
The approved sample should remain the physical reference during bulk inspection.
How Long Does the Sample Process Take?
Standard sampling at Jundong generally takes about 5–7 days once the main specifications and materials are confirmed. More complex structures, special materials, custom hardware, unusual logo work, or multiple revisions may require additional time.
The process may include:
- structural review;
- paper pattern development;
- material preparation;
- cutting;
- logo application;
- sewing;
- assembly;
- internal checks;
- revision;
- packing for shipment.
The fastest way to reduce unnecessary revision is to confirm the major structure before cutting begins.
Changing the outer size after the shoe chamber has already been developed can affect multiple panels. Changing the laptop size may affect the bag depth. Moving the shoe access from side to bottom may require a completely different body pattern.
A well-engineered travel bag usually feels simple in use because the difficult decisions were settled before production started.
What Should Brands Ask Before Ordering Custom Travel Bags?
Before placing a custom travel bag order, the most important details to confirm are not limited to fabric, logo, and unit price. The bag should first be proven as a complete travel product: the intended contents must fit, functional sections must work under load, materials must suit the expected use, the approved sample must be translated into production specifications, and packaging must protect the finished appearance through shipment.
For a travel bag with shoe storage, laptop protection, wet sections, or several access pockets, small structural decisions can affect both cost and daily use. An extra zipper changes sewing time. A deeper shoe tunnel changes usable capacity. A thicker padded laptop sleeve changes internal dimensions. A gift box can change carton volume and shipping cost.
The most useful pre-order review therefore covers seven areas:
| Area to Confirm | Why It Matters |
|---|---|
| Product dimensions | Controls capacity, material use, and packing |
| Internal layout | Determines how the bag works when loaded |
| Materials and components | Affect feel, weight, durability, and cost |
| Logo and labels | Affect setup, appearance, and production details |
| Quantity and color split | Affect sourcing and unit cost |
| Approved sample | Becomes the physical production reference |
| Packaging and delivery | Affect final presentation, carton volume, and timing |
A clear specification at this stage reduces late revisions, price changes, and disagreements after production begins.
How Do Shoe Compartments Affect Cost?
A shoe compartment adds cost because it introduces additional material, components, cutting pieces, sewing operations, and inspection work. The exact impact depends heavily on how the compartment is built.
A basic soft shoe tunnel may only require lining panels, one zipper, binding, and extra stitching. A structured bottom chamber may also need outer fabric, foam, PE board or EVA reinforcement, coated lining, ventilation parts, and a more complex assembly sequence.
The following elements normally influence the cost difference:
| Cost Element | Simple Shoe Tunnel | Structured Shoe Section |
|---|---|---|
| Extra lining | Yes | Yes |
| Separate zipper | Yes | Yes |
| Additional outer panels | Limited | Often |
| Foam or board | Rare | Possible |
| Ventilation hardware | Optional | Optional |
| Coated easy-clean material | Optional | Common |
| Extra reinforcement | Limited | More likely |
| Sewing complexity | Medium | Higher |
The cheapest construction is not always the most economical product decision.
For example, a very thin internal tunnel may reduce sewing cost but create side-wall bulging when shoes are loaded. Correcting that problem after sampling can require new patterns, additional panels, or another sample round.
Cost should therefore be reviewed together with function. Jundong’s documented pricing factors include material, size, structural complexity, compartment design, lining, padding, zippers, hardware, logo method, packaging, quantity, timing, and testing requirements.
Does a Shoe Compartment Affect MOQ?
A shoe compartment does not automatically change the minimum order quantity. The components used to build it can.
A travel bag using standard polyester, common lining, stock zipper colors, and regular hardware may remain straightforward to source. A design requiring custom-colored TPU lining, special zipper pullers, molded ventilation parts, exclusive hardware, custom printed lining, or gift packaging can introduce separate minimums from material or component sources.
For Jundong, the standard MOQ is 500 pcs per design. The final MOQ may be higher depending on product complexity, material requirements, custom components, packaging, and other project-specific specifications.
Color division matters as well.
An order of 1,000 pieces split into five colors is not always equivalent to one color at 1,000 pieces. Each color may require separate fabric ordering, zipper matching, lining preparation, cutting arrangement, logo setup, labels, and packing control.
Multi-style programs should therefore be reviewed by:
- design;
- color;
- main material;
- lining;
- logo method;
- custom hardware;
- packaging format.
The total order quantity alone does not always show the true production structure.
What Information Should Be Sent for Quotation?
A reference photo is a useful beginning, but it is not enough for an accurate quotation when the design includes functional compartments.
The most helpful information is:
| Information | What It Controls |
|---|---|
| Bag type | Overall construction |
| External size | Material consumption and capacity |
| Target capacity | Internal planning |
| Shoe type and size | Shoe section dimensions |
| Main material | Cost, appearance, weight |
| Lining requirement | Interior feel and cleaning |
| Laptop size | Sleeve dimensions and padding |
| Wet section | Material and seam decisions |
| Logo artwork | Process, size, setup |
| Quantity | Production planning |
| Color split | Material sourcing |
| Packaging | Cost and carton volume |
| Delivery date | Production scheduling |
| Destination | Freight planning |
A complete tech pack is helpful, but it is not required to start.
A project can begin with a reference photo, physical sample, sketch, design file, approximate dimensions, logo, intended use, or packaging idea. Jundong’s documented project-review process supports starting from these types of materials and then confirming the missing technical details before sampling and final costing.
For a shoe-compartment travel bag, adding one more detail can save considerable revision time: specify the actual footwear the section must hold.
“Fits one pair of shoes” is much less useful than “fits one pair of men’s athletic shoes at the intended size without forcing the zipper or distorting the side wall.”
How Should Different Factories Be Compared?
The comparison should use the same specification.
One quotation may assume standard polyester, basic lining, regular zippers, and simple packaging. Another may include coated shoe lining, reinforced handles, heavier foam, premium hardware, and individual retail packing. The prices cannot be compared fairly until the construction is aligned.
A stronger comparison looks at five areas:
| Area | What to Compare |
|---|---|
| Material | Exact type, weight, coating, lining |
| Structure | Same compartments and reinforcement |
| Components | Zippers, hardware, webbing, foam |
| Sample quality | Fit, shape, sewing, function |
| Packing | Individual packing, labels, carton rules |
The physical sample often reveals more than the quotation.
Check whether the shoes actually fit, whether the main compartment remains usable, whether the bag hangs evenly from the shoulder strap, whether the zipper moves smoothly under load, and whether the external shape stays controlled.
It is also useful to see how the factory handles functional inspection. For travel bags, Jundong’s documented checks include shoulder straps, handles, shoe compartments, zipper systems, pockets, openings, lining, and related usability details.
A lower initial price can lose its advantage quickly if structural revisions, unsuitable materials, or weak packing create problems later.
Which Sample Should Be Approved Before Bulk Production?
The approved sample should represent the version that is actually expected from production.
An early prototype may be useful for testing size and structure, but it should not become the final production reference if materials, logo, zippers, lining, or compartments are still changing.
Before approval, confirm:
- overall dimensions;
- main fabric;
- lining;
- color;
- shoe compartment size;
- zipper type and pullers;
- handle length;
- shoulder strap;
- hardware;
- laptop sleeve;
- wet section;
- reinforcement;
- logo size and position;
- internal labels;
- hangtags;
- packing method.
The sample should also be tested under a realistic load.
For a travel bag with shoe storage, load the intended footwear, clothing, laptop, toiletries, and accessories at the same time. A bag that works only when half empty is not ready for approval.
Jundong’s sampling guidance treats the sample as a reference for appearance, material, structure, logo, packaging, function, and production feasibility. Approved samples should then be converted into production details and quality standards rather than remaining only a visual reference.
Standard bag sampling is generally around 5–7 days once the main specifications and materials are confirmed. More complex structures, special materials, custom parts, or multiple revisions may require additional time.
How Do You Choose the Right Factory for Your Design?
Look at how the project is discussed before the first sample is made.
A strong travel-bag factory should be comfortable discussing usable capacity, shoe dimensions, material weight, zipper access, lining, strap placement, reinforcement, weight distribution, packaging, and how the bag behaves after it is filled.
The most useful signs are practical:
- the team asks what the bag must carry;
- the shoe size is discussed before the shoe pocket is finalized;
- laptop dimensions are confirmed rather than guessed;
- material suggestions are linked to intended use;
- reinforcement is placed around actual stress areas;
- the sample is tested under load;
- packaging is discussed before production is complete.
Travel bags depend on more than outer appearance. The relationship between handles, shoulder straps, zipper areas, bottom seams, webbing, D-rings, reinforcement stitching, and heavy-load areas affects durability and carrying performance. Jundong’s documented load-bearing inspection covers these areas rather than relying only on fabric thickness.
A strong development process should make the final bag easier to use, not simply easier to produce.
What Should Be Confirmed Before Mass Production?
Before bulk production begins, the remaining variables should be frozen as clearly as possible.
A practical confirmation list includes:
| Category | Final Details |
|---|---|
| Size | External and key internal dimensions |
| Materials | Shell, lining, foam, coated sections |
| Colors | Main fabric, lining, zipper, webbing |
| Structure | Shoe section, wet pocket, laptop sleeve |
| Components | Zippers, pullers, buckles, D-rings |
| Carrying | Handles, shoulder strap, trolley sleeve |
| Branding | Method, size, location, colors |
| Labels | Main label, care label, barcode, SKU |
| Packaging | Polybag, hangtag, box, carton marks |
| Quantity | Total and color/style split |
| Delivery | Production timing and shipment plan |
Functional areas should be checked one more time against the approved sample before cutting begins.
If the shoe compartment was developed around a specific athletic shoe size, verify it again. If the laptop sleeve was designed for a 15.6-inch device, confirm the final internal dimensions. If a gift box or special folding method is used, confirm how the bag looks immediately after unpacking.
Packaging should not be left until the last moment. Jundong’s documented packaging capability includes polybags, hangtags, barcode labels, SKU labels, FBA labels, color boxes, gift boxes, and carton marks depending on project requirements.
The strongest custom travel programs reach production with very little left open to interpretation. Materials, dimensions, function, branding, packaging, and approval standards should all refer back to the same final sample and specification.
Let's work together
With over 10 years of OEM/ODM bag industry experience, I would be happy to share with you the valuable knowledge related to leather products from the perspective of a leading supplier in China.

Factory catalogue
Table of Contents
Latest blogs


Make A Sample First?
If you have your own artwork, logo design files, or just an idea, please provide details about your project requirements, including preferred fabric, color, and customization options, we’re excited to assist you in bringing your custom bag designs to life through our sample production process.